How to Start DigiFinex Trading in 2025: A Step-By-Step Guide for Beginners
How to Register in DigiFinex
Register an Account on DigiFinex with Phone Number or Email
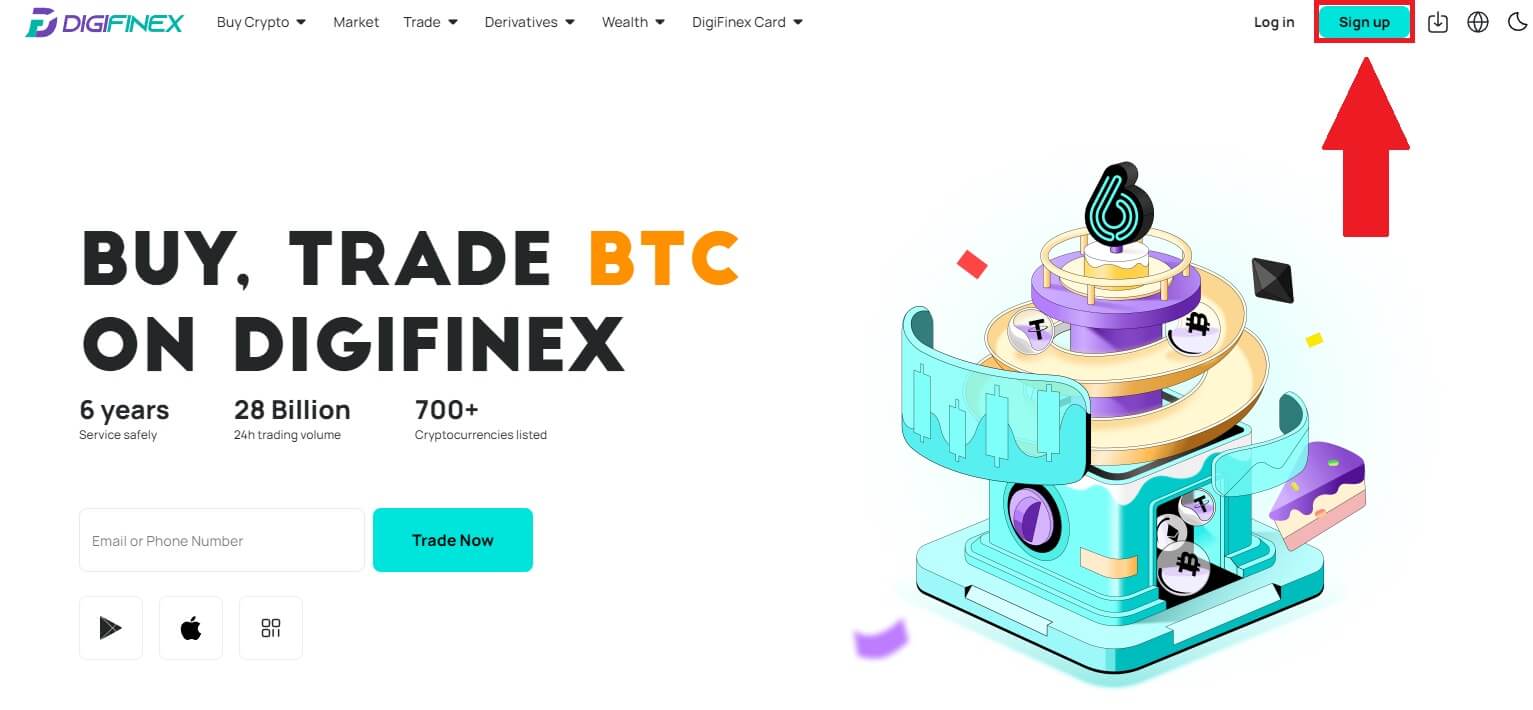
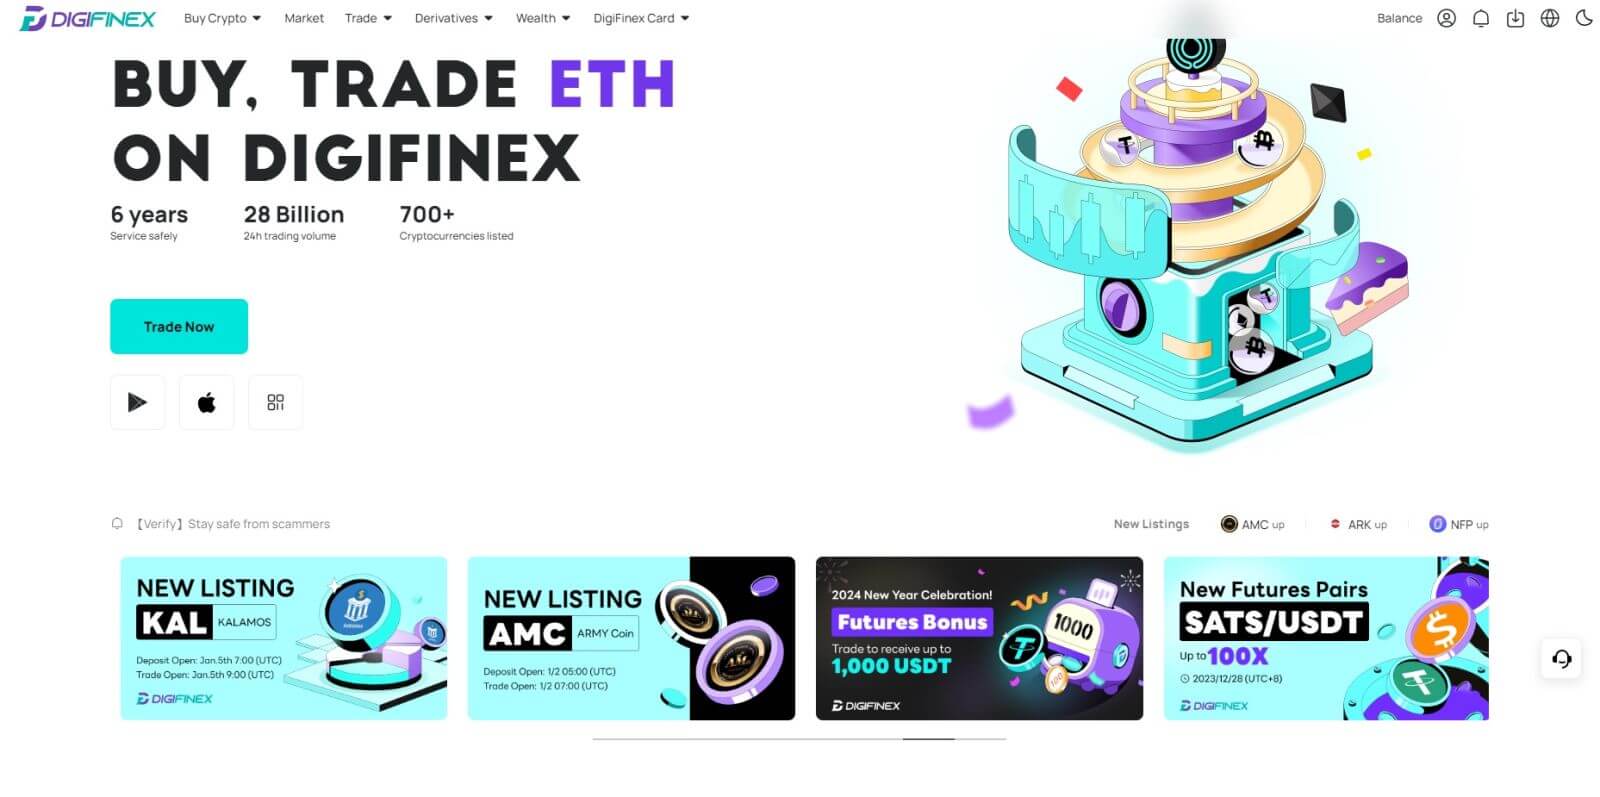
1. Go to the DigiFinex website and click [Sign up].
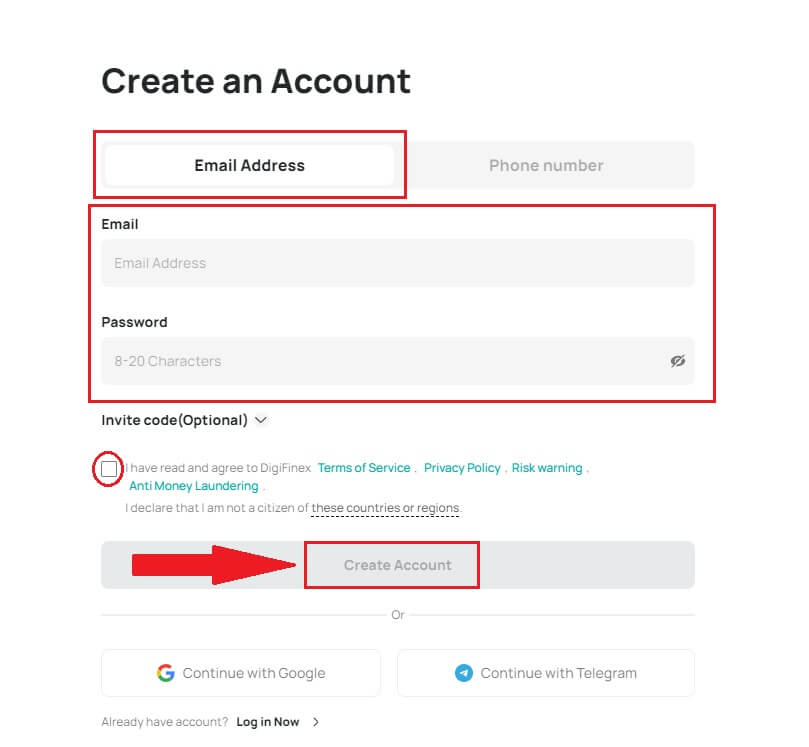
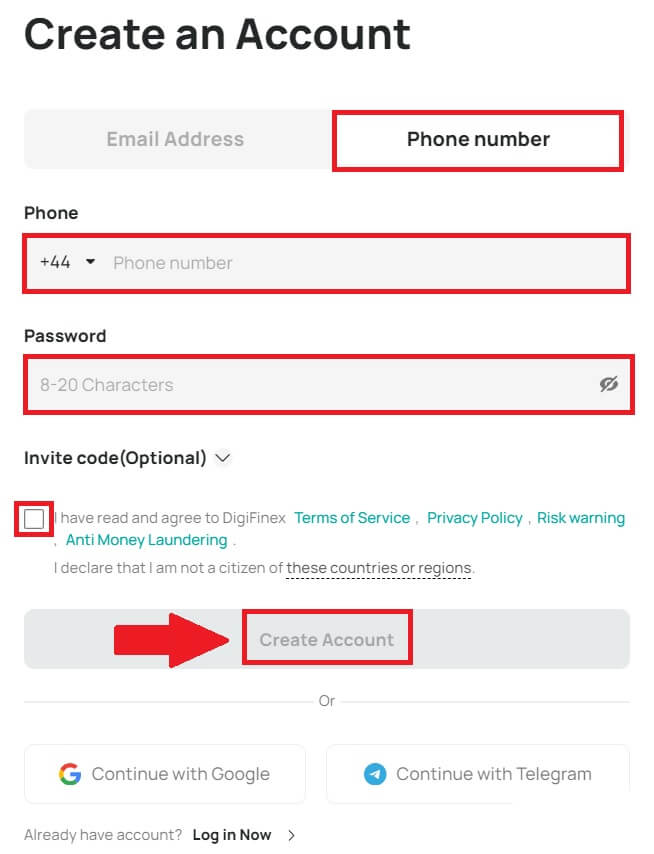
2. Select [Email Address] or [Phone number] and enter your email address/phone number. Then, create a secure password for your account.
Note:
-
Your password must contain at least 8 characters, including one uppercase letter and one number.
Read and agree to the Terms of Service and Privacy Policy, then click [Create Account].
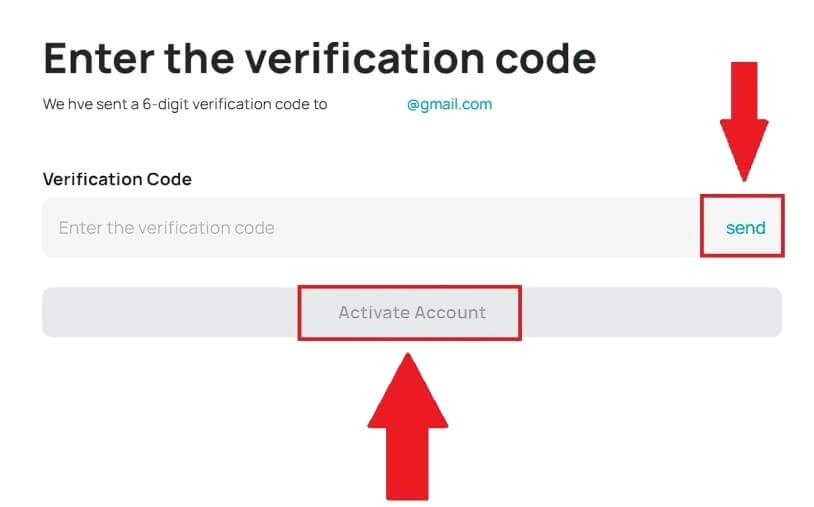
3. Click [send] and you will receive a 6-digit verification code in your email or phone. Enter the code and click [Activate Account].
4. Congratulations, you have successfully registered on DigiFinex.
Register an Account on DigiFinex with Google
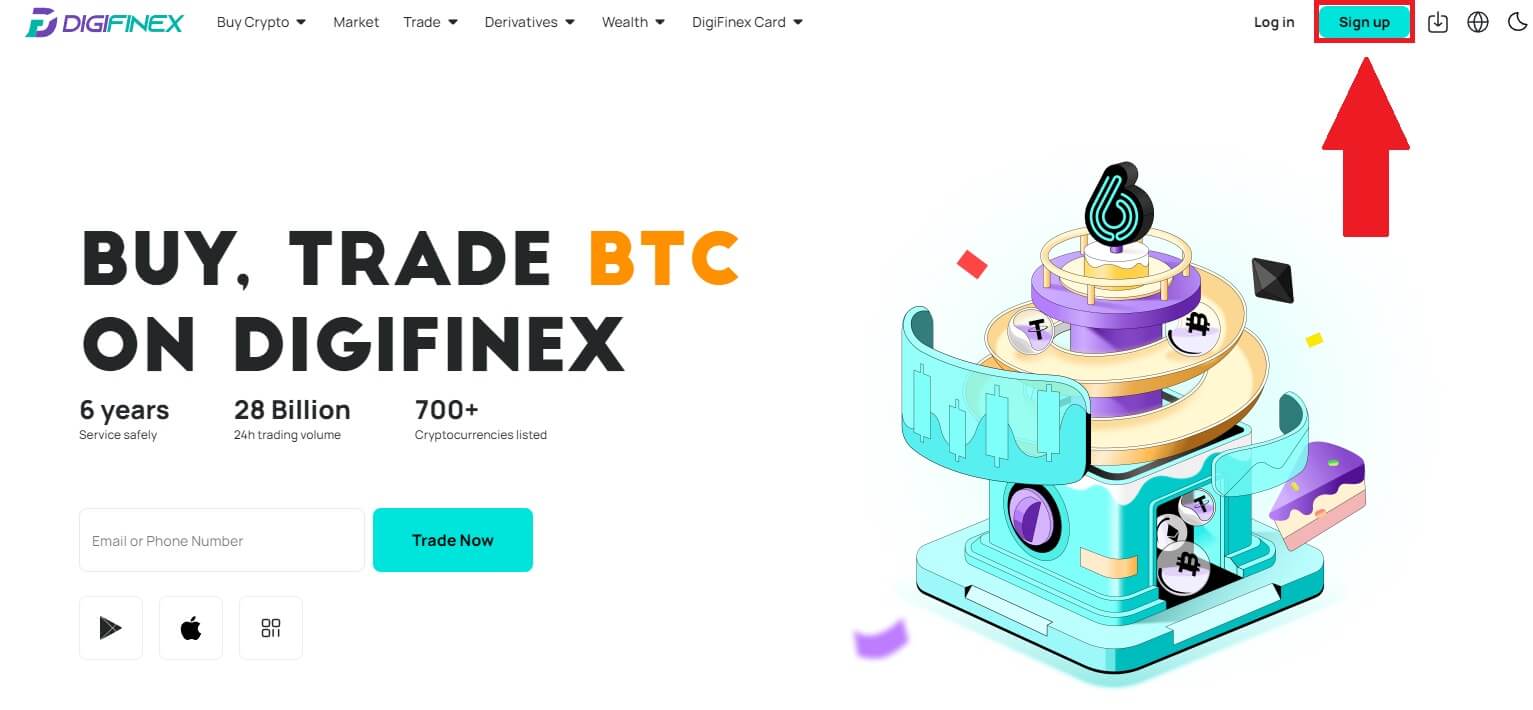
1. Go to the DigiFinex website and click [Sign up].
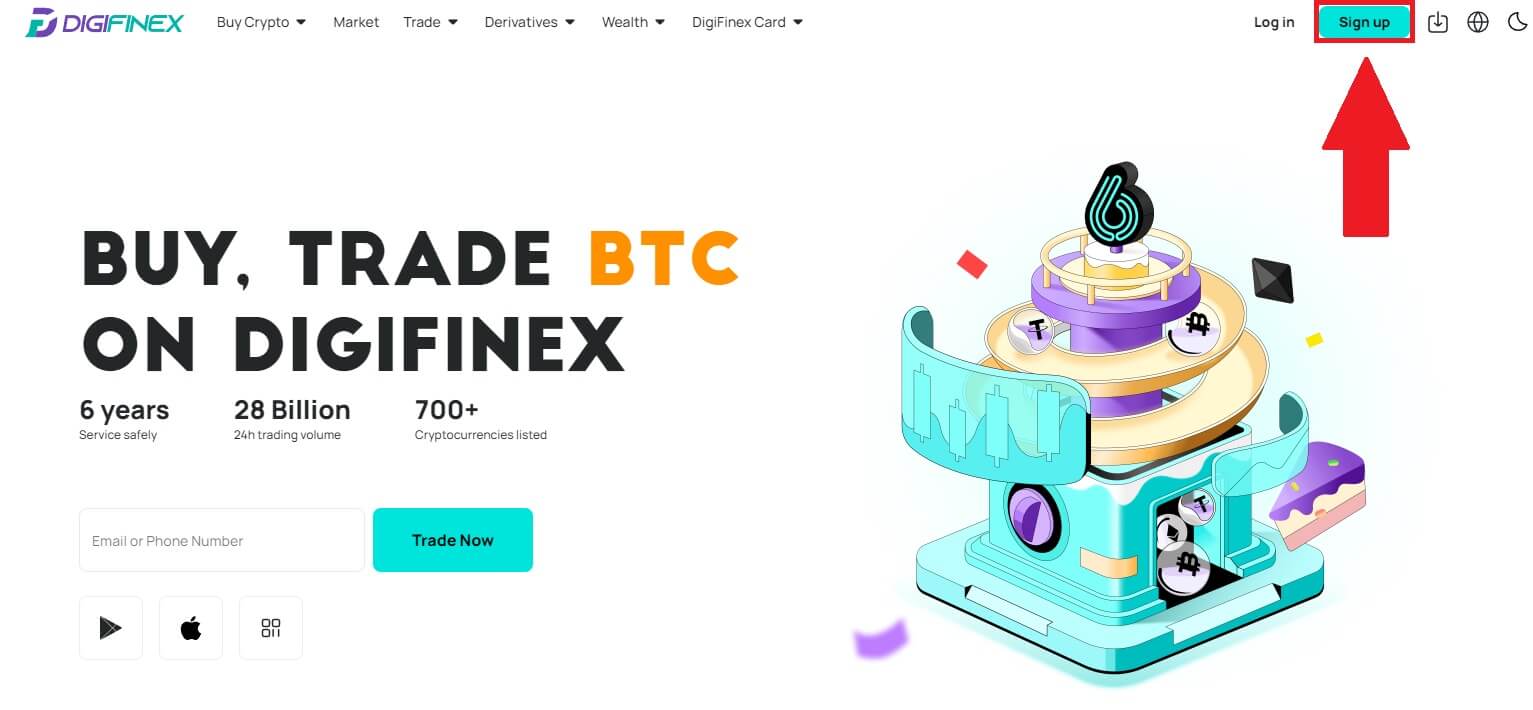
2. Click on [Continue with Google] button.
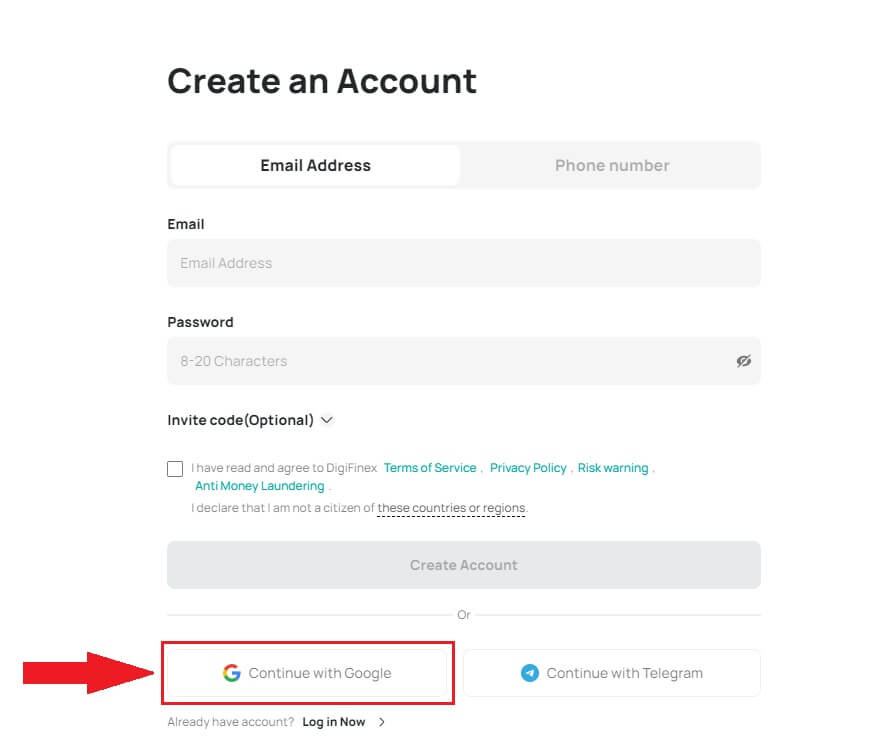
3. A sign-in window will be opened, where you will need to enter your Email address or phone number and click on [Next].
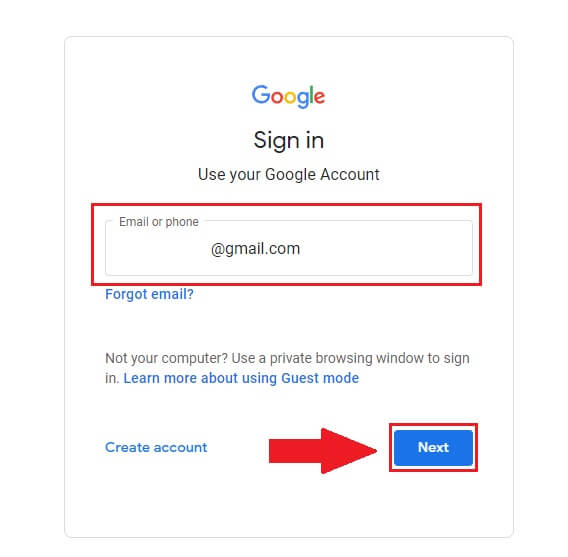
4. Enter the password for your Gmail account and click [Next].
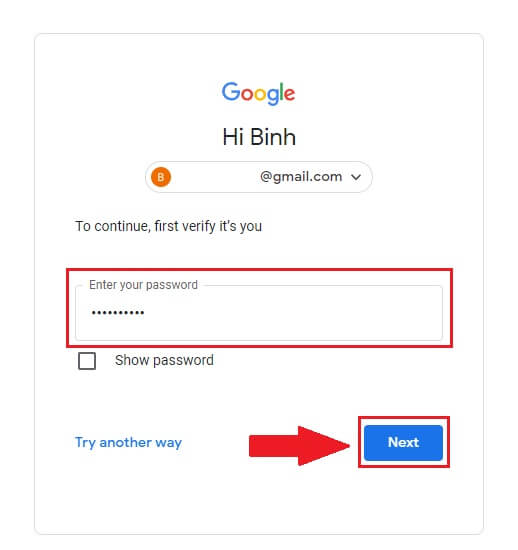
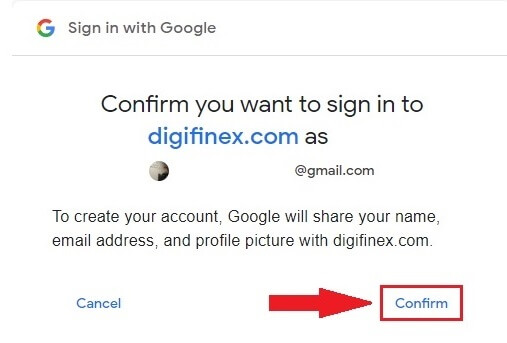
5. Then click on [Confirm] to continue signing up with your Google account.
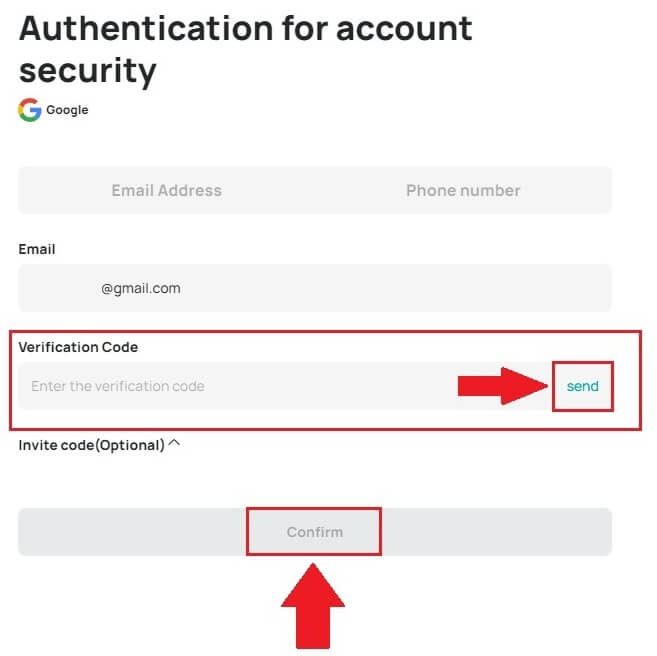
6. Enter the verification code and click on [Confirm] to finish signing up your account.
Note:
- You must click on [send] to receive the verification code that will be sent to your Google account.
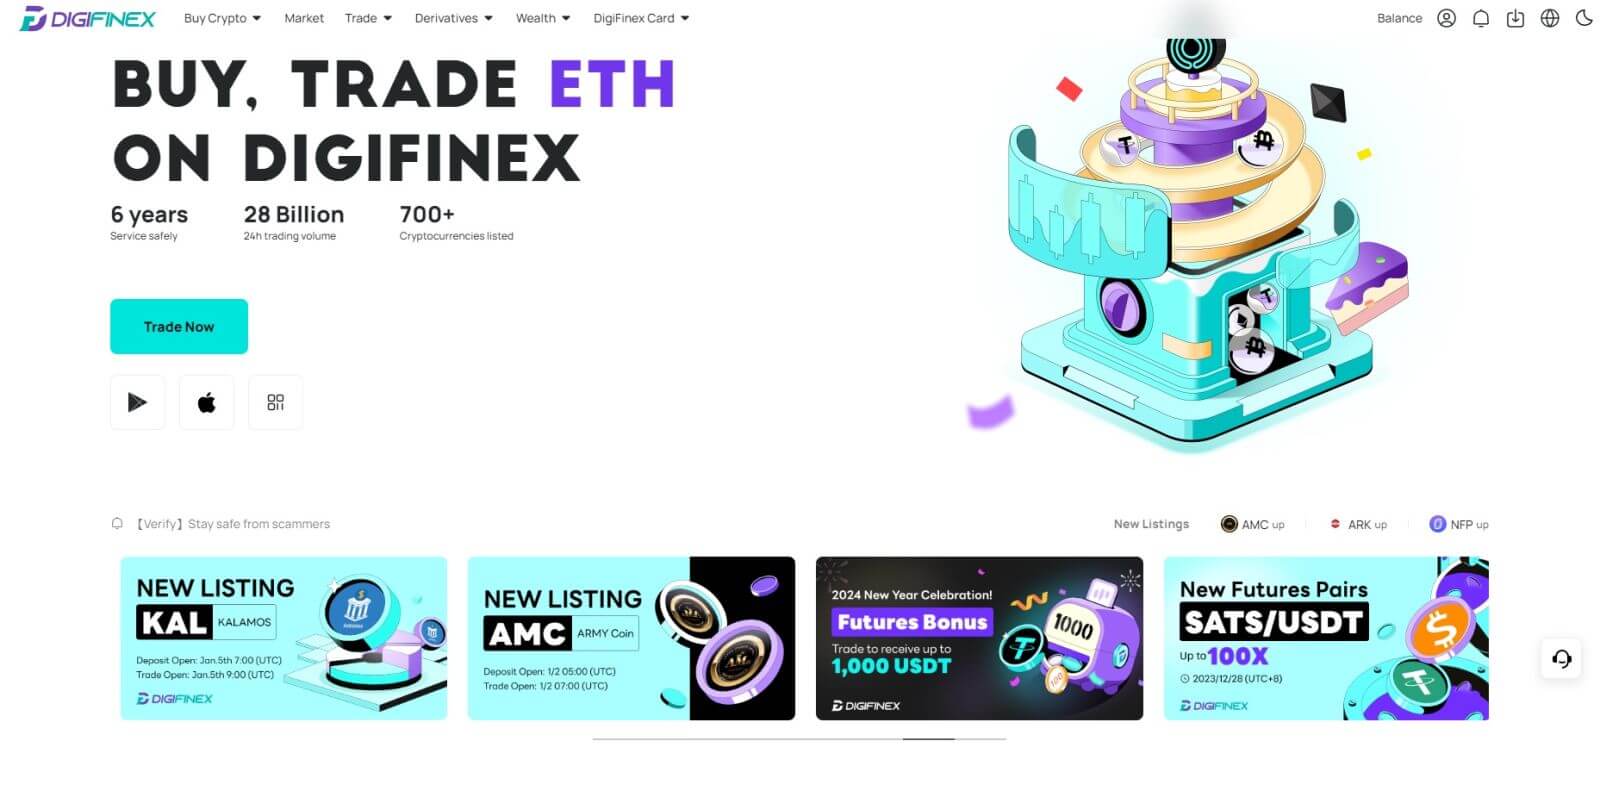
7. Congratulations, you have successfully registered on DigiFinex.
Register an Account on DigiFinex with Telegram
1. Go to the DigiFinex website and click [Sign up].
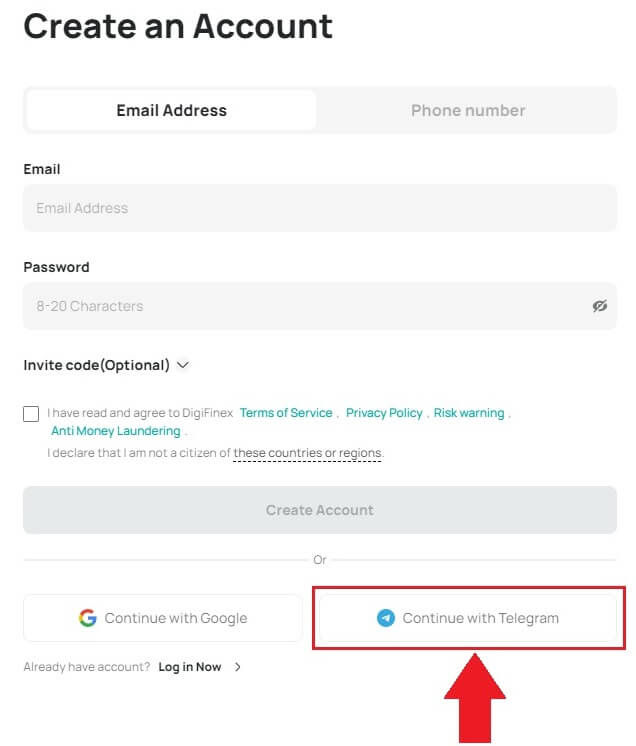
2. Click on the [Telegram] button.
Note:
- Tick the box to read and agree to the Terms of Service and Privacy Policy, then tap [Telegram].
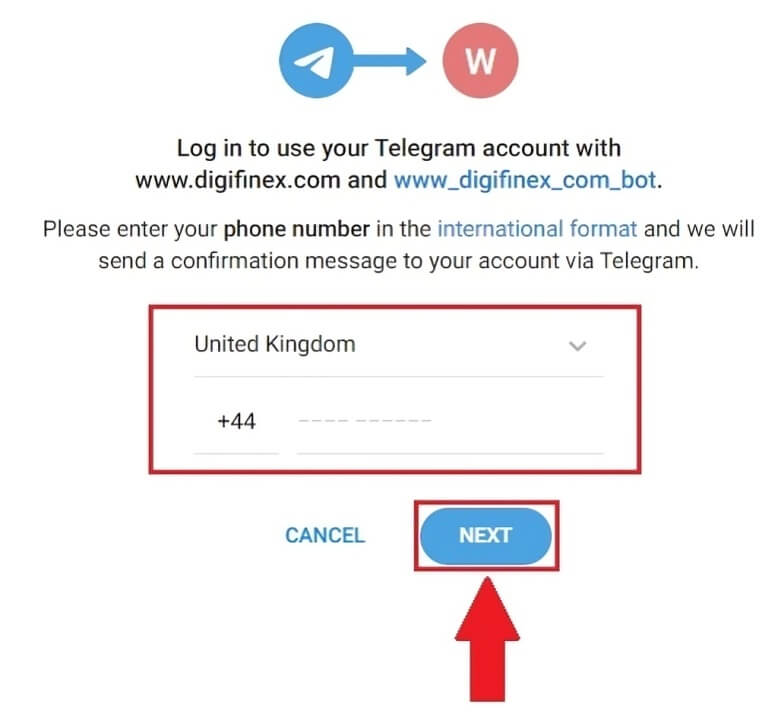
3. Select your phone number region, then enter your phone number below and click on [NEXT].
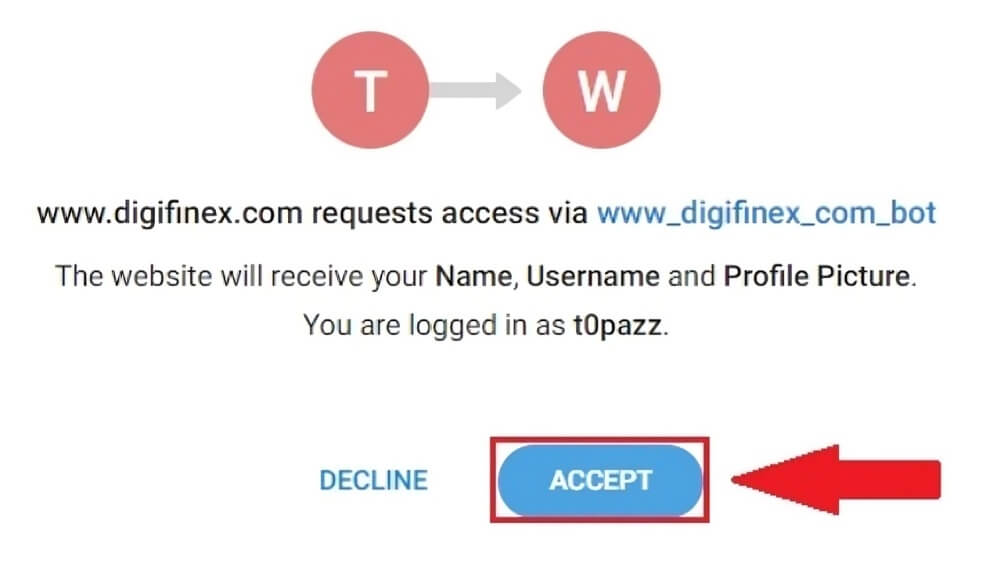
4. Authorize DigiFinex to access your Telegram information by clicking on [ACCEPT].
5. Enter your Email Address.
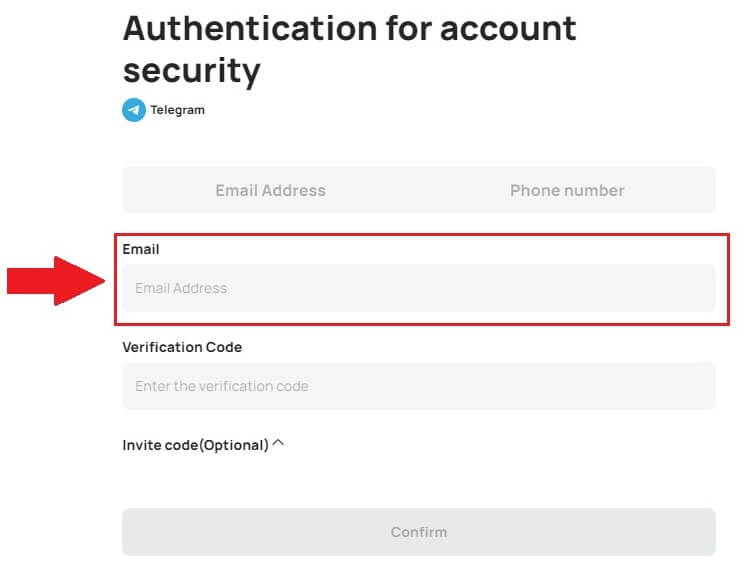
6. Set up your password. You will receive a 6-digit verification code in your email. Enter the code and click [Confirm].
Note:
Your password must contain at least 8 characters, including one uppercase letter and one number.
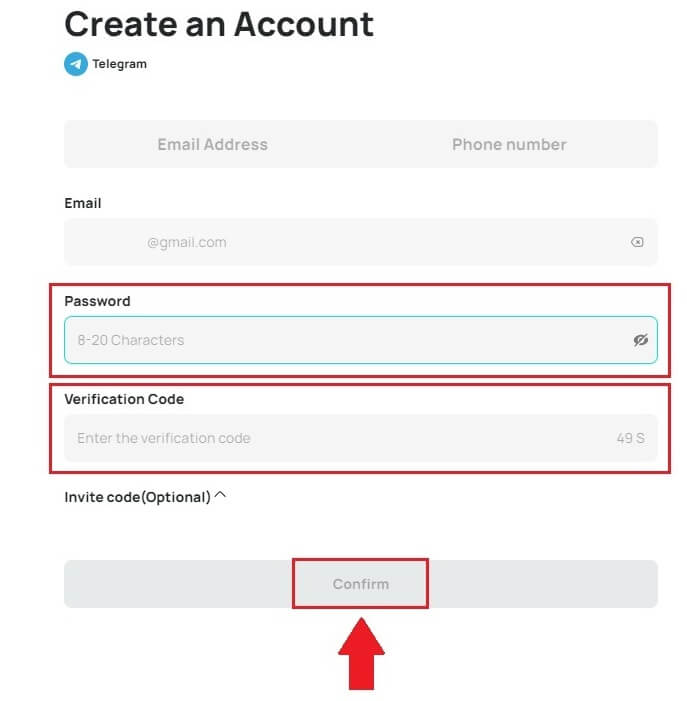
7. Congratulations, you have successfully registered on DigiFinex.
Register on DigiFinex App
1. You need to install the DigiFinex application to create an account on the Google Play Store or App Store.
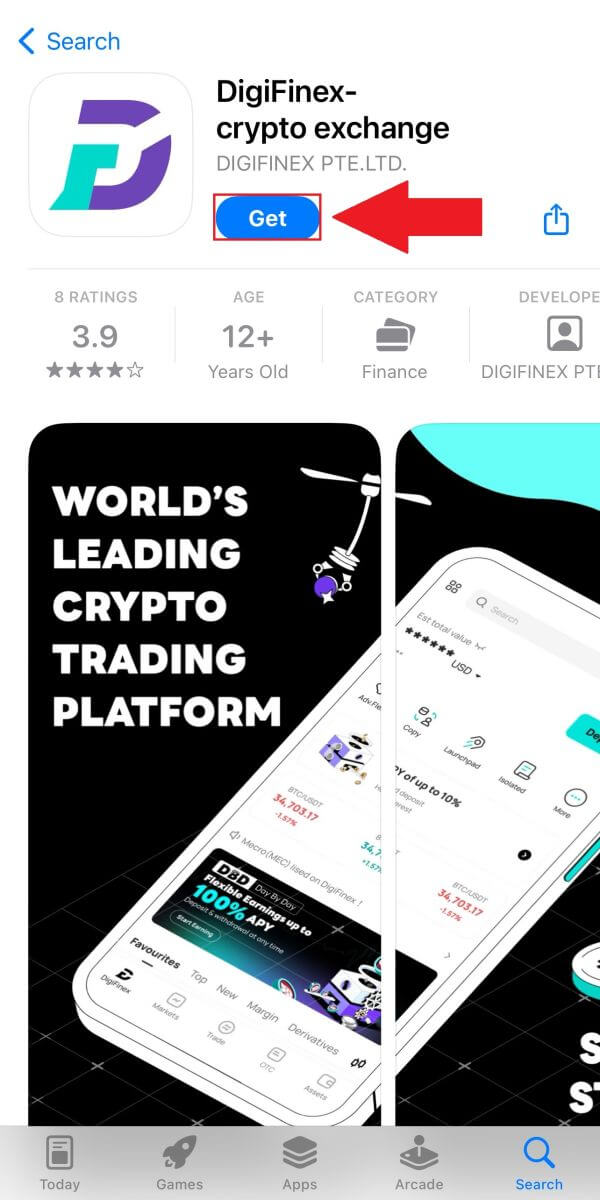
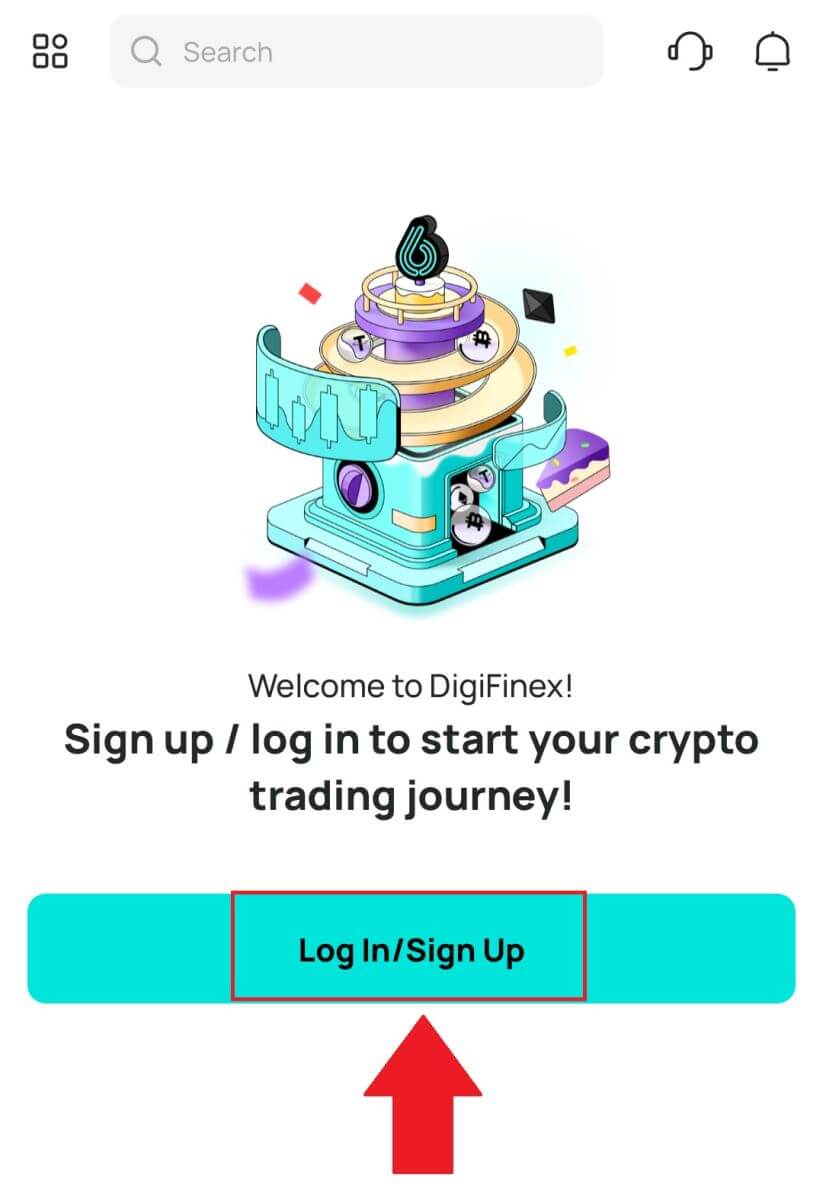
2. Open the DigiFinex app and tap [Log In/Sign Up].
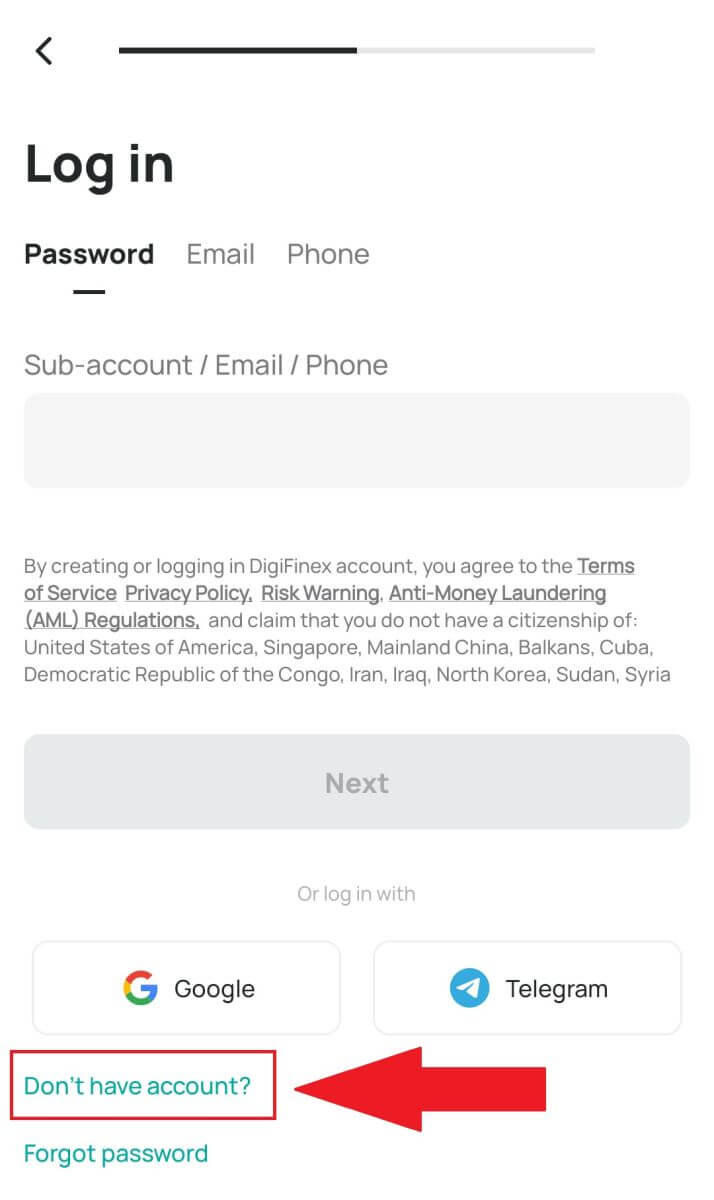
3. Tap on [Don’t have account?] To begin signing up your account.
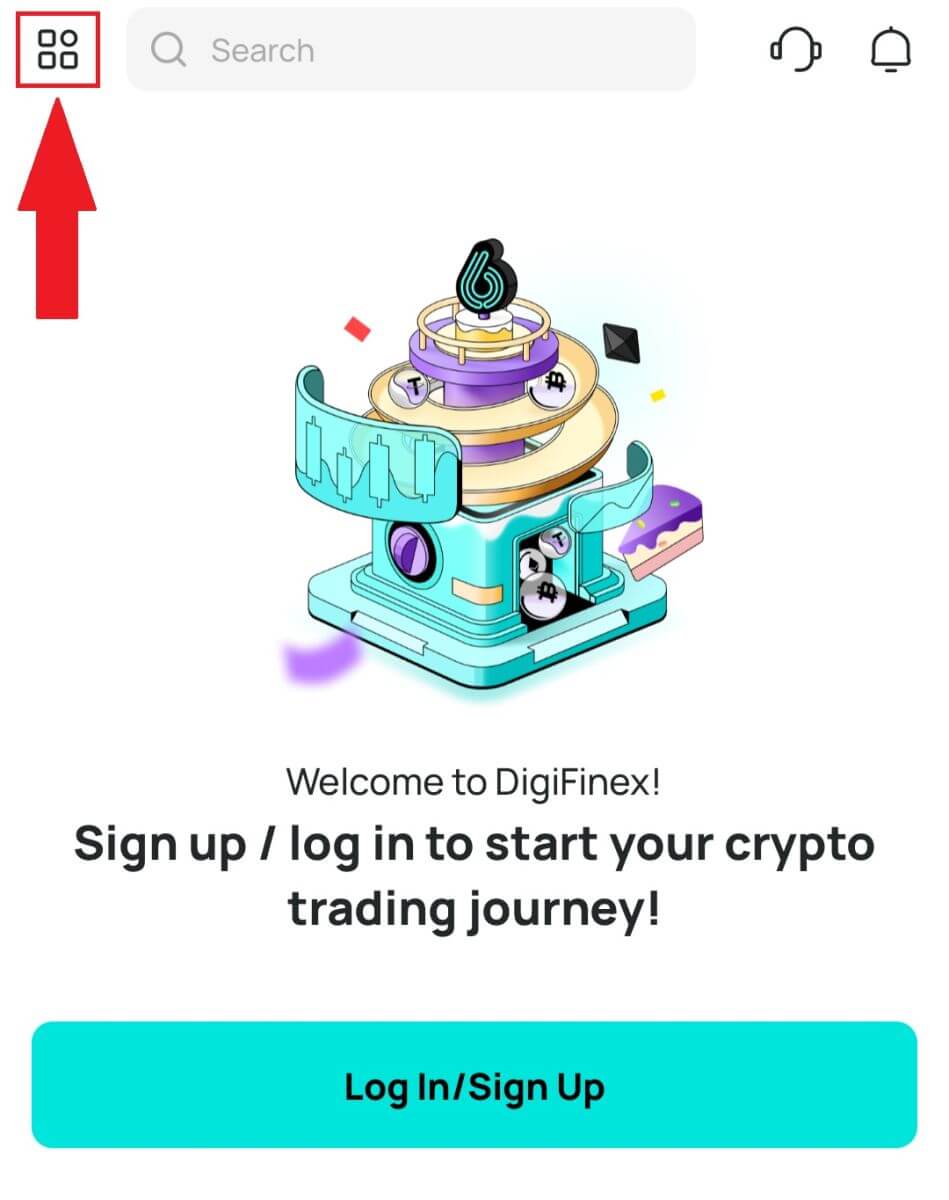
Or you can sign up by tapping on the menu icon.
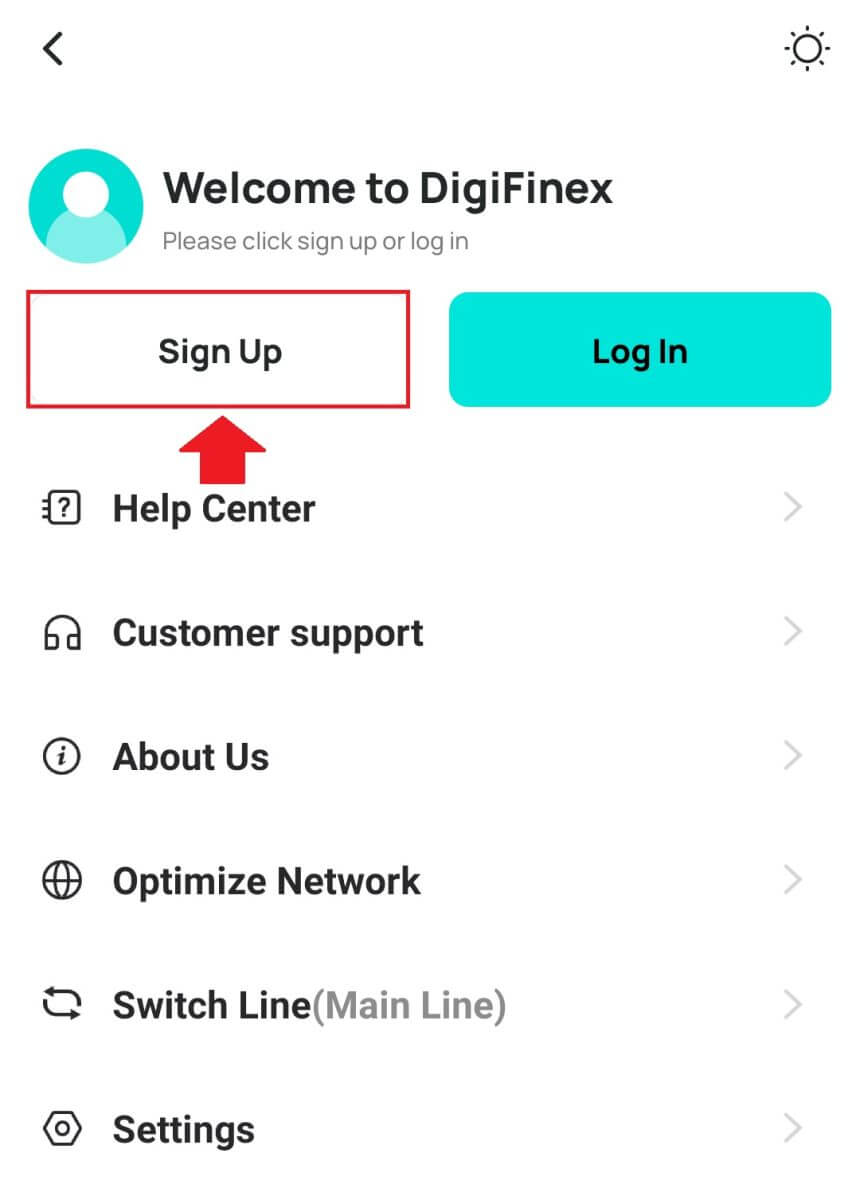
And tap [Sign Up].
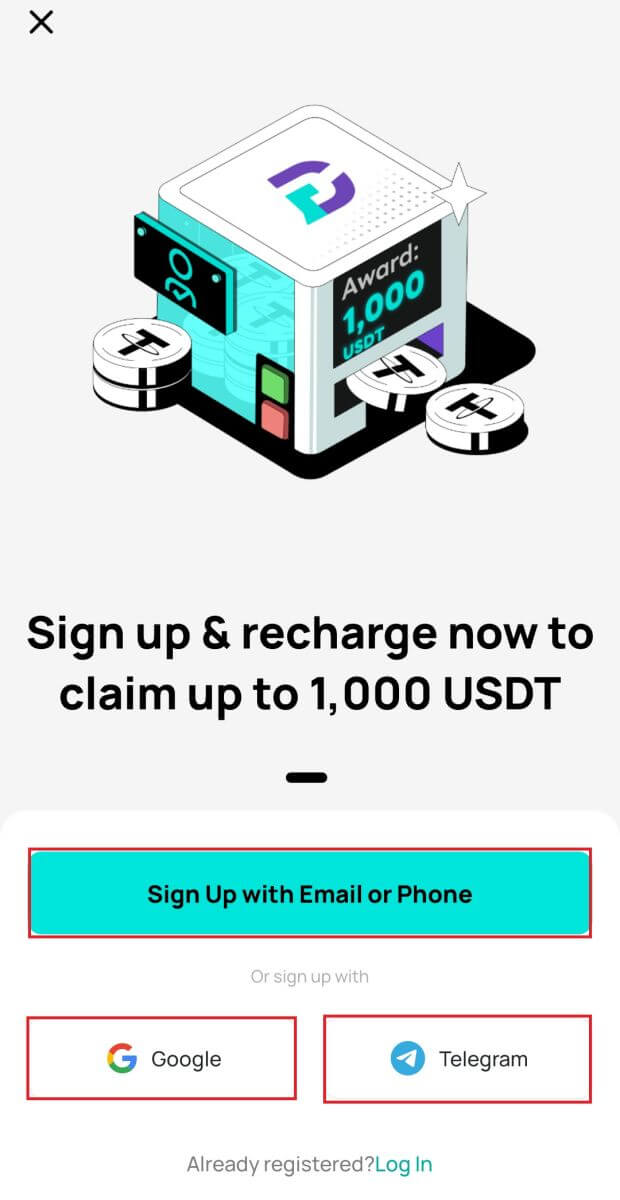
Then select a registration method.
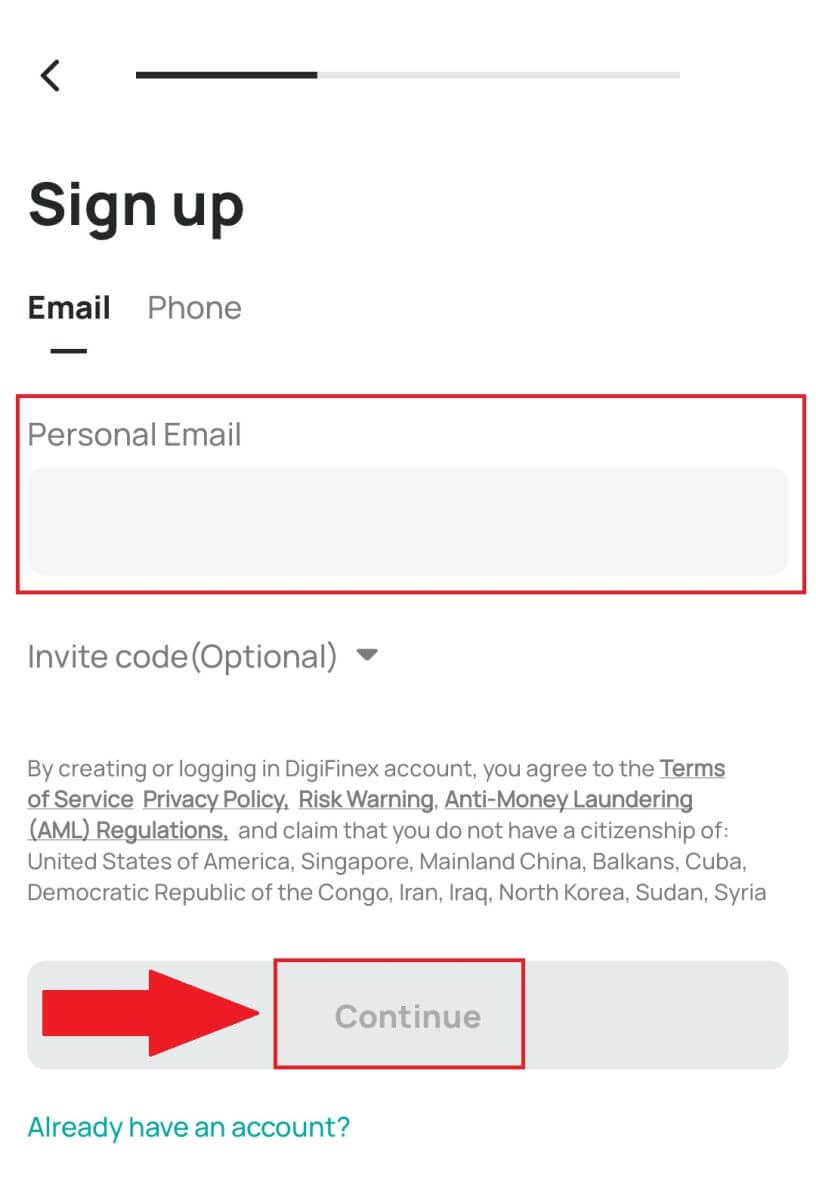
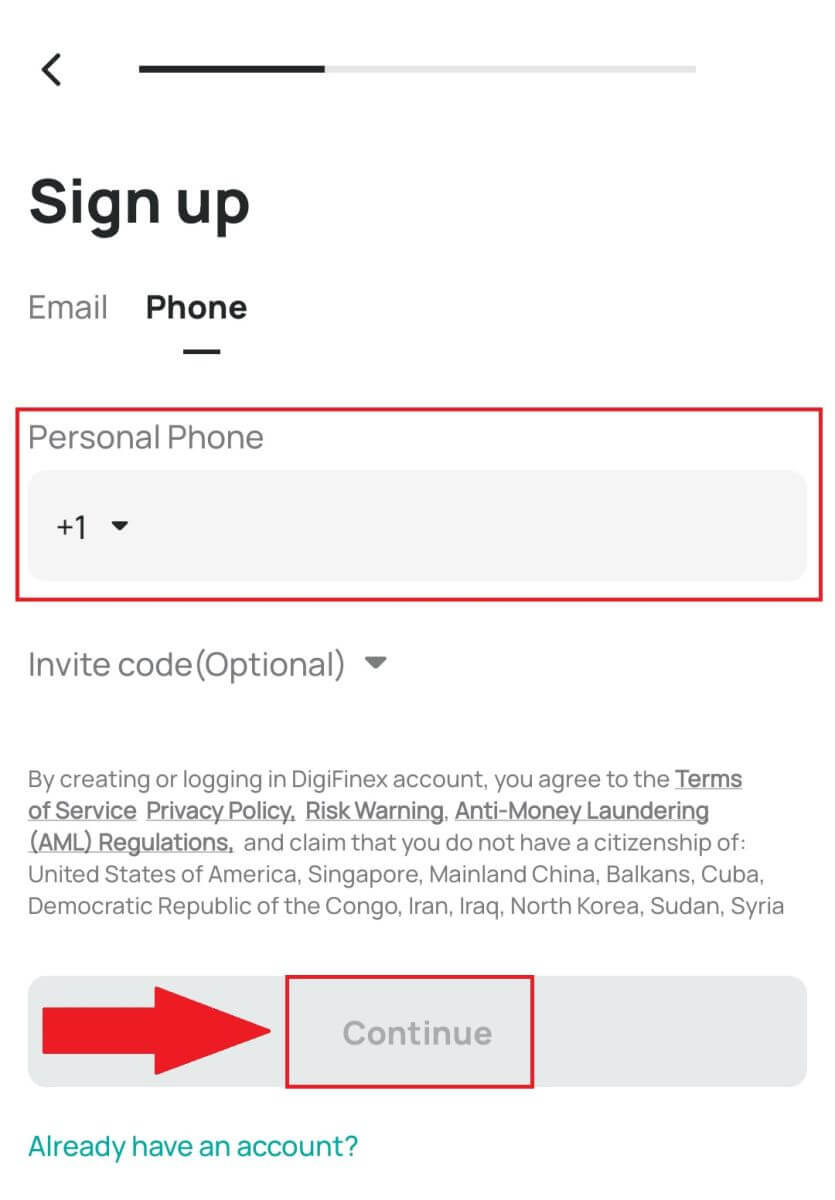
4. If you choose [Sign Up with Email or Phone] then select [Email] or [Phone] and enter your email address/phone number. Then, press [Continue] and create a secure password for your account.
Note:
-
Your password must contain at least 8 characters, including one uppercase letter and one number.
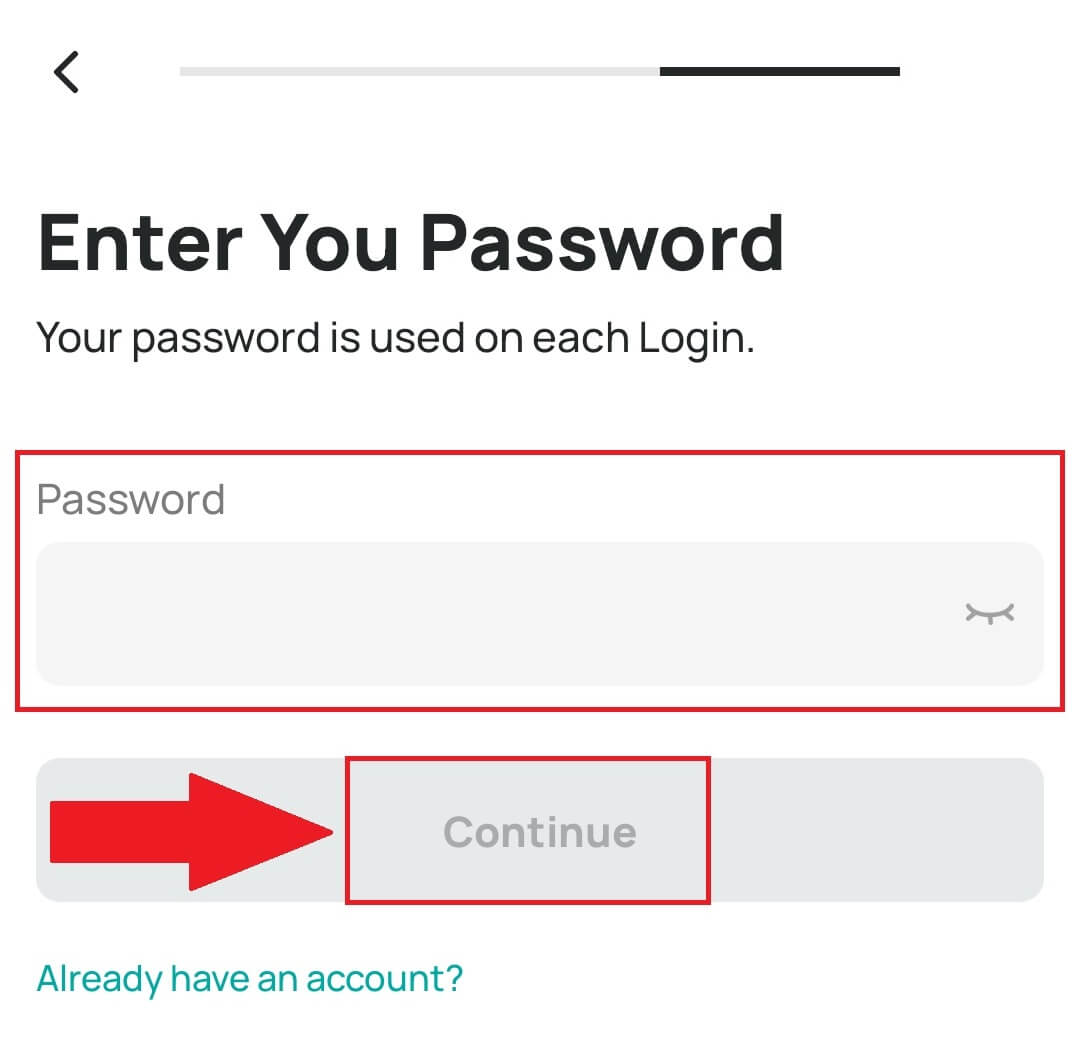
5. You will receive a 6-digit verification code in your email or phone.
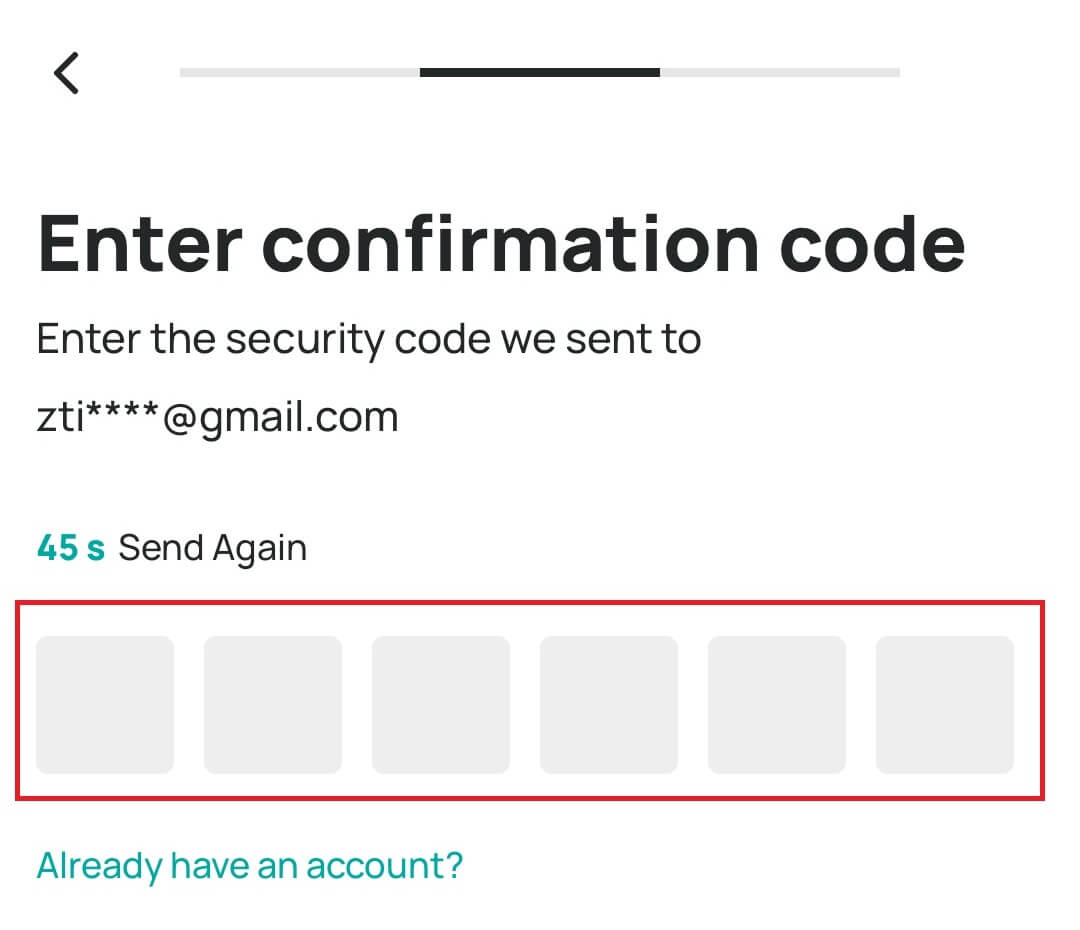
6. Congratulations! You have successfully created a DigiFinex account.
How to Verify an Account on DigiFinex
Where can I get my account verified on DigiFinex?
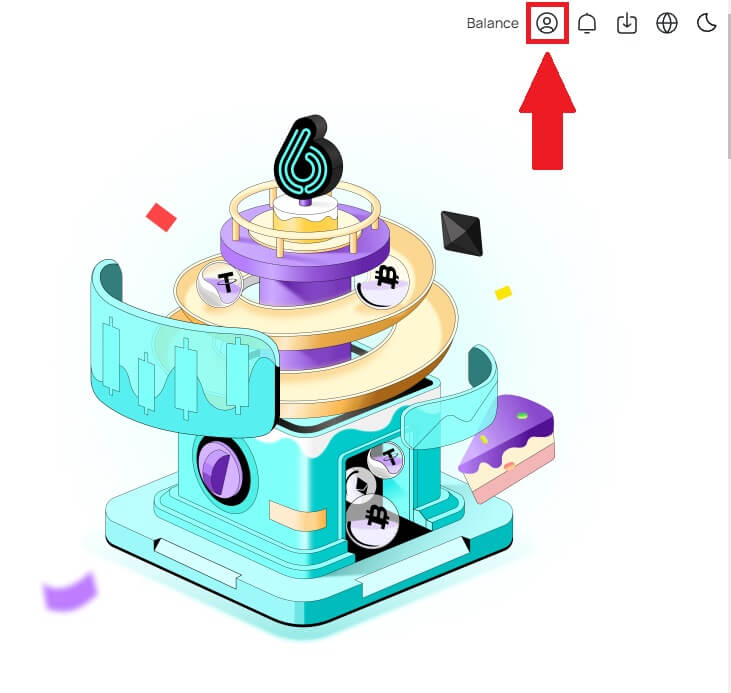
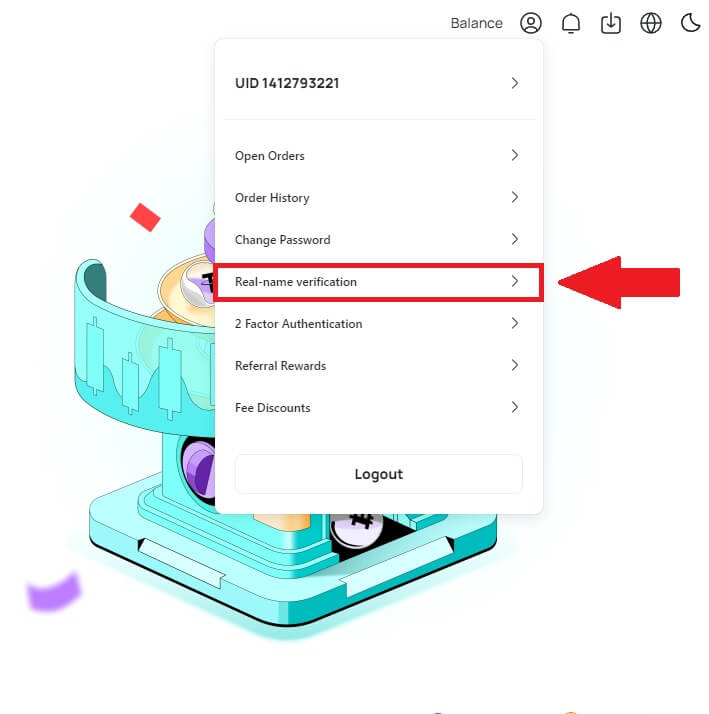
1. Log into your DigiFinex account, and you can access the Identity Verification from [User Center] - [Real-name verification].
How to complete Identity Verification on DigiFinex?
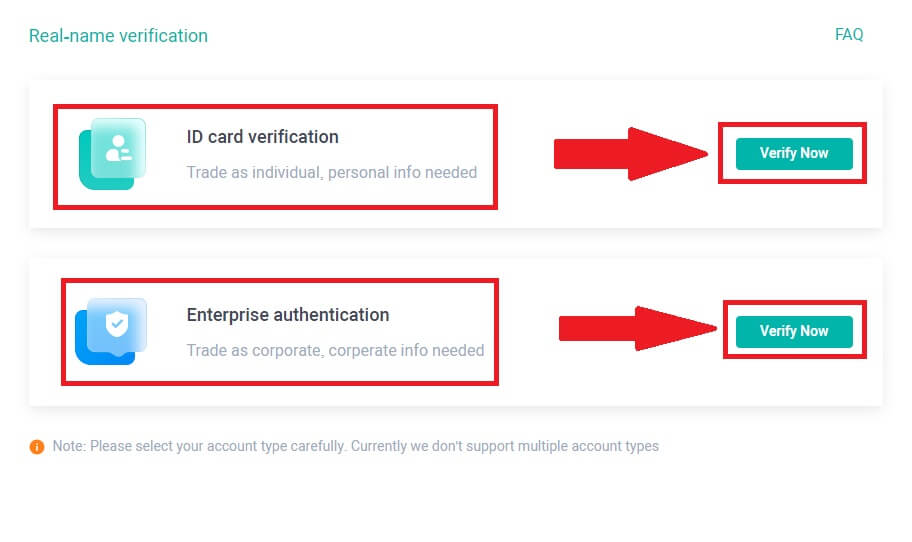
1. Choose the correct type of account you want to verify and click [Verify Now].
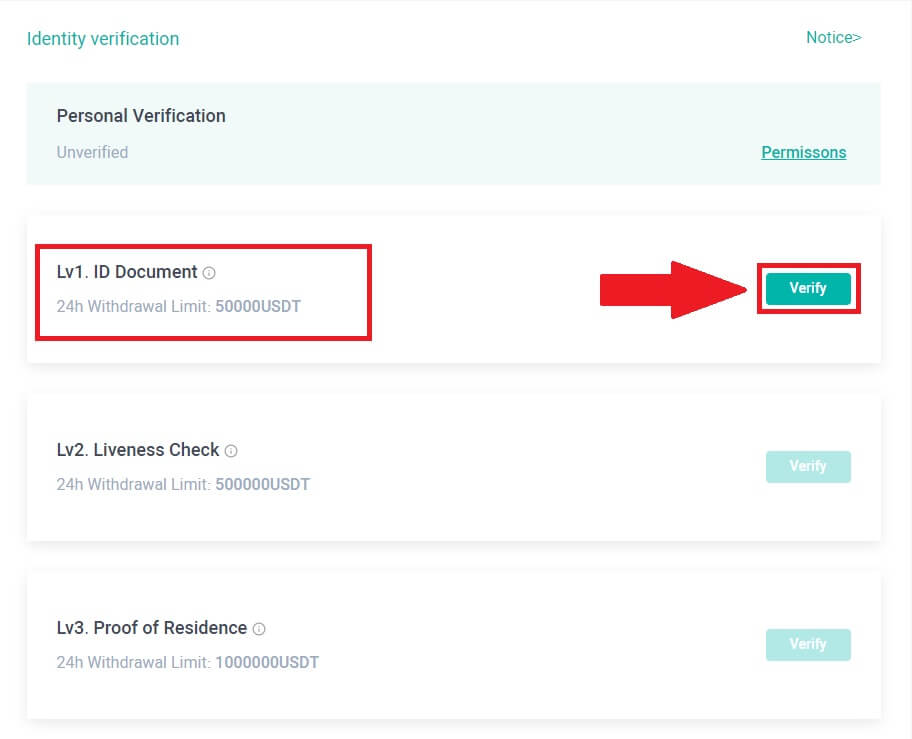
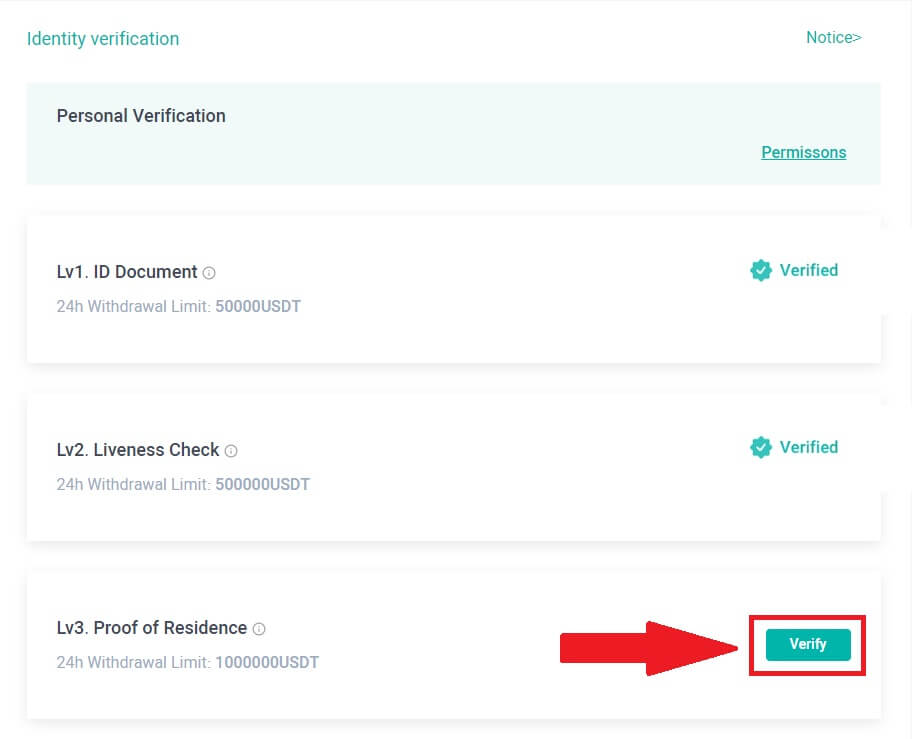
2. Click [Verify] to verify the LV1. ID Document. You can check your current verification level on the page, which determines the trading limit of your DigiFinex account. To increase your limit, please complete the respective Identity Verification level.
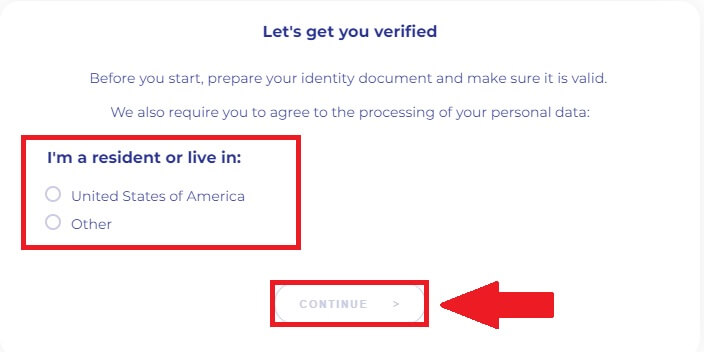
3. Select the country you live in and click [CONTINUE].
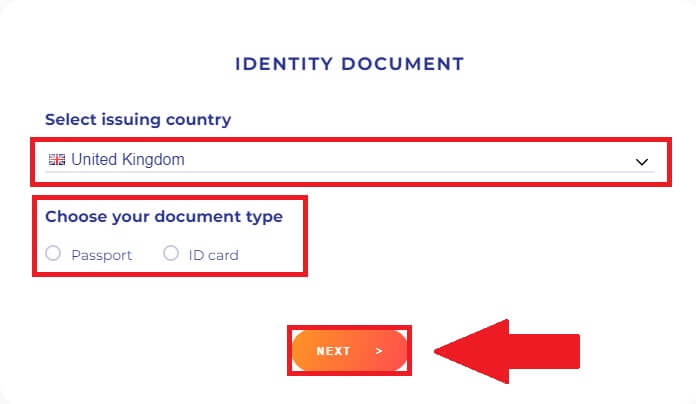
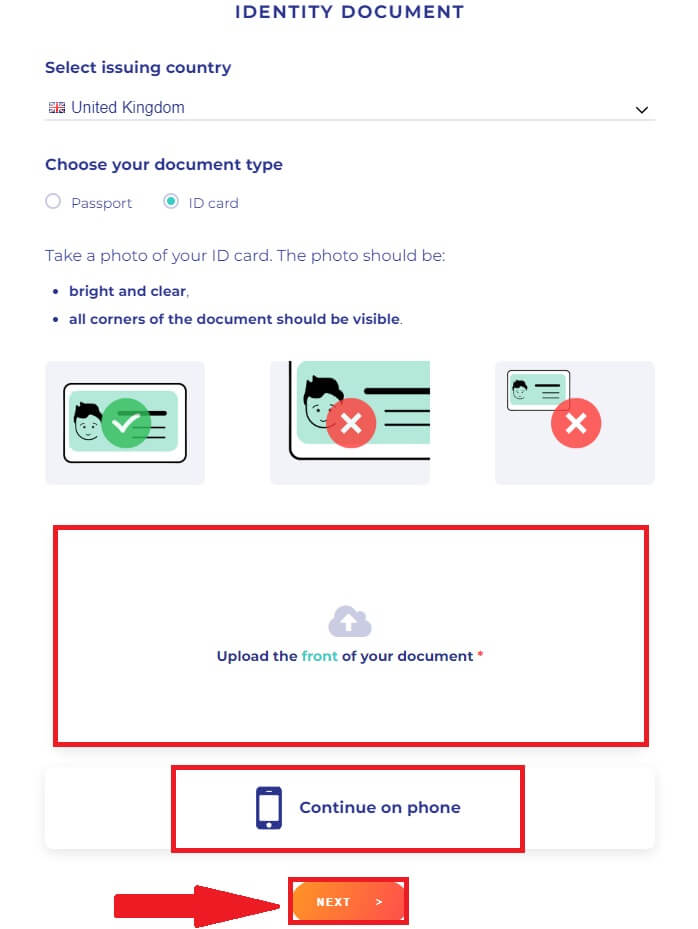
4. Select the issuing country you are from and choose the document type you want to use to verify and click [NEXT].
Note: Please select the country and document type of the ID (either National ID Card or Passport) you wish to use. Please make sure that all corners of the document are visible, no foreign objects or graphic elements are present, both sides of the national ID Card are uploaded or both the photo/information page and the signature page of the passport are included, and the signature is present.
5. Follow the instructions to upload photos of your document, or press [Continue on phone] to swtich to your phone and click [NEXT].
Note: Your photos should clearly show the full Passport or ID document, and please enable camera access on your device, or we cannot verify your identity.
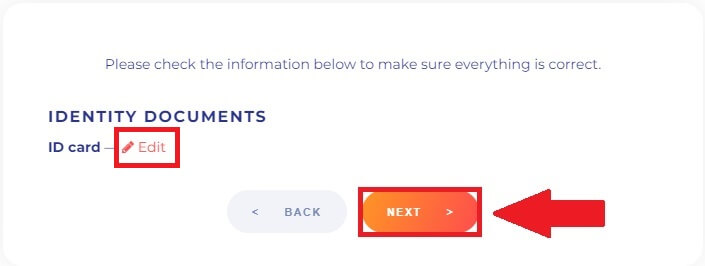
Note: Follow the instruction and if you want to change the identity documents, press [Edit] to change them. Click [NEXT] to continue verifying.
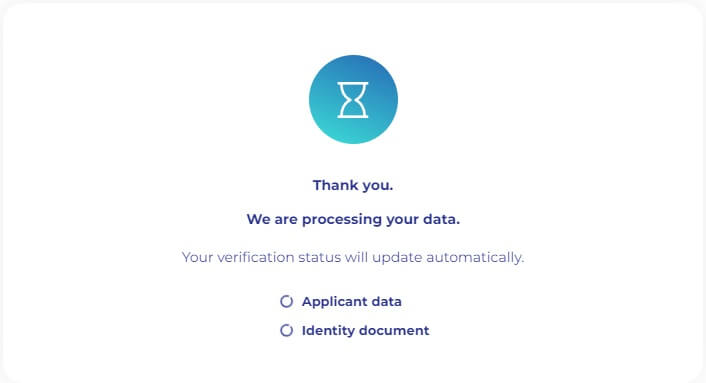
6. After completing the process, please wait patiently. DigiFinex will review your data in a timely manner. Once your application has been verified, we will send you an email notification.
7. Once the LV1 identity verification process is finished, proceed to click on the [Verify] option for LV2 to initiate the liveness check. Follow the provided instructions to capture a selfie using the camera for facial verification. Submit the selfie upon completion and await automatic review by the system.
Note: In case of an audit failure, please consult the system for details on the reason for the failure. Re-submit the required real-name identification materials or reach out to customer service for clarification on the specific reasons behind the audit failure (avoid submitting materials multiple times or repeatedly).
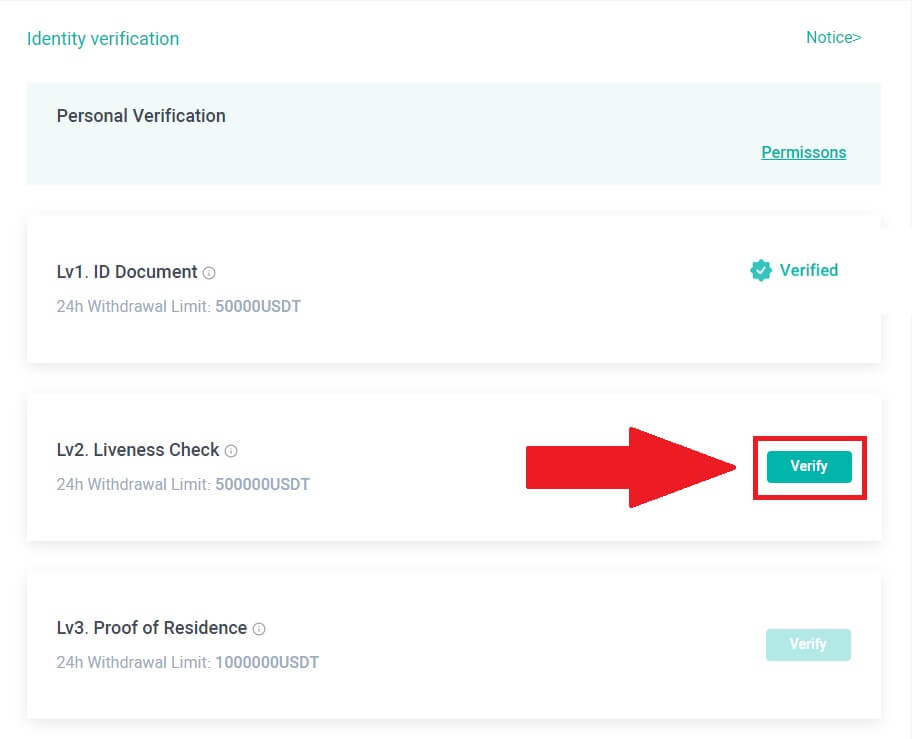
8. Once the liveness check for LV2 is successfully done, proceed to press [Verify] for LV3 to verify proof of residence.
Please submit documentation as proof of address, ensuring that the document includes your full name and address, and is dated within the last three months. Choose from the following options for proof of address:
- Bank statement with name and date of issue.
- Utility bills for gas, electricity, water, internet, etc., associated with the property.
- Credit card statement.
- Letters from government agencies.
- Front and back of driver’s license with address (Note: Driver’s licenses without address information will not be accepted).
-
Kindly submit genuine information certification. Accounts engaging in deceptive practices, including the provision of false information or fraudulent certification details, will result in account suspension.
-
Photos must be in JPG or PNG format, and their size should not exceed 2MB.
-
Ensure that uploaded photos are clear, unaltered, and free from cropping, obstructions, or modifications. Any deviation may lead to application rejection.
How to complete Identity Verification on DigiFinex app?
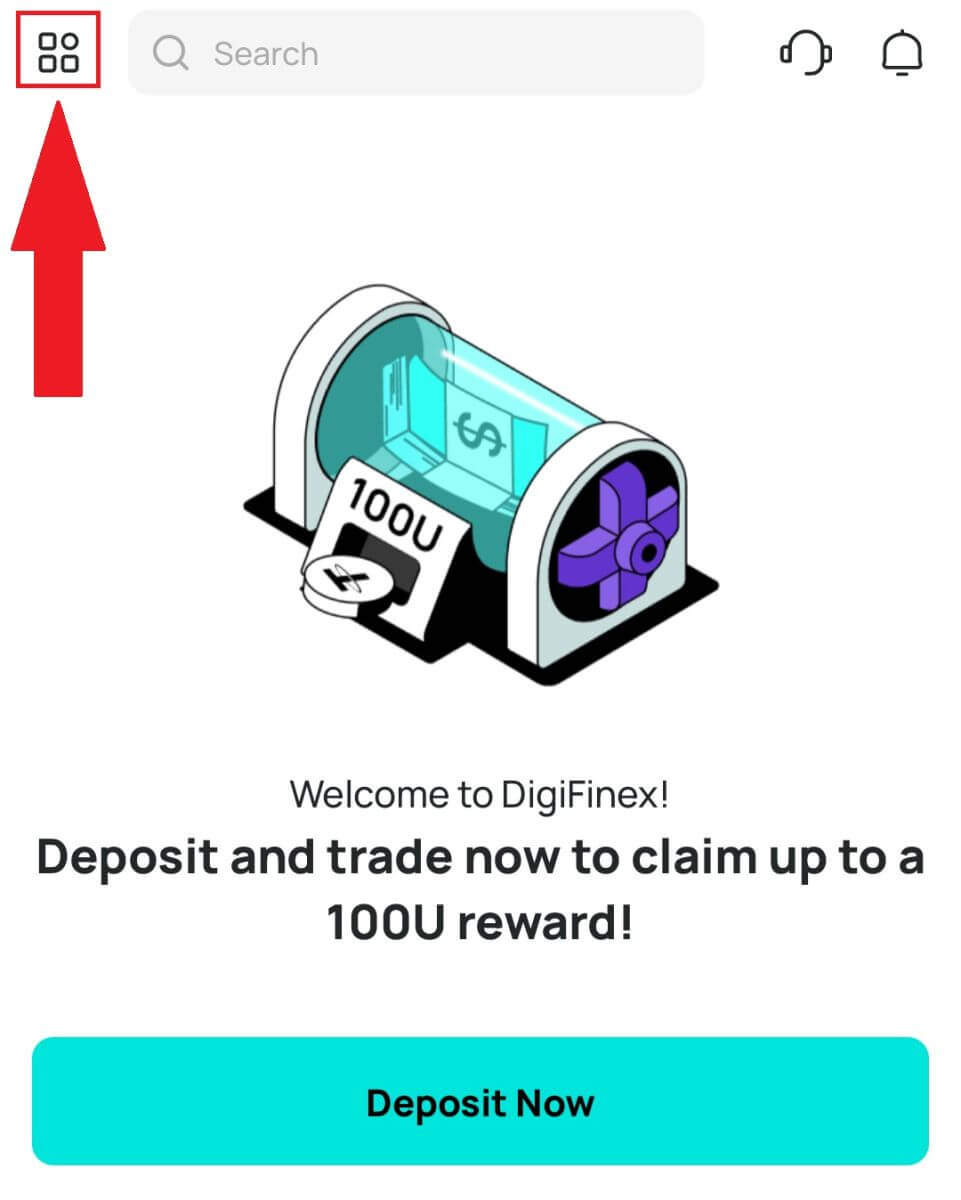
1. Open the DigiFinex app and tap on the menu icon.
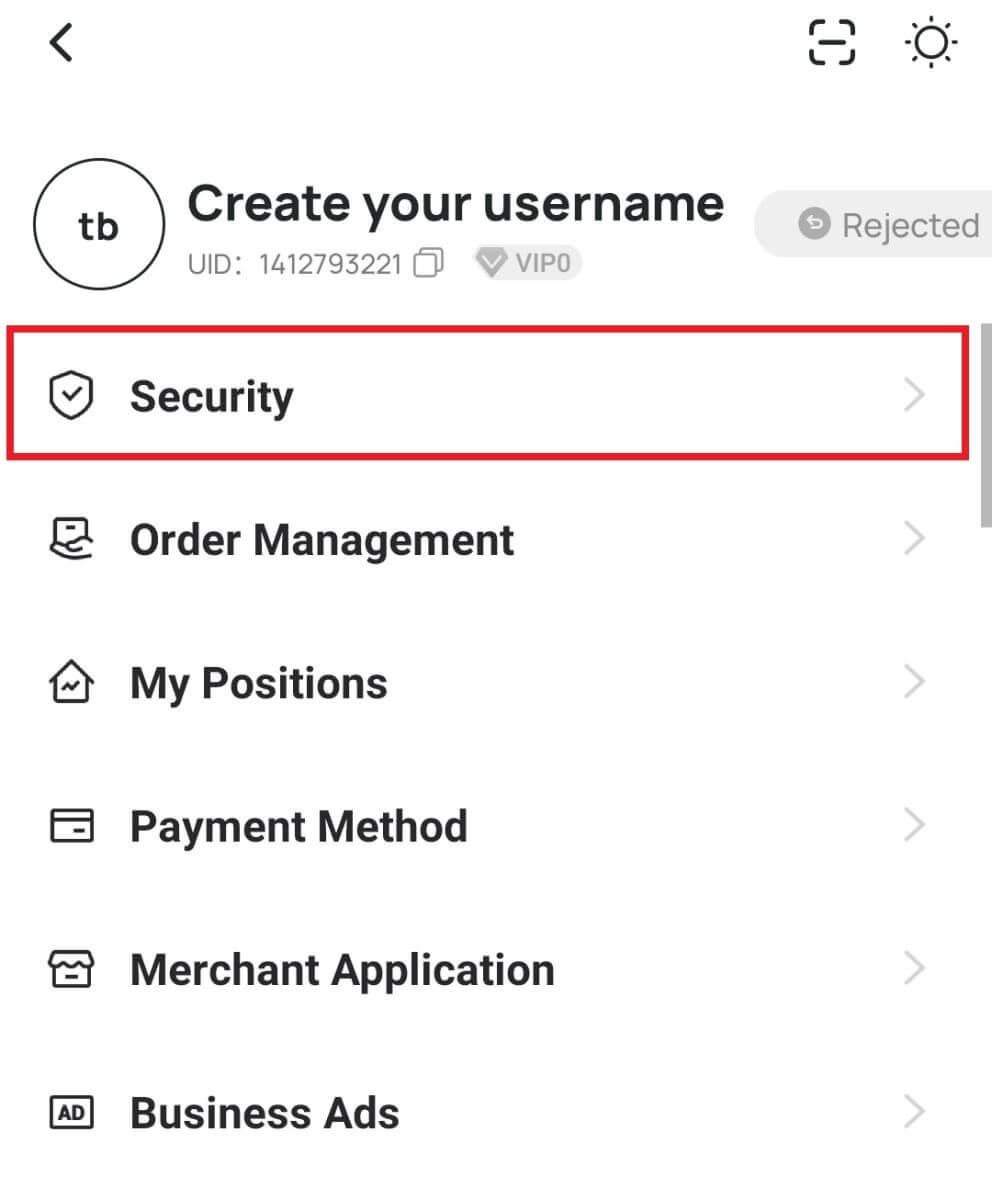
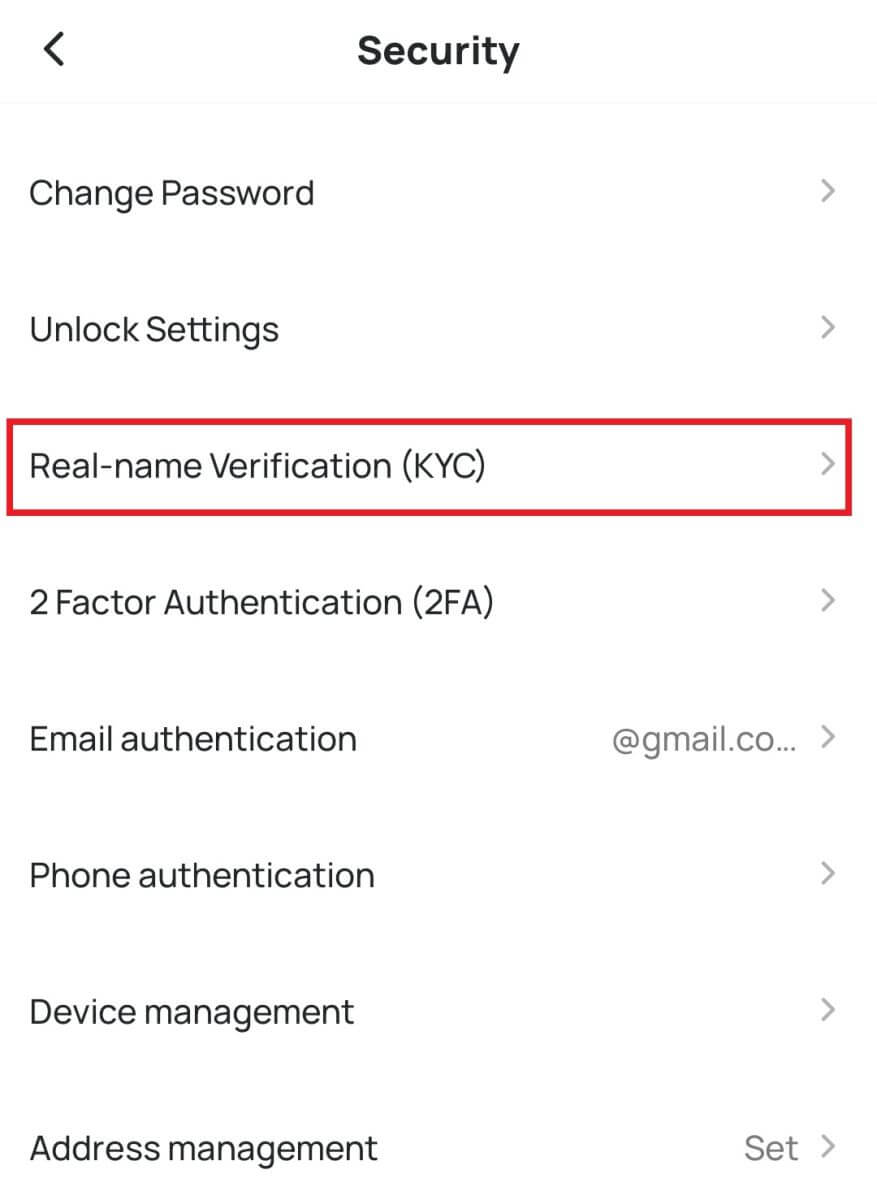
2. Tap on [Security] and select [Real-name Verification (KYC)].
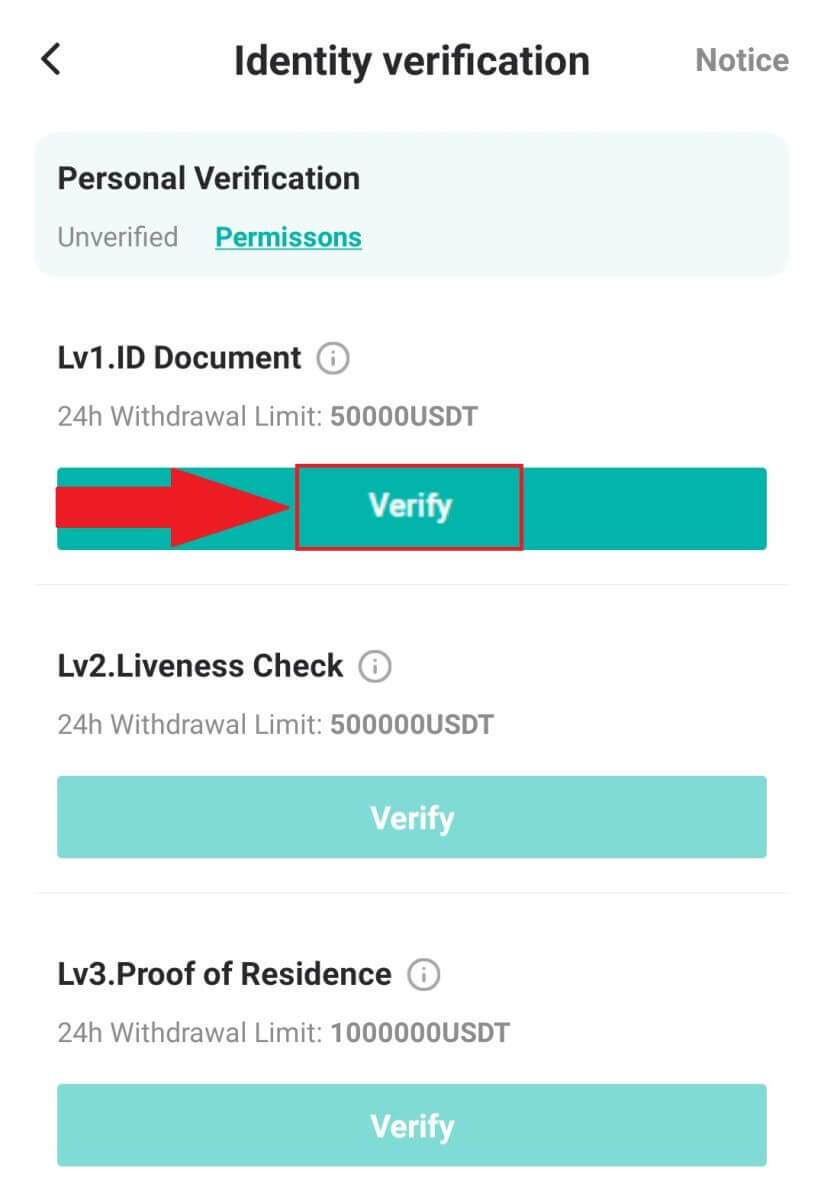
3. Tap on [Verify] to complete the LV1 identity verification.
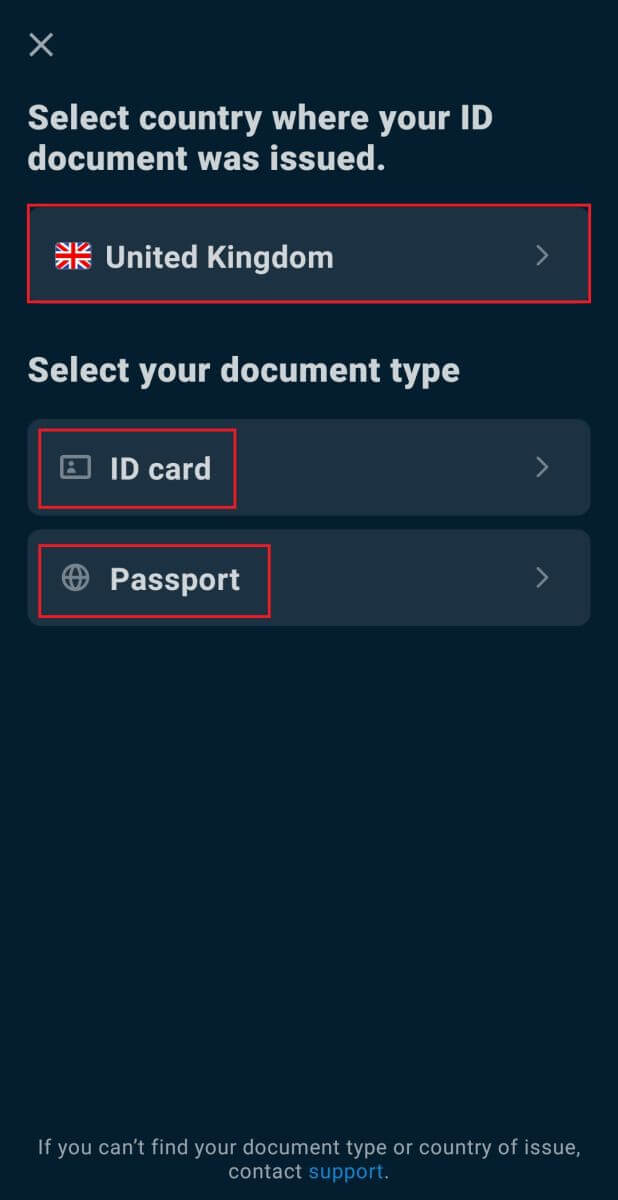
4. Select your nationality (registration is not allowed for individuals below the age of 18) and choose the document type you want to use to verify, either [ID card] or [Passport].
Note: Submit images of your identification (both front and back of the ID card, as well as the left and right sides of the personal information page of the passport, ensuring that it includes a signature).
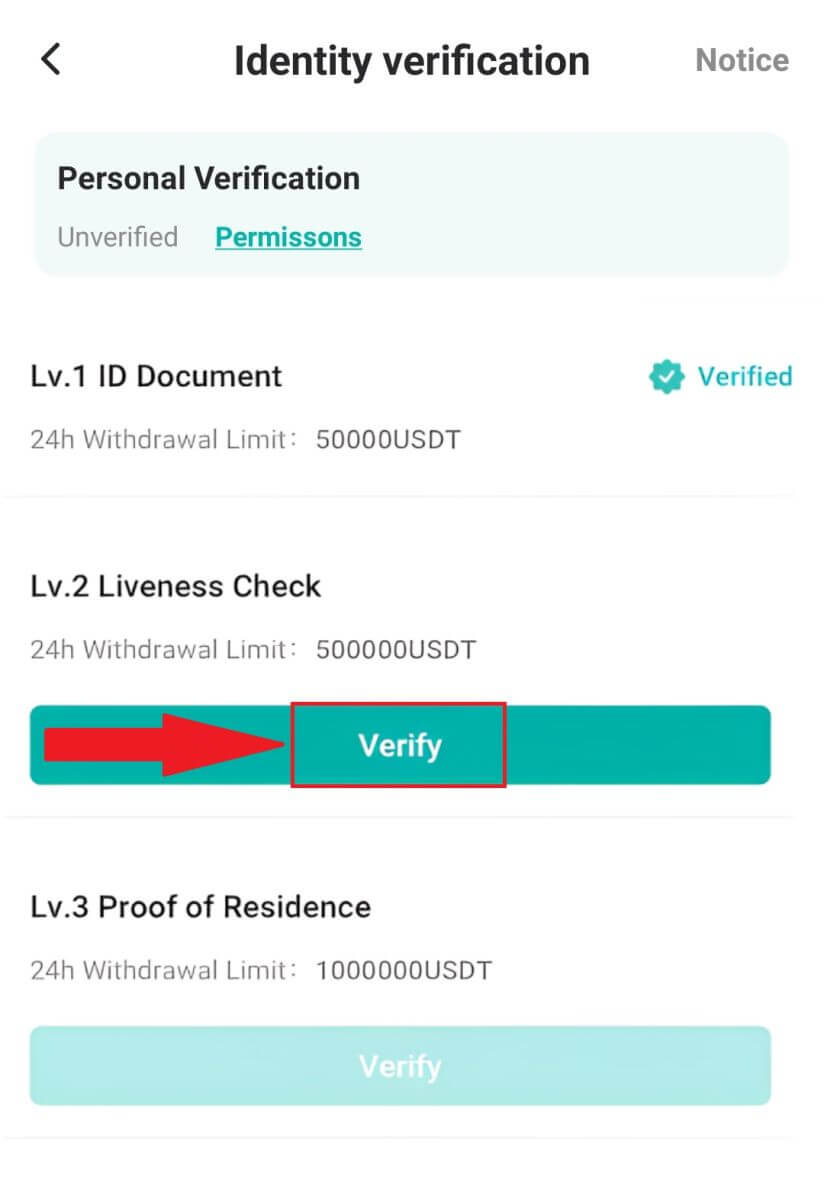
5. Once the LV1 identity verification process is finished, proceed to click on the [Verify] option for LV2 to initiate the liveness check. Follow the provided instructions to capture a selfie using the camera for facial verification. Submit the selfie upon completion and await automatic review by the system.
Note: In case of an audit failure, please consult the system for details on the reason for the failure. Re-submit the required real-name identification materials or reach out to customer service for clarification on the specific reasons behind the audit failure (avoid submitting materials multiple times or repeatedly).
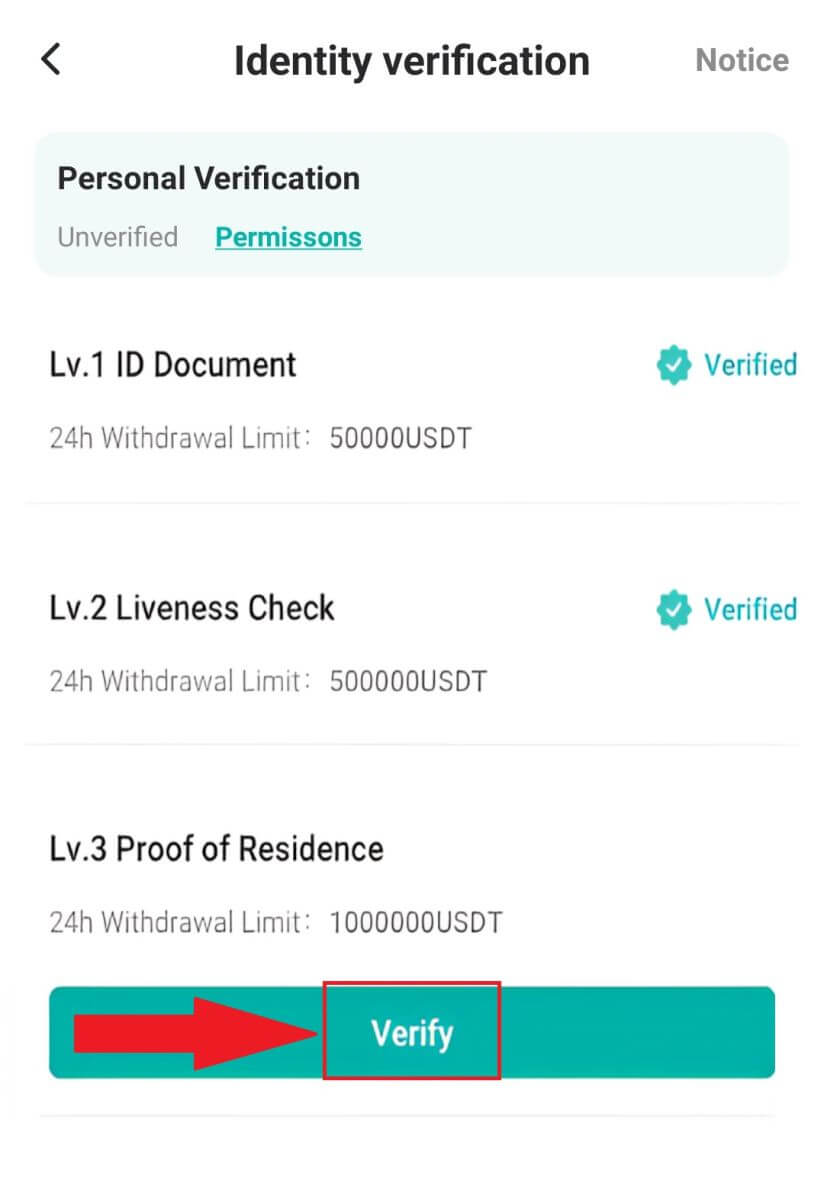
6. Once the liveness check for LV2 is successfully done, proceed to press [Verify] for LV3 to verify proof of residence.
Please submit documentation as proof of address, ensuring that the document includes your full name and address, and is dated within the last three months. Choose from the following options for proof of address:
- Bank statement with name and date of issue.
- Utility bills for gas, electricity, water, internet, etc., associated with the property.
- Credit card statement.
- Letters from government agencies.
- Front and back of driver’s license with address (Note: Driver’s licenses without address information will not be accepted).
-
Kindly submit genuine information certification. Accounts engaging in deceptive practices, including the provision of false information or fraudulent certification details, will result in account suspension.
-
Photos must be in JPG or PNG format, and their size should not exceed 2MB.
-
Ensure that uploaded photos are clear, unaltered, and free from cropping, obstructions, or modifications. Any deviation may lead to application rejection.
How to Deposit on DigiFinex
How to Buy Crypto with Credit/Debit Card on DigiFinex
Buy Crypto with Credit/Debit Card on DigiFinex (Web)
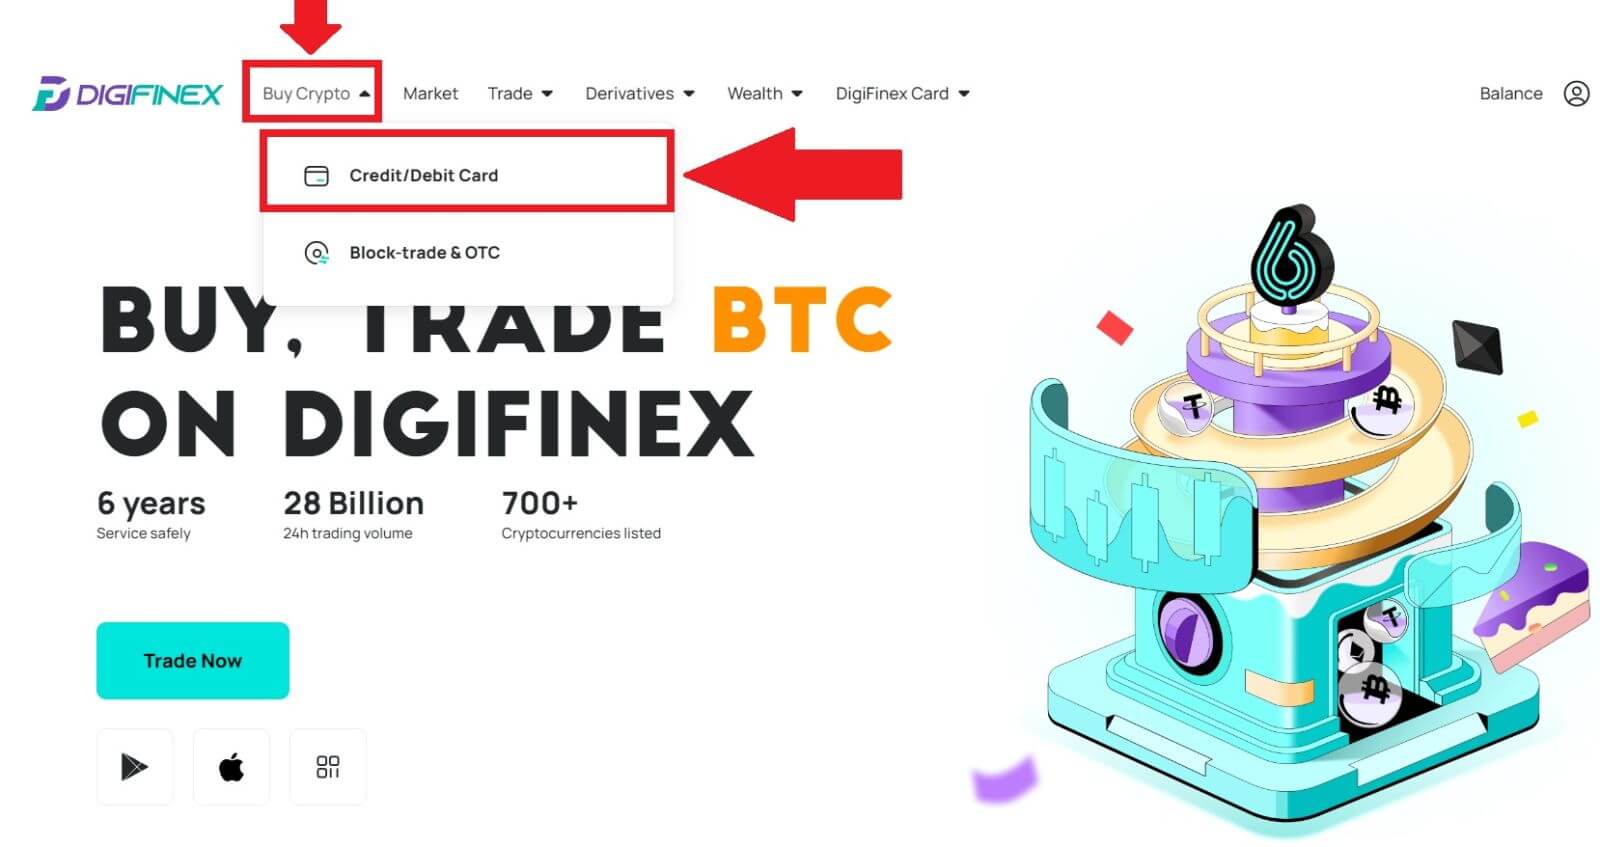
1. Log in to your DigiFinex account and click [Buy Crypto] - [Credit/Debit Card].
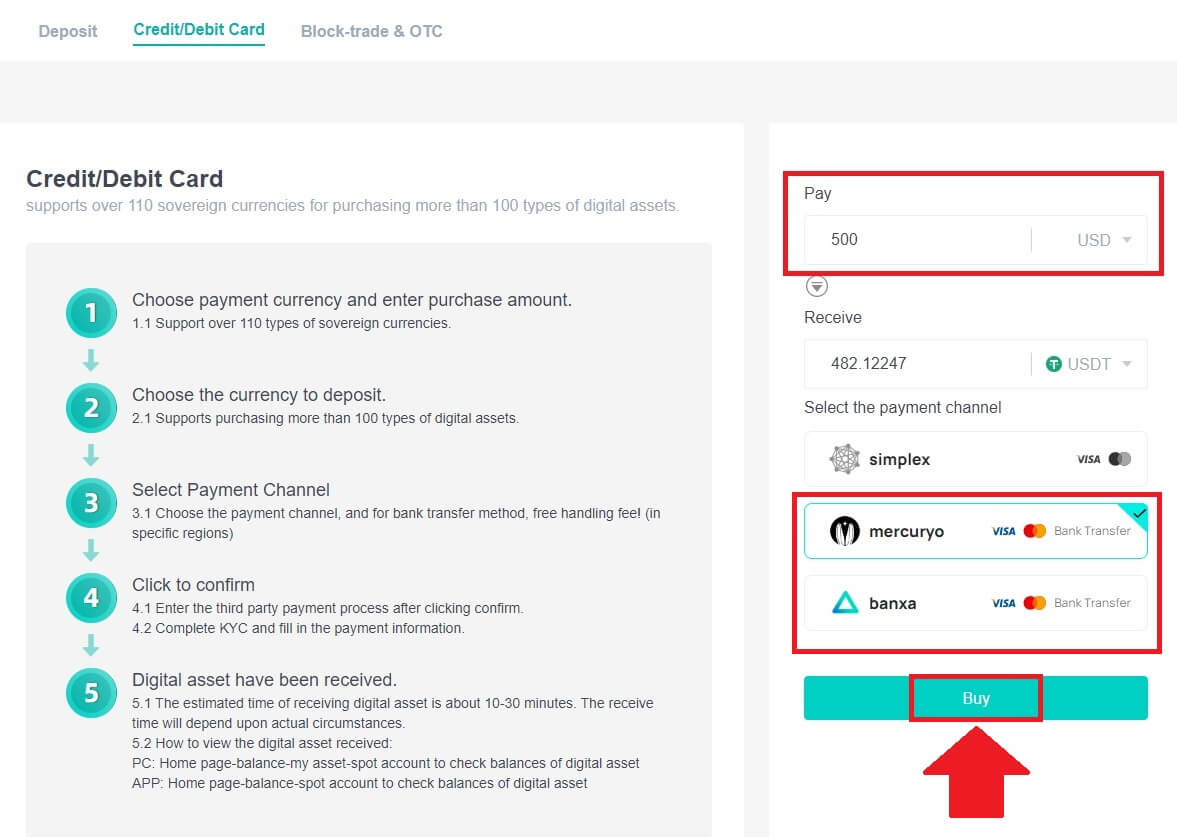
2. Here you can choose to buy crypto with different fiat currencies. Enter the fiat amount you want to spend and the system will automatically display the amount of crypto you can get, select the preferred payment channel and click [Buy].
Note: Diffrent payment channel will have diffrent fees for your transactions.
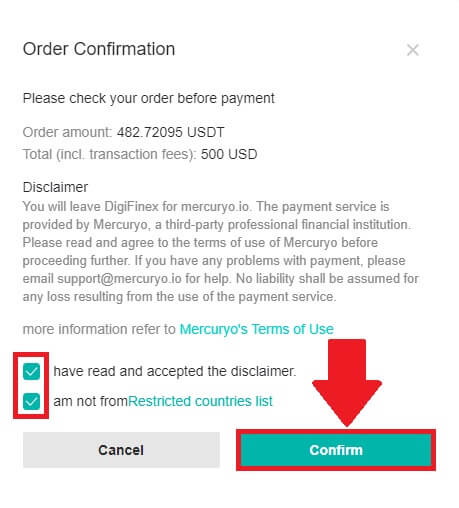
3. Confirm the details of the order. Tick the boxes and press [Confirm].
Buy Crypto with mercuryo payment channel (Web)
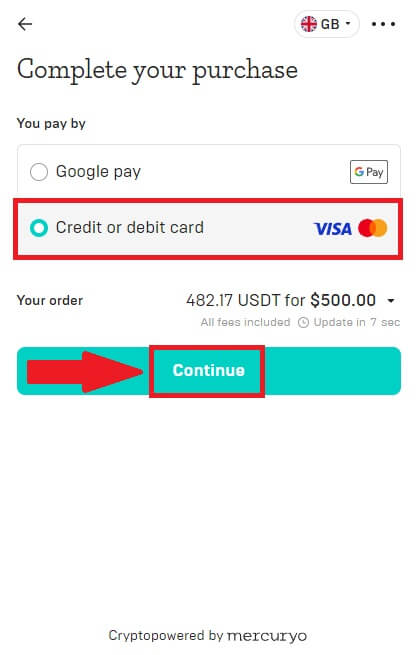
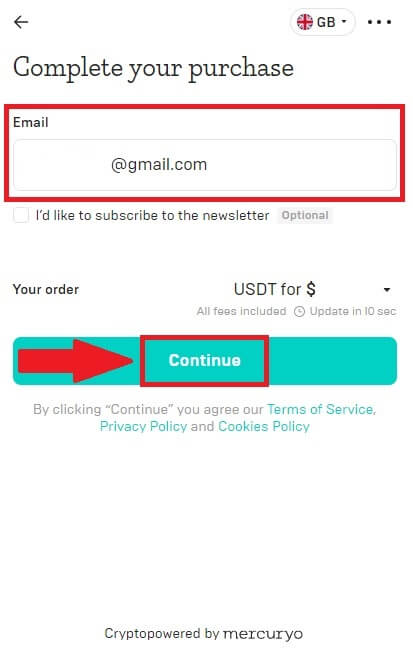
1. Click on [Credit or debit card] then click [Continue]. Then fill out your Email address and click [Continue].
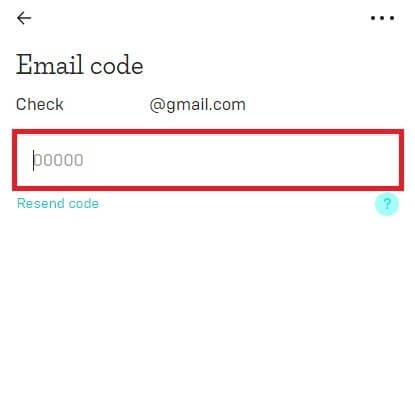
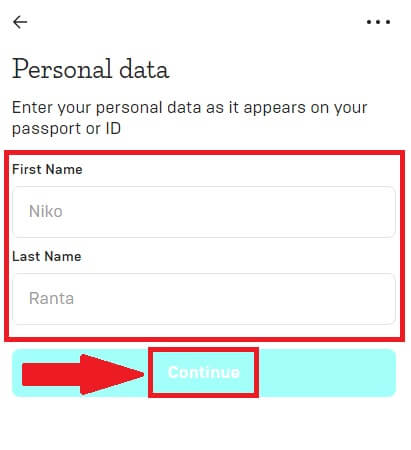
2. Enter the code was sent to your Email address and fill out your personal data and click [Continue] to complete the purchasing process.
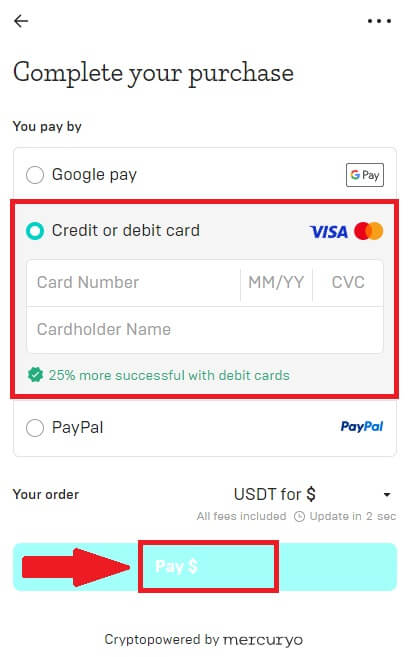
3. Choose [Credit or debit card], then fill out your credit card or debit card details and click [Pay $].
Note: You can only pay with credit cards in your name.
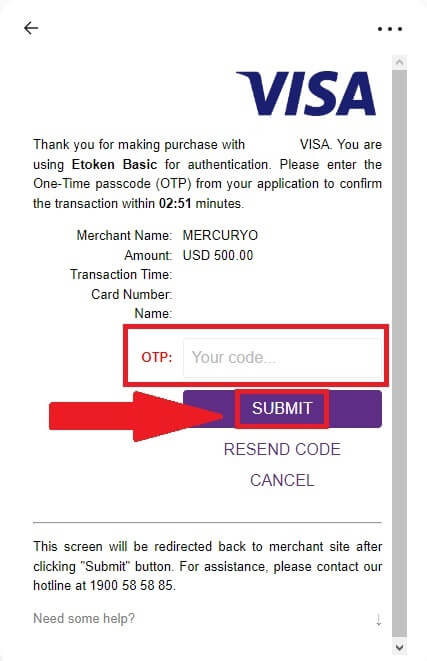
4. You will be redirected to your banks OTP transaction page. Follow the on-screen instructions to verify the payment.
Buy Crypto with banxa payment channel (Web)
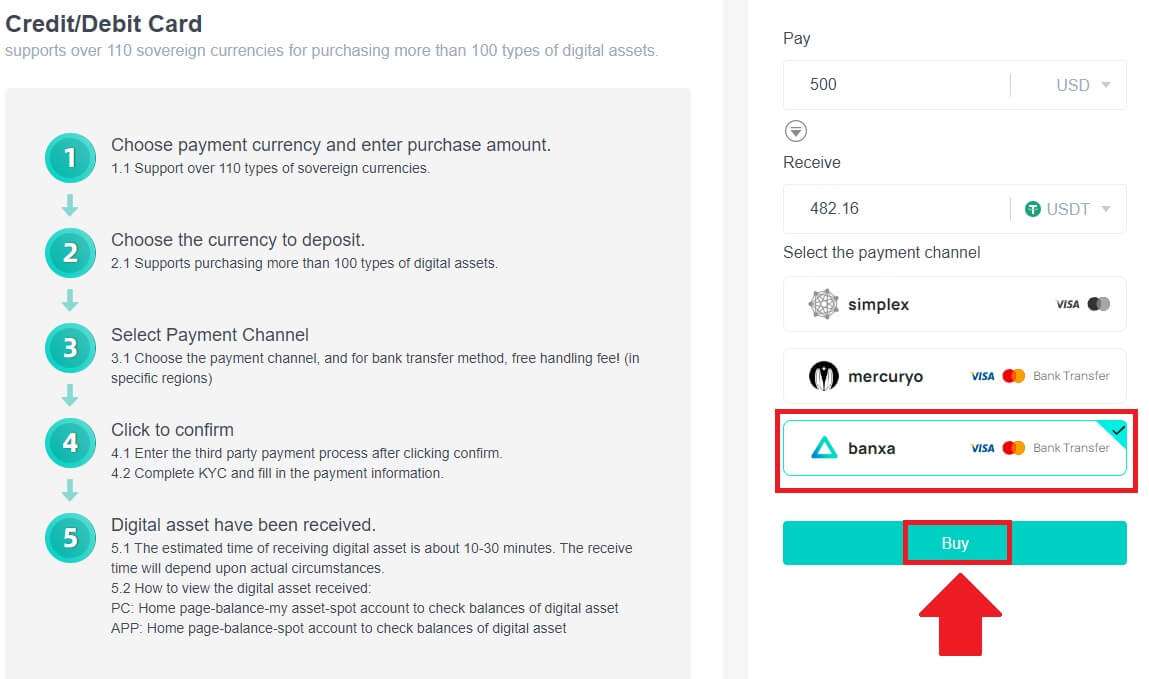
1. Choose [banxa] payment method and click [Buy].
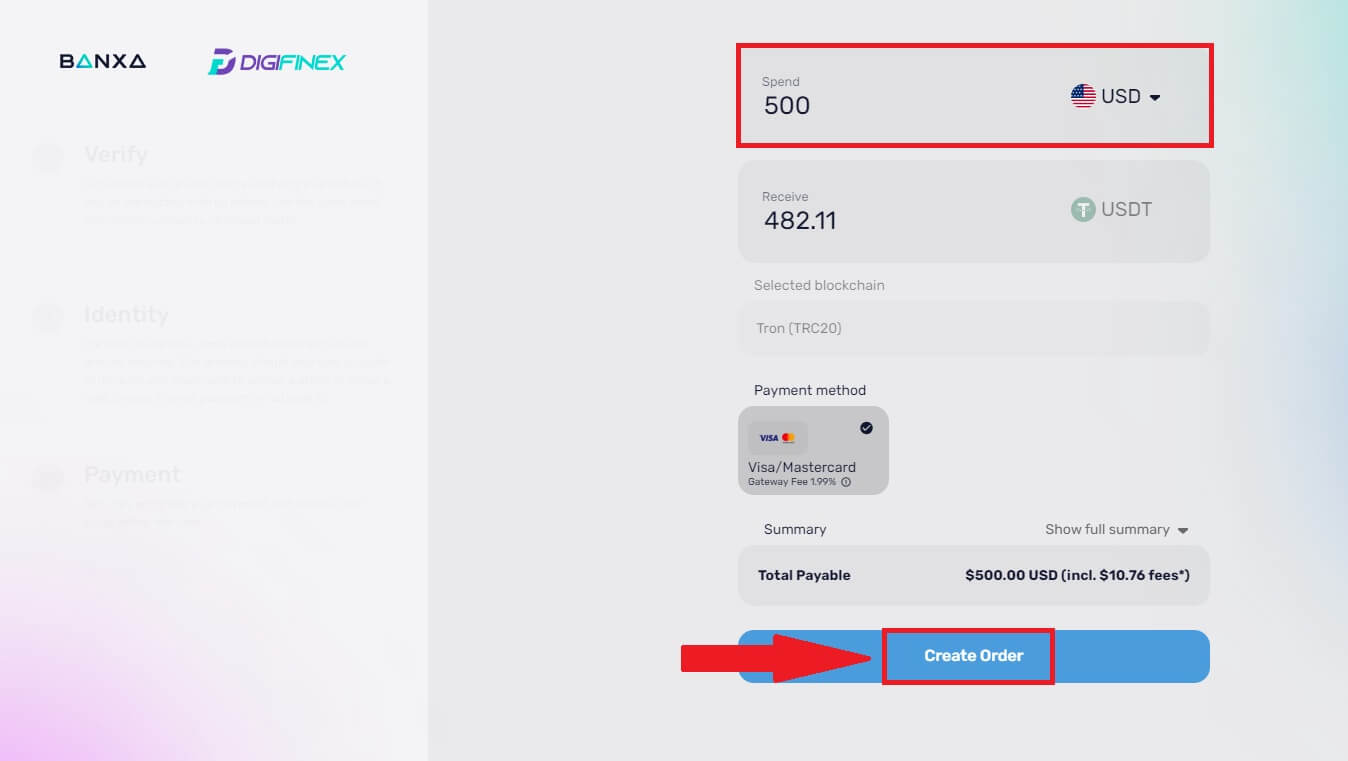
2. Enter the fiat amount you want to spend and the system will automatically display the amount of crypto you can get, and click [Create Order].
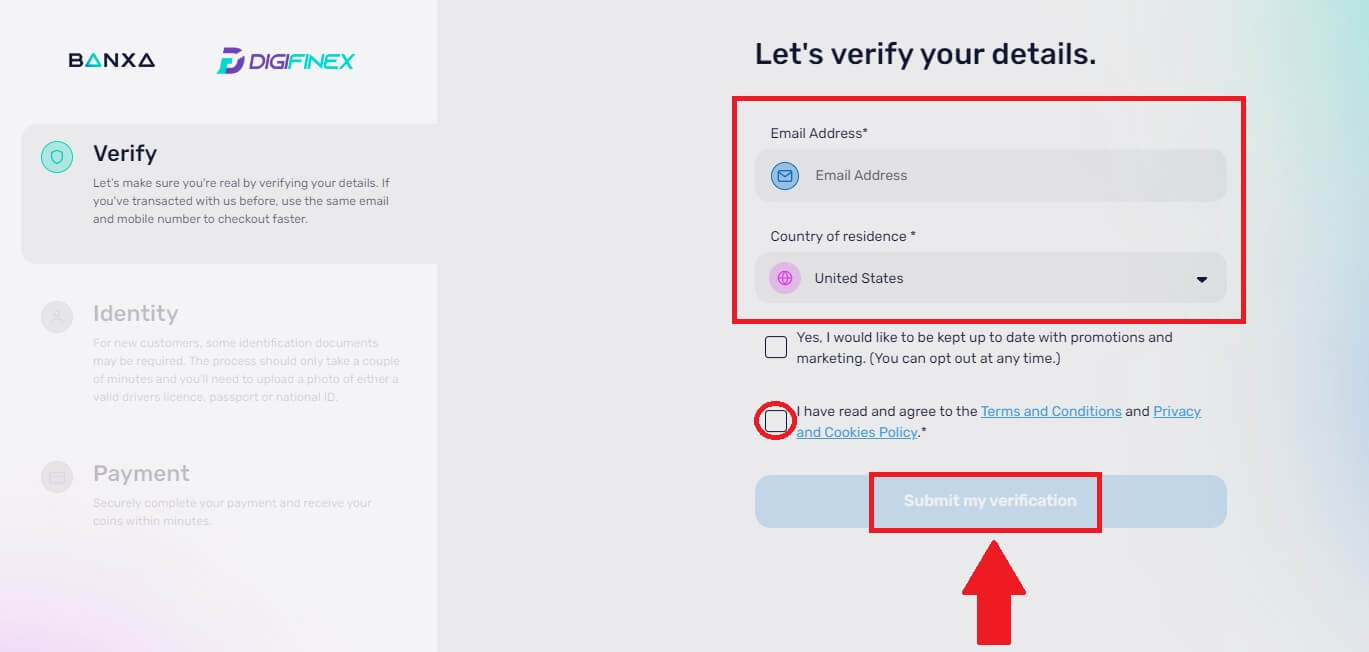
3. Enter the required informations and tick the box then press [Submit my verification].
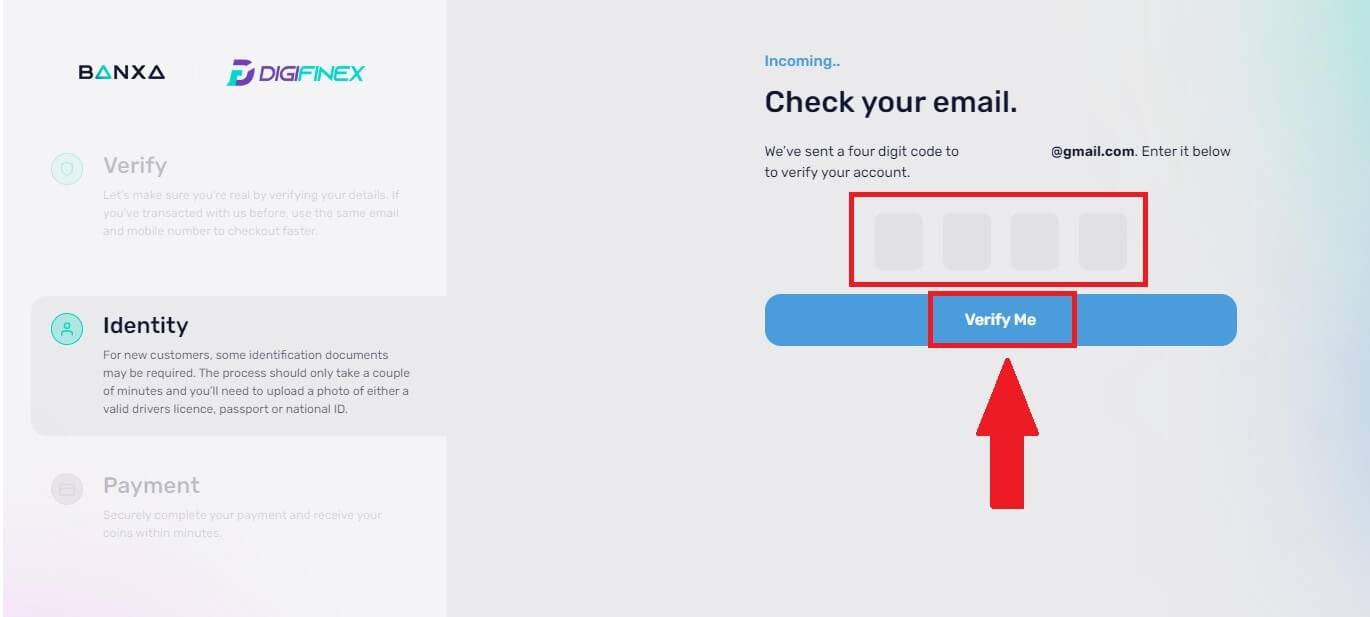
4. Enter the verification code that was sent to your email address and click [Verify Me].
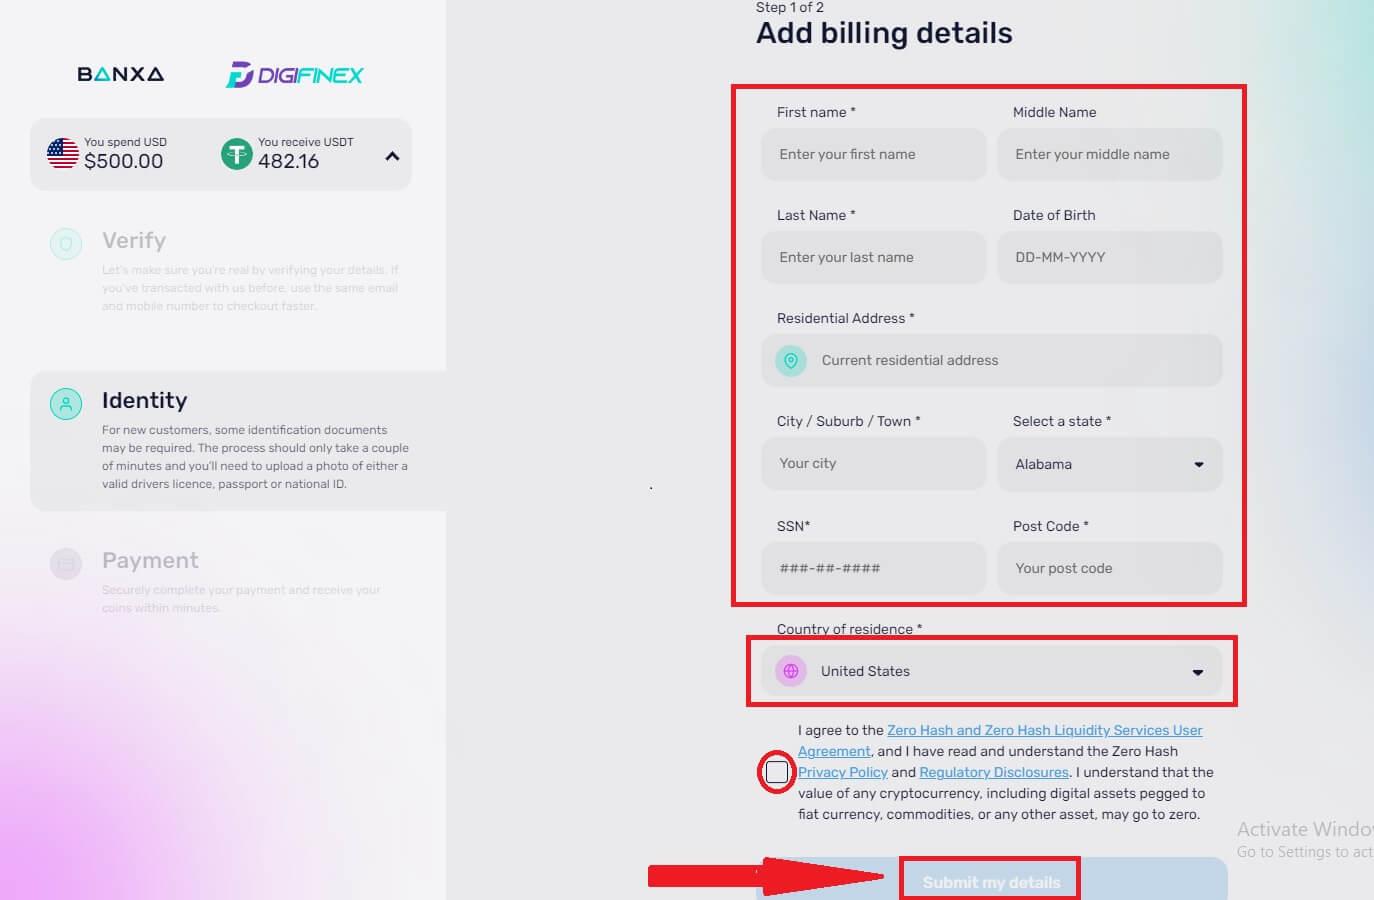
5. Enter your billing details and select your country of residence then tick the box and press [Submit my details].
6. Fill out your credit card or debit card details to continue then you will be redirected to your banks OTP transaction page. Follow the on-screen instructions to verify the payment.
Note: You can only pay with credit cards in your name.
Buy Crypto with Credit/Debit Card on DigiFinex (App)
1. Open your DigiFinex app and tap on [Credit/Debit Card].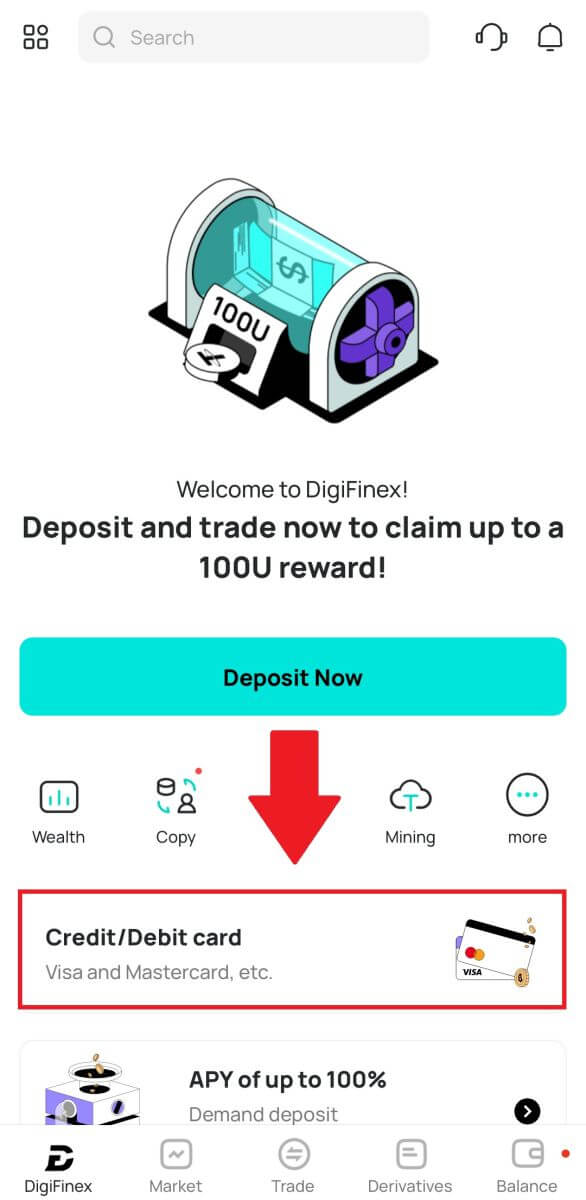
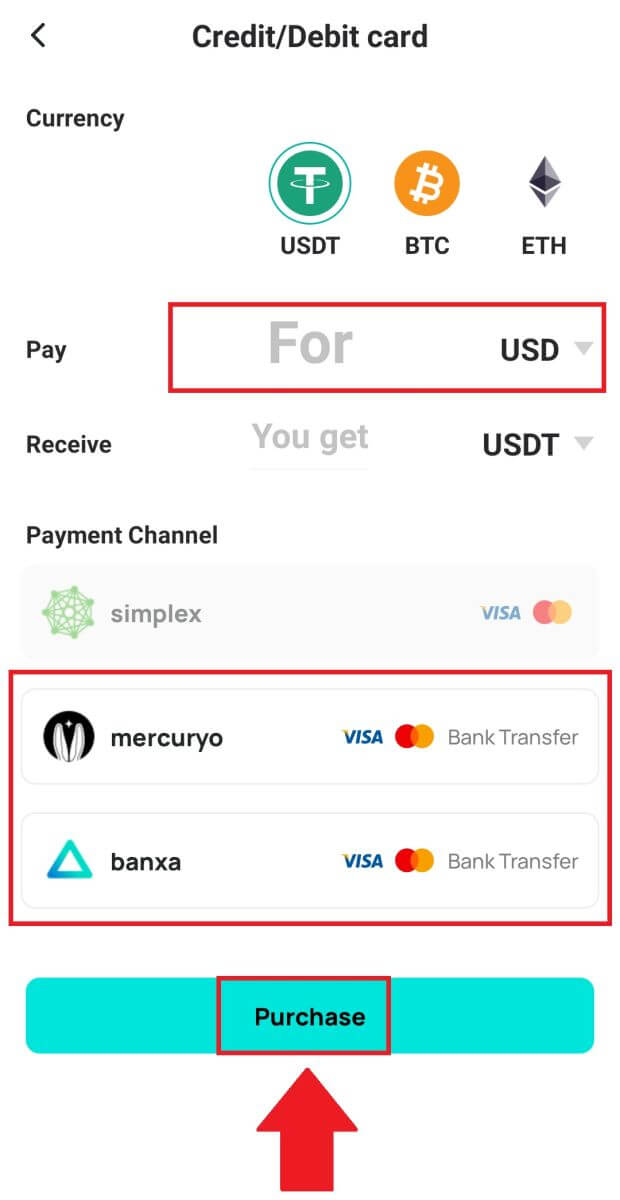
2. Here you can choose to buy crypto with different fiat currencies. Enter the fiat amount you want to spend and the system will automatically display the amount of crypto you can get, select the preferred payment channel and tap [Purchase].
Note: Diffrent payment channel will have diffrent fees for your transactions.
3. Confirm the details of the order. Tick the boxes and press [Confirm].
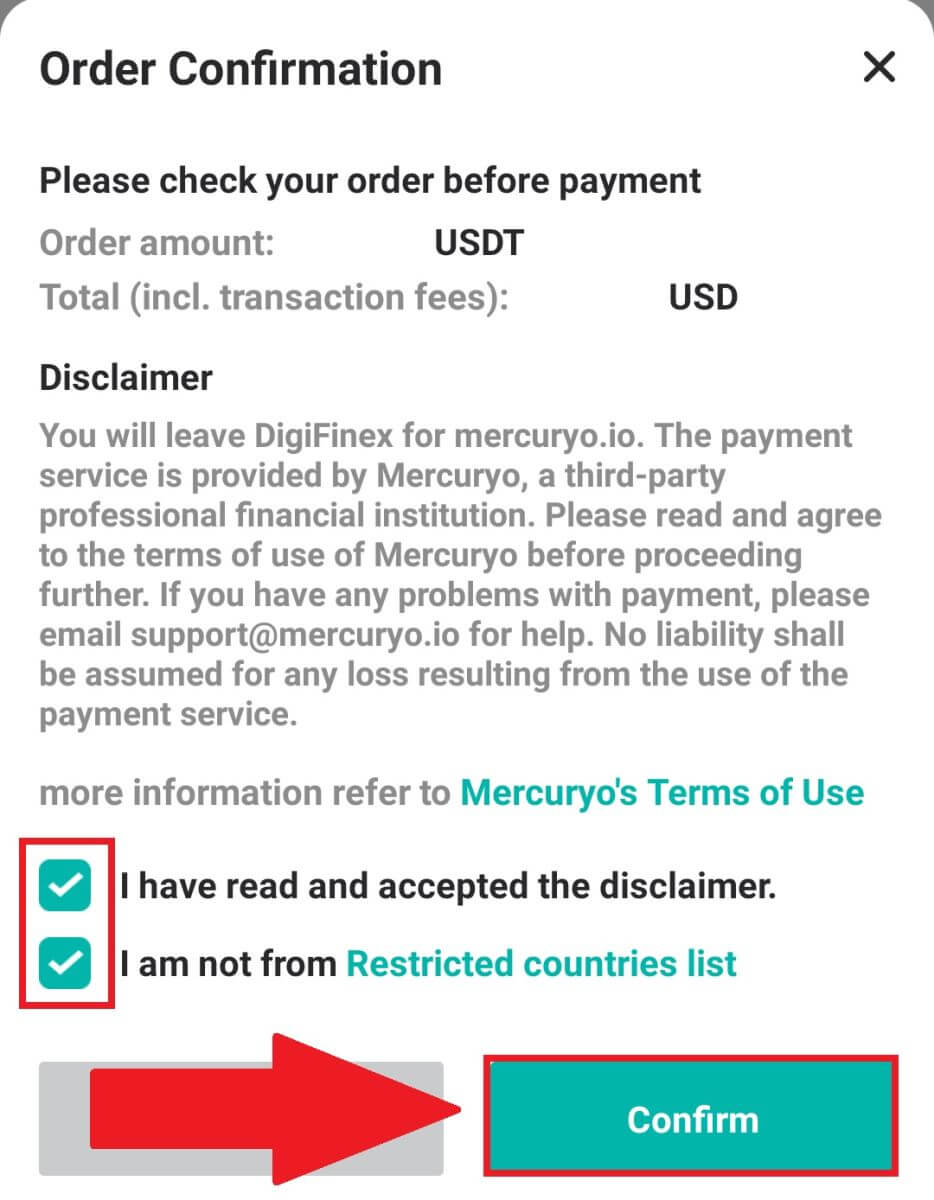
Buy Crypto with mercuryo payment channel (App)
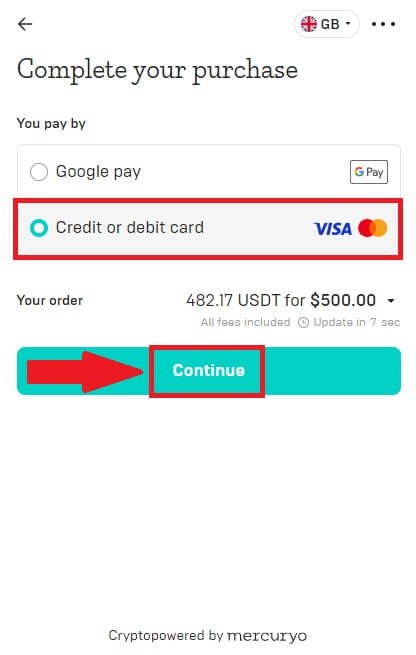
1. Click on [Credit or debit card] then click [Continue]. Then fill out your Email address and click [Continue].
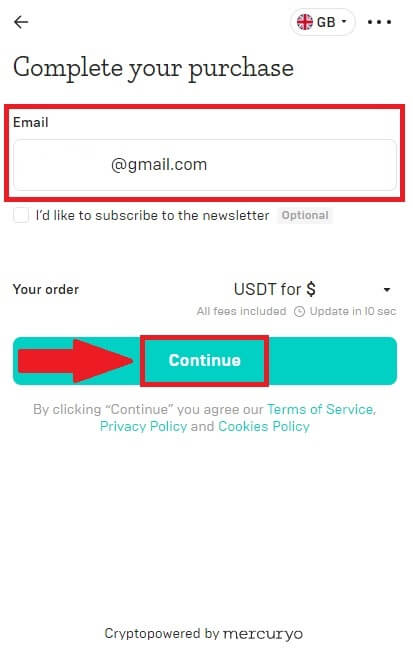
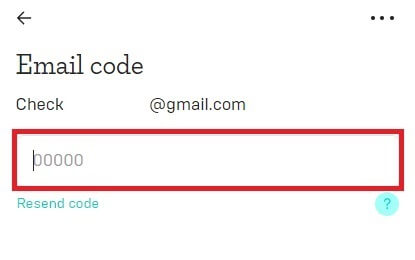
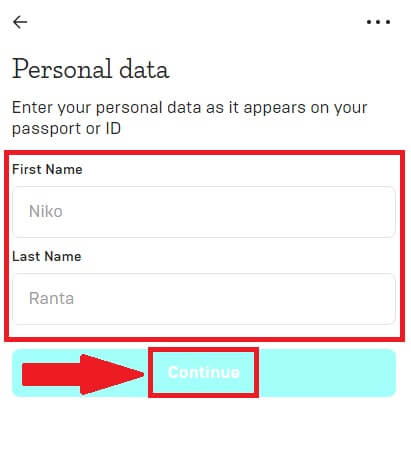
2. Enter the code was sent to your Email address and fill out your personal data and click [Continue] to complete the purchasing process.
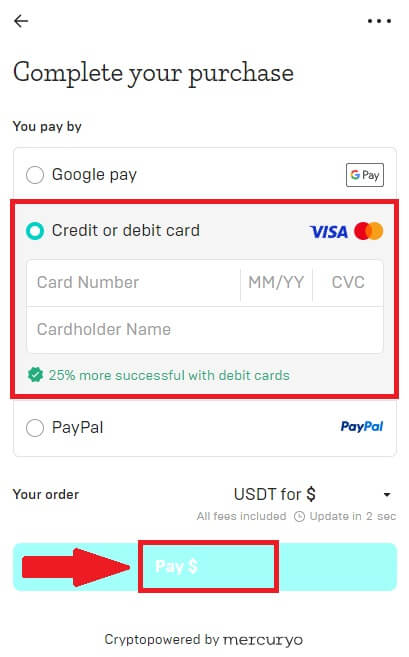
3. Choose [Credit or debit card], then fill out your credit card or debit card details and click [Pay $].
Note: You can only pay with credit cards in your name.
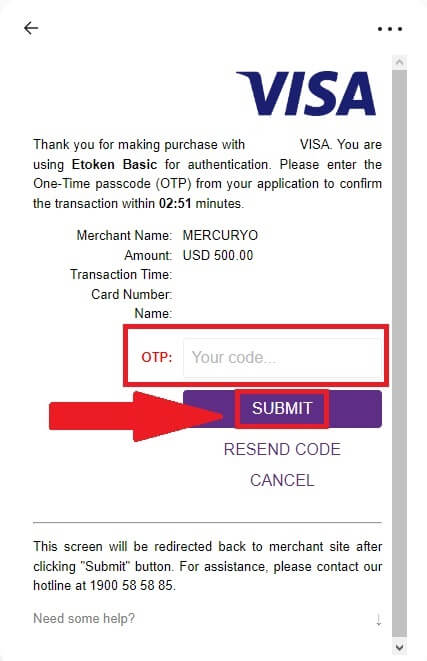
4. You will be redirected to your banks OTP transaction page. Follow the on-screen instructions to verify the payment and finish the transaction.
Buy Crypto with banxa payment channel (App)
1. Choose [banxa] payment method and click [Buy].
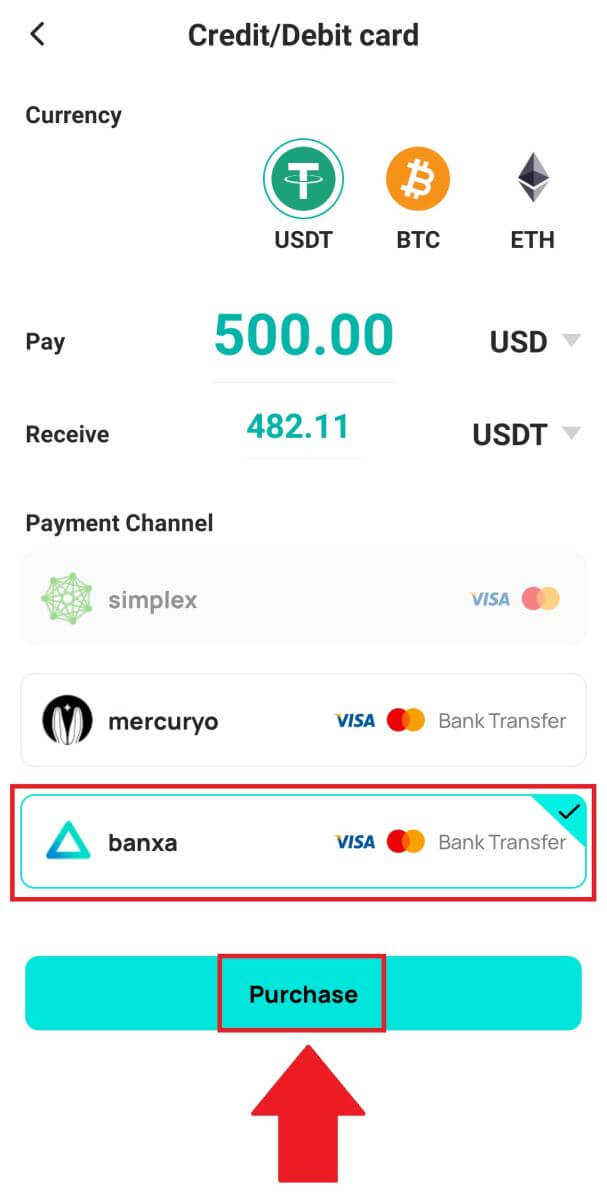
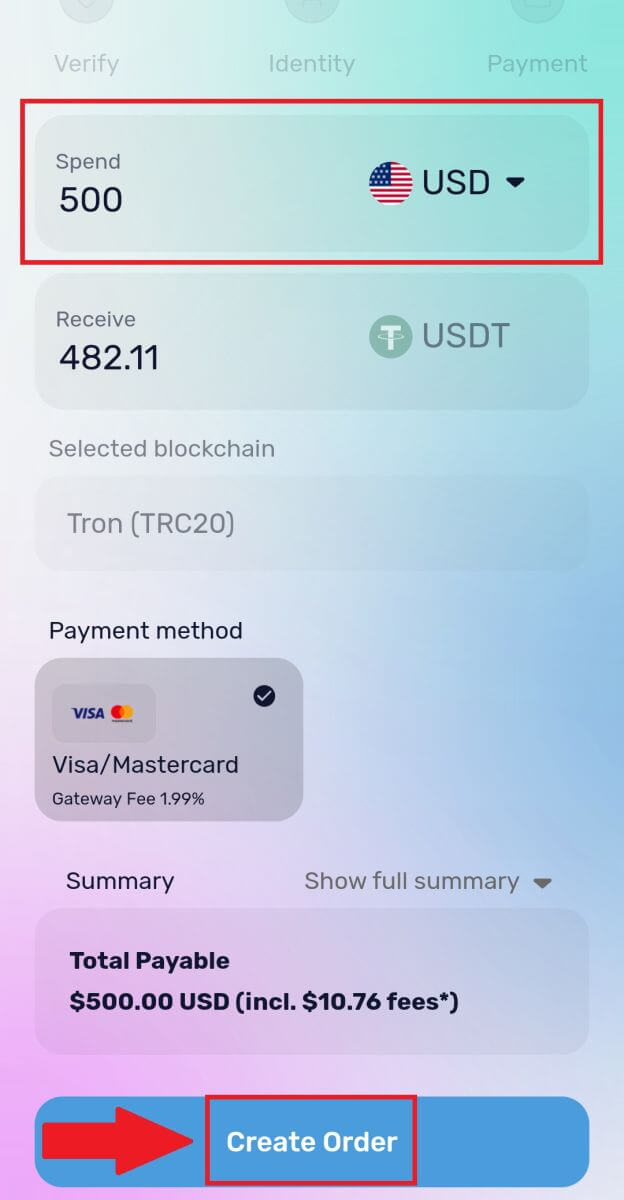
2. Enter the fiat currency and amount you want to spend and the system will automatically display the amount of crypto you can get, and click [Create Order].
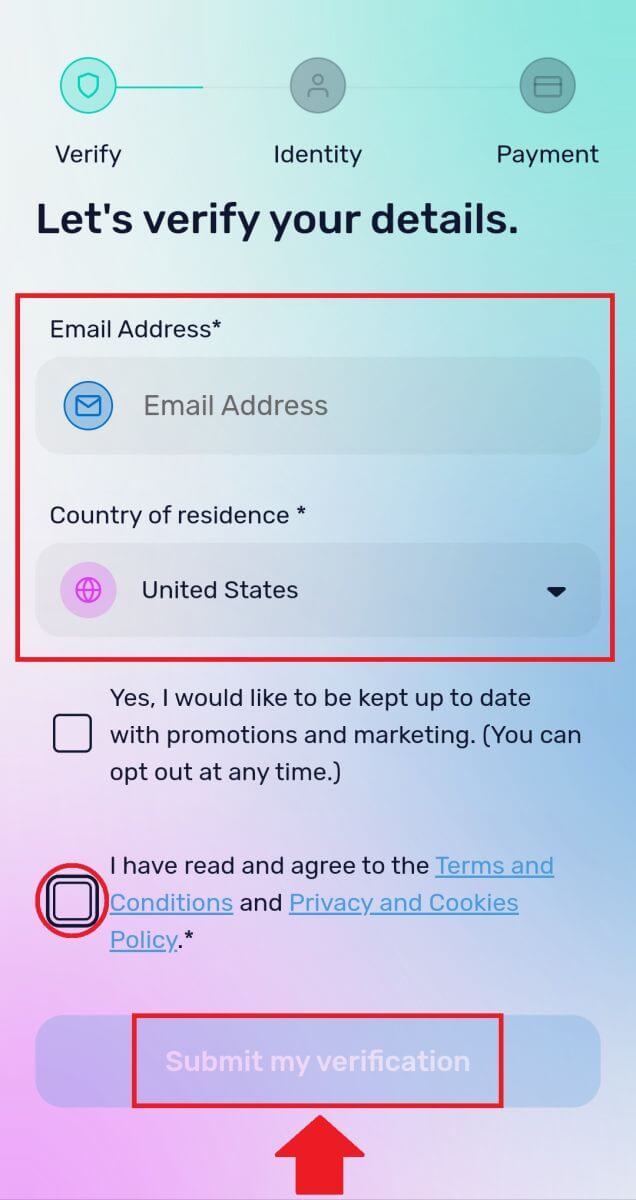
3. Enter the required informations and tick the box then press [Submit my verification].
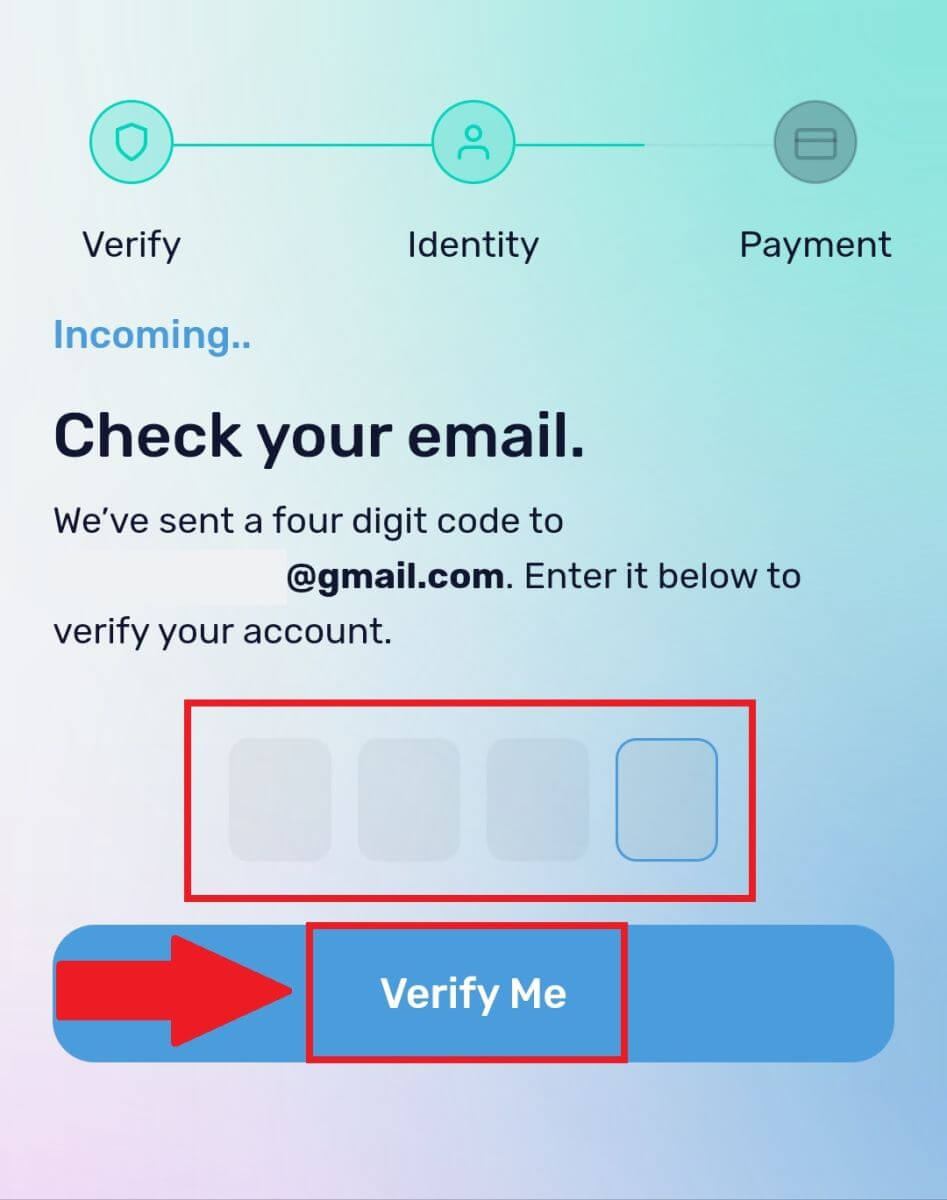
4. Enter the verification code that was sent to your email address and click [Verify Me].
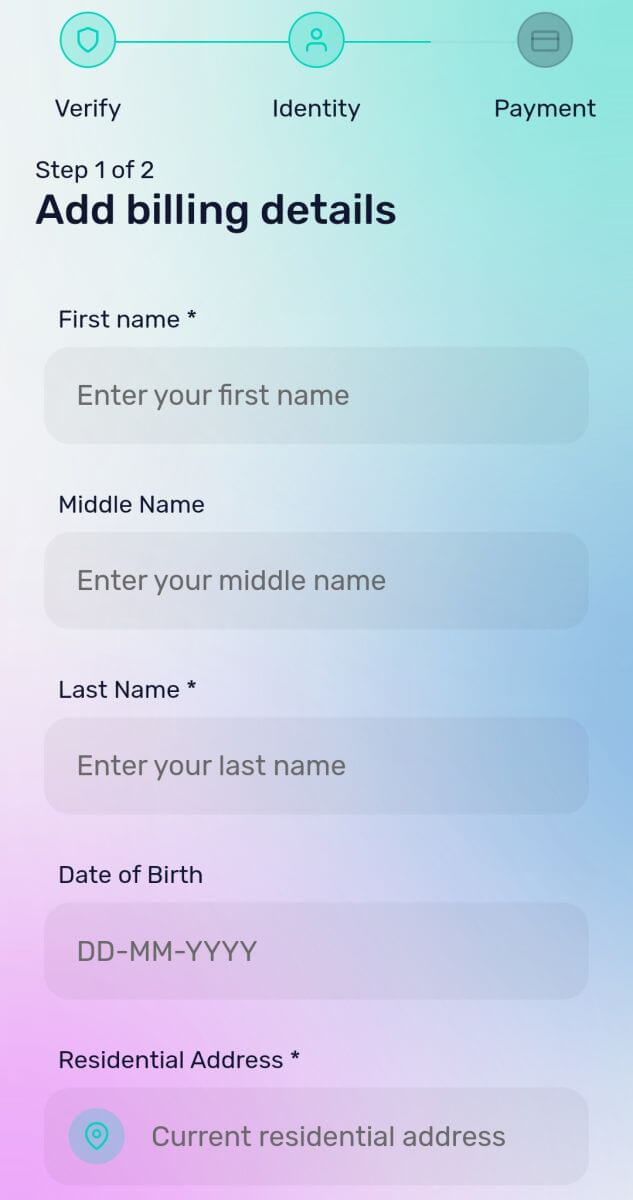
5. Enter your billing details and select your country of residence then tick the box and press [Submit my details].
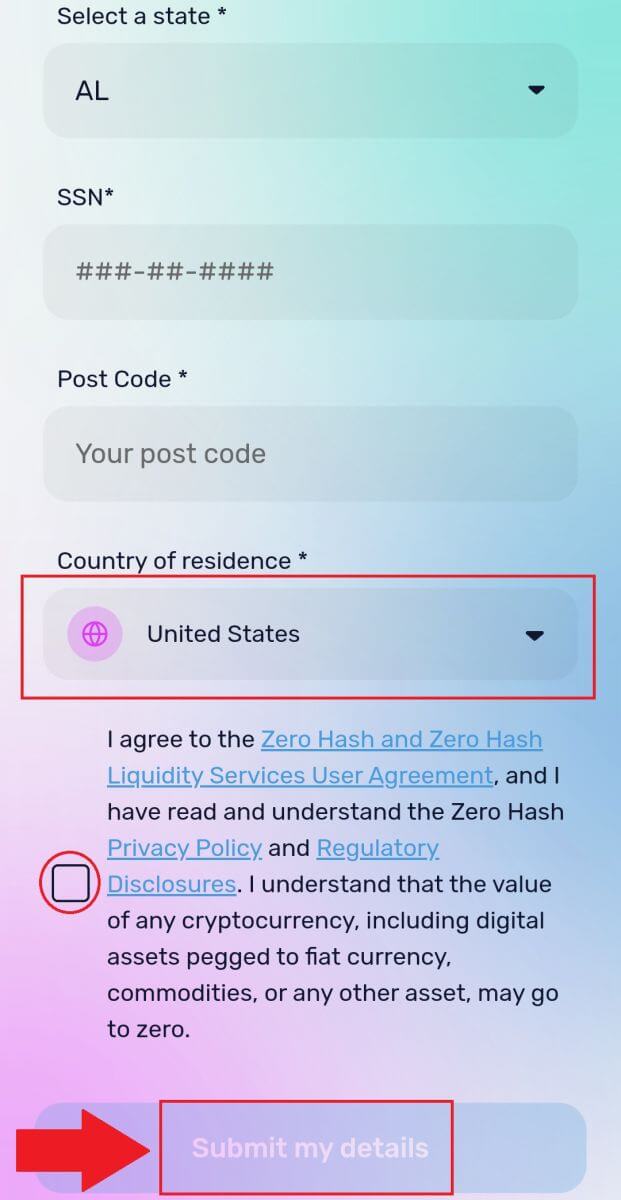
6. Fill out your credit card or debit card details to continue then you will be redirected to your banks OTP transaction page. Follow the on-screen instructions to verify the payment.
Note: You can only pay with credit cards in your name.
How to Buy Crypto on DigiFinex P2P
Buy Crypto on DigiFinex P2P (Web)
1. Go to the DigiFinex website and click on [Buy Crypto] and then click on [Block-trade OTC].
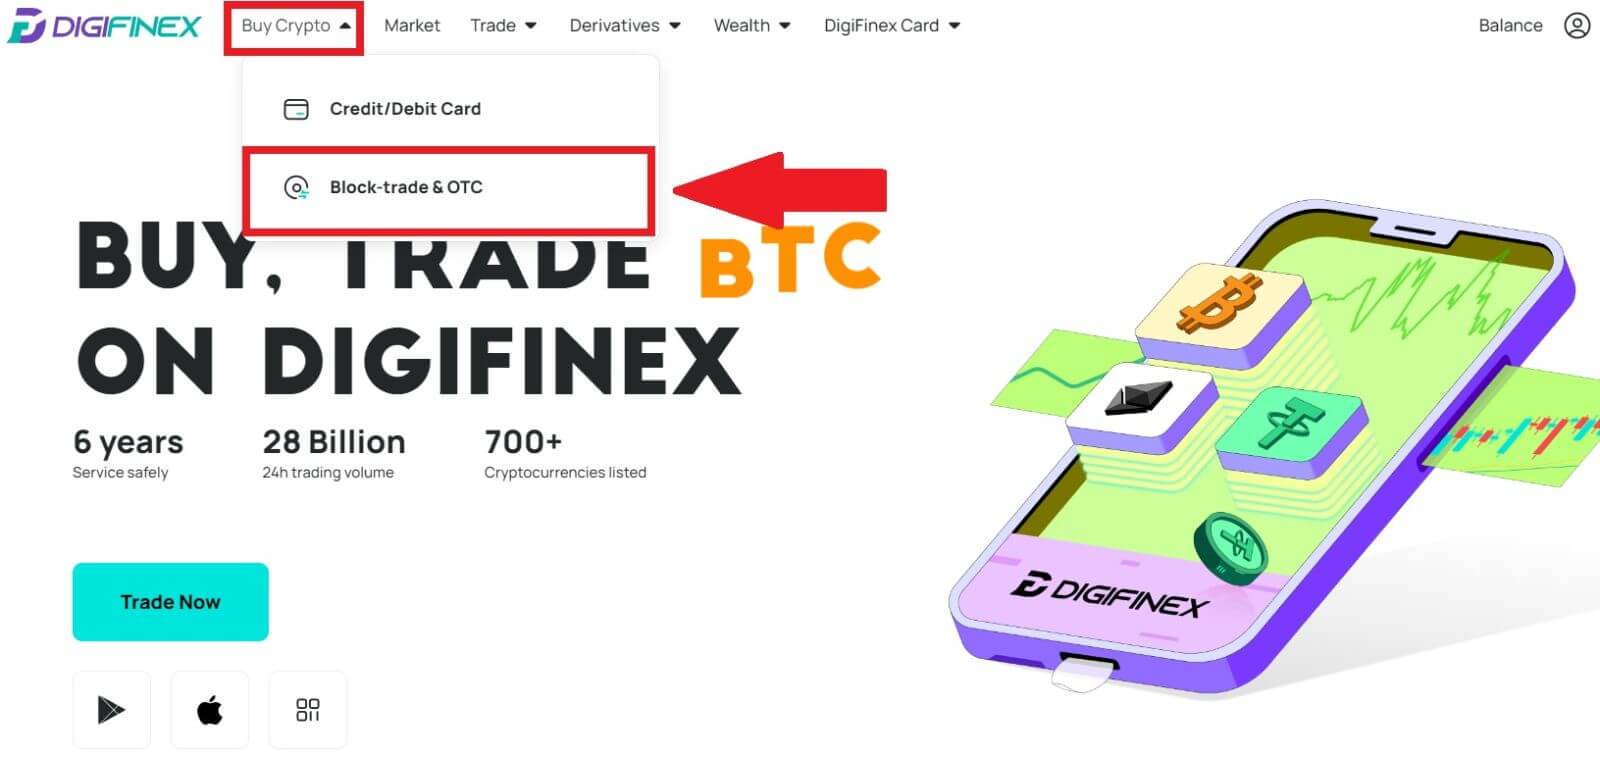
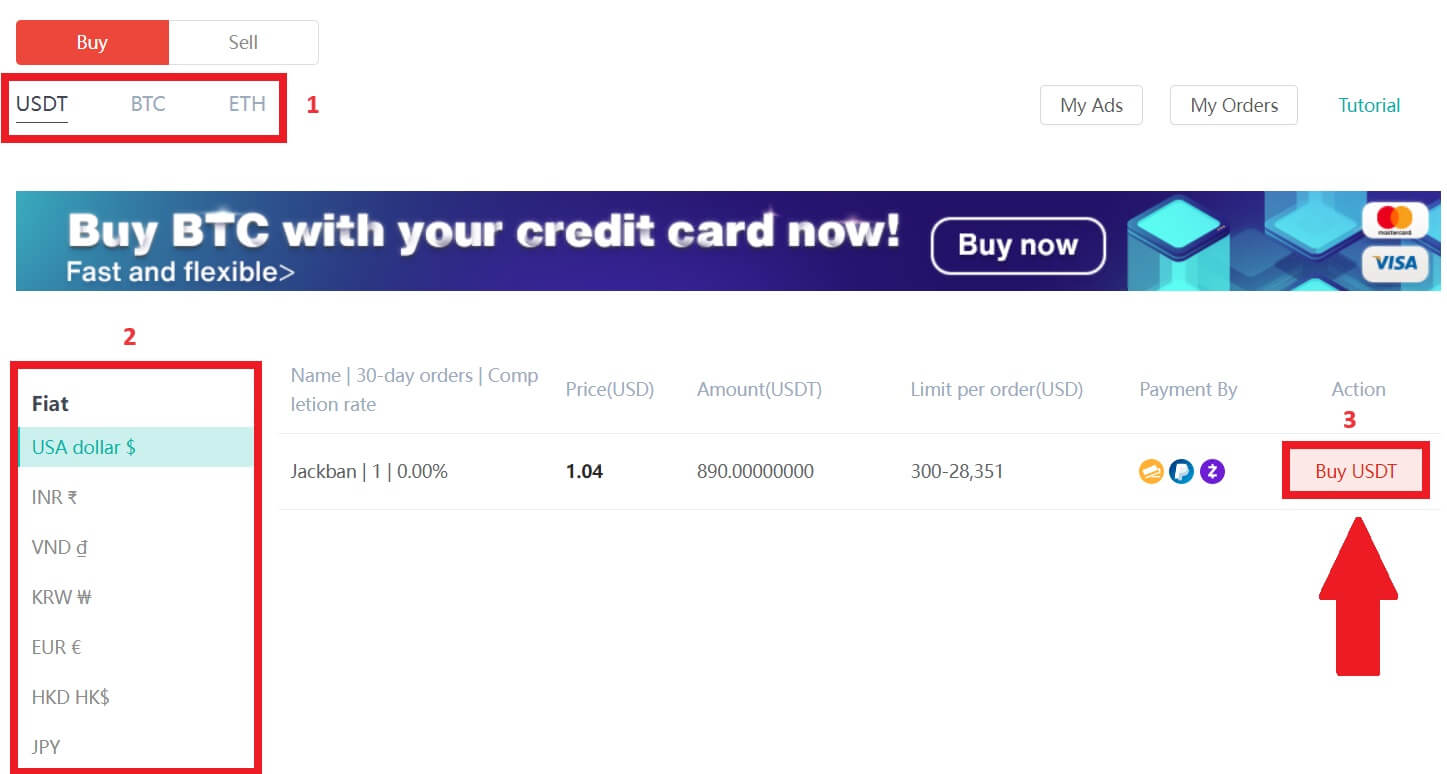
2. After reaching the OTC trade page, follow the steps below.
-
Choose the type of cryptocurrency.
-
Select the fiat currency.
-
Press [Buy USDT] to purchase the chosen cryptocurrency. (In this case, USDT is used as an example).
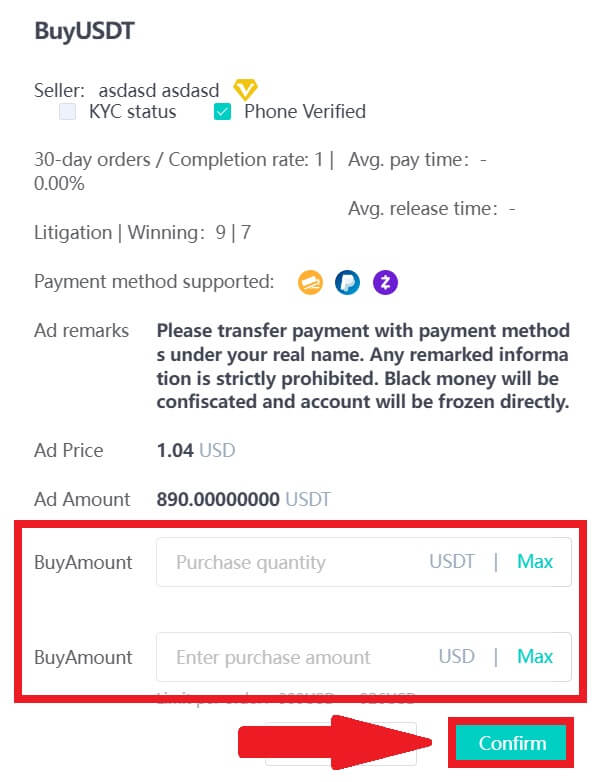
3. Enter the purchase amount, and the system will automatically calculate the corresponding fiat money amount for you, then click [Confirm].
Note: Each transaction must be equal to or exceed the minimum [Order Limit] specified by the businesses.
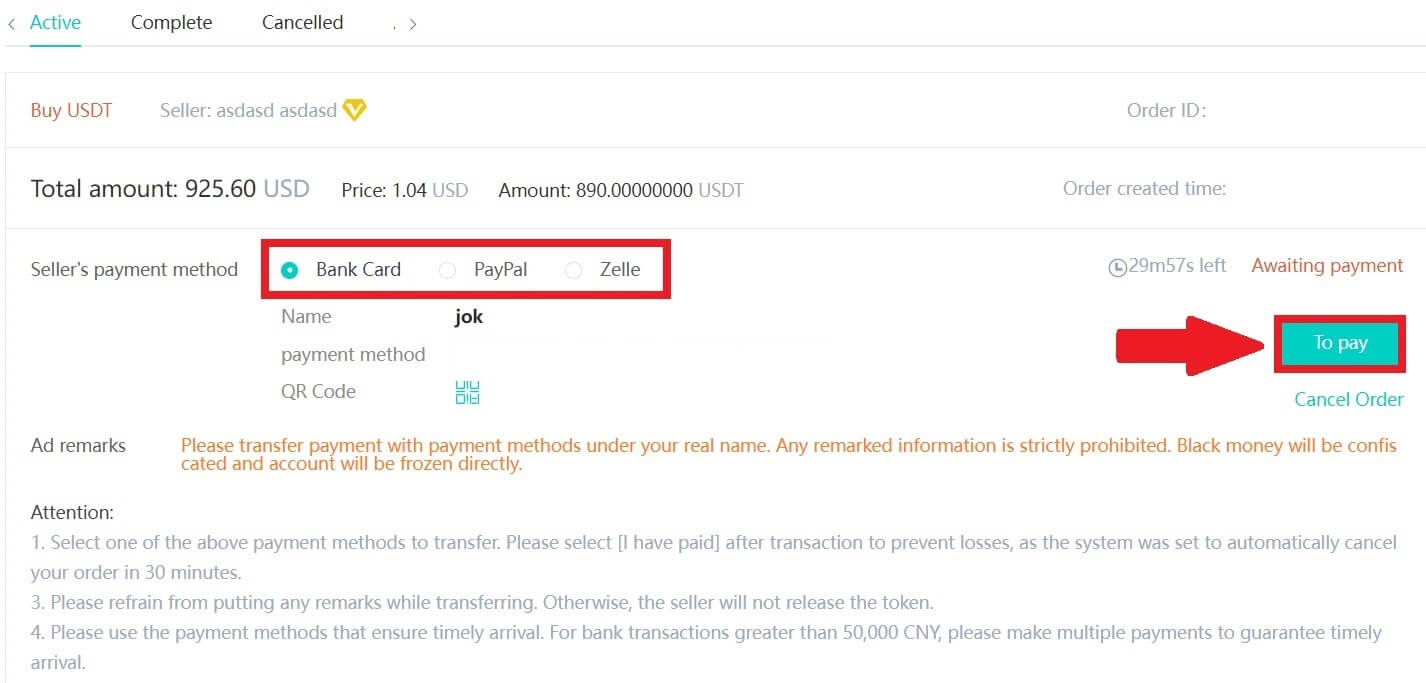
4. Select one of the three payment methods below and click [To pay].
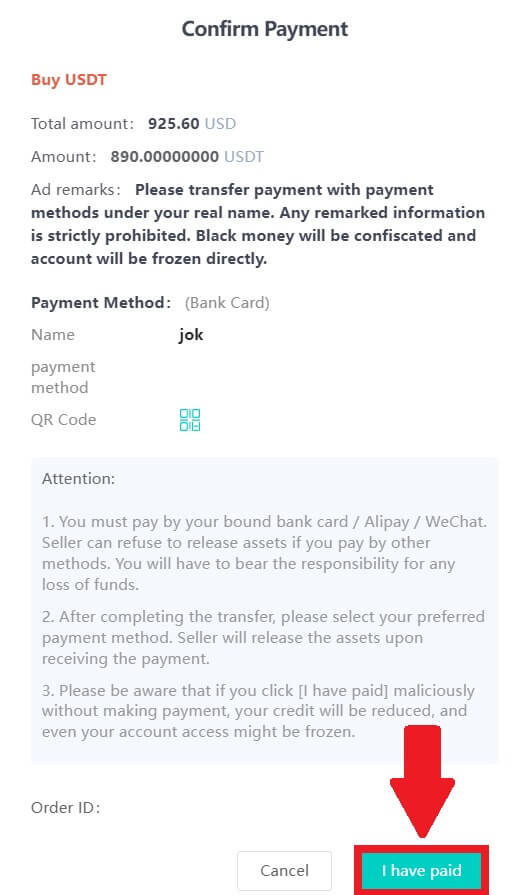
5. Confirm the payment method and amount (total price) on the Order Details page and then click on [I have paid].
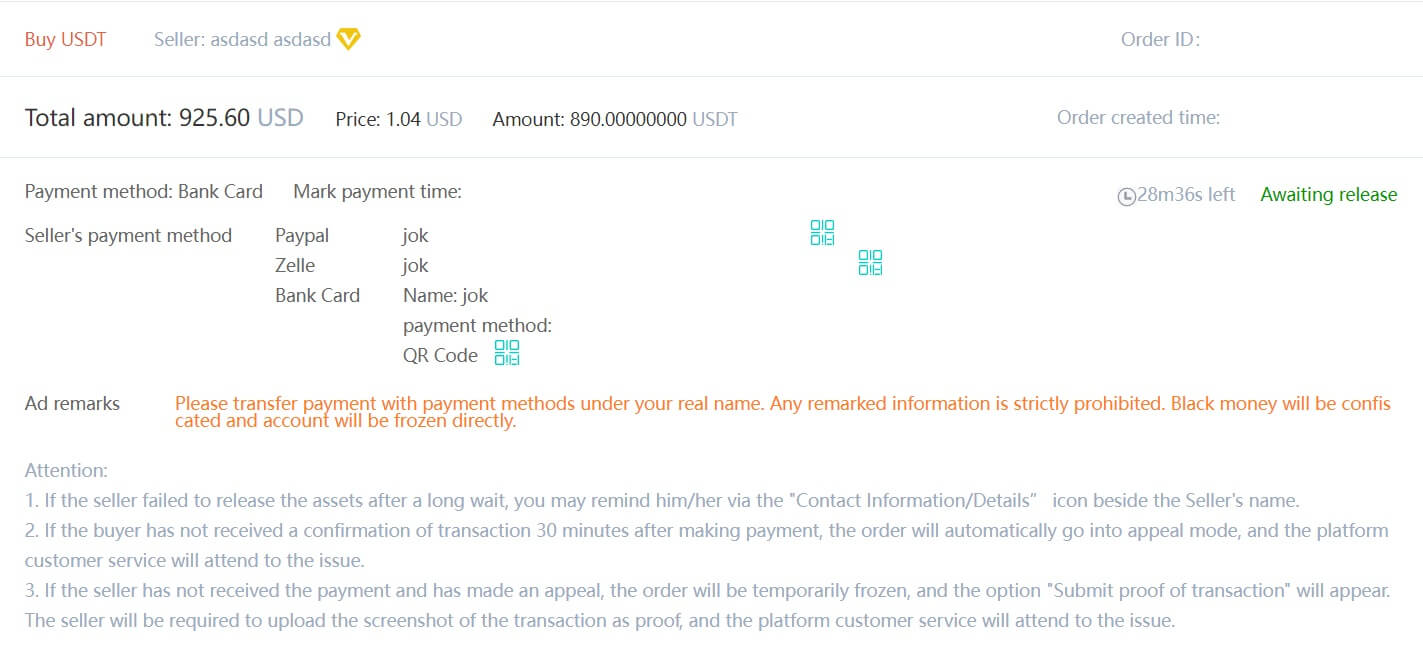
6. Wait for the seller to release the cryptocurrency, and the transaction will be completed.
Transfer assets from the OTC account to the spot account
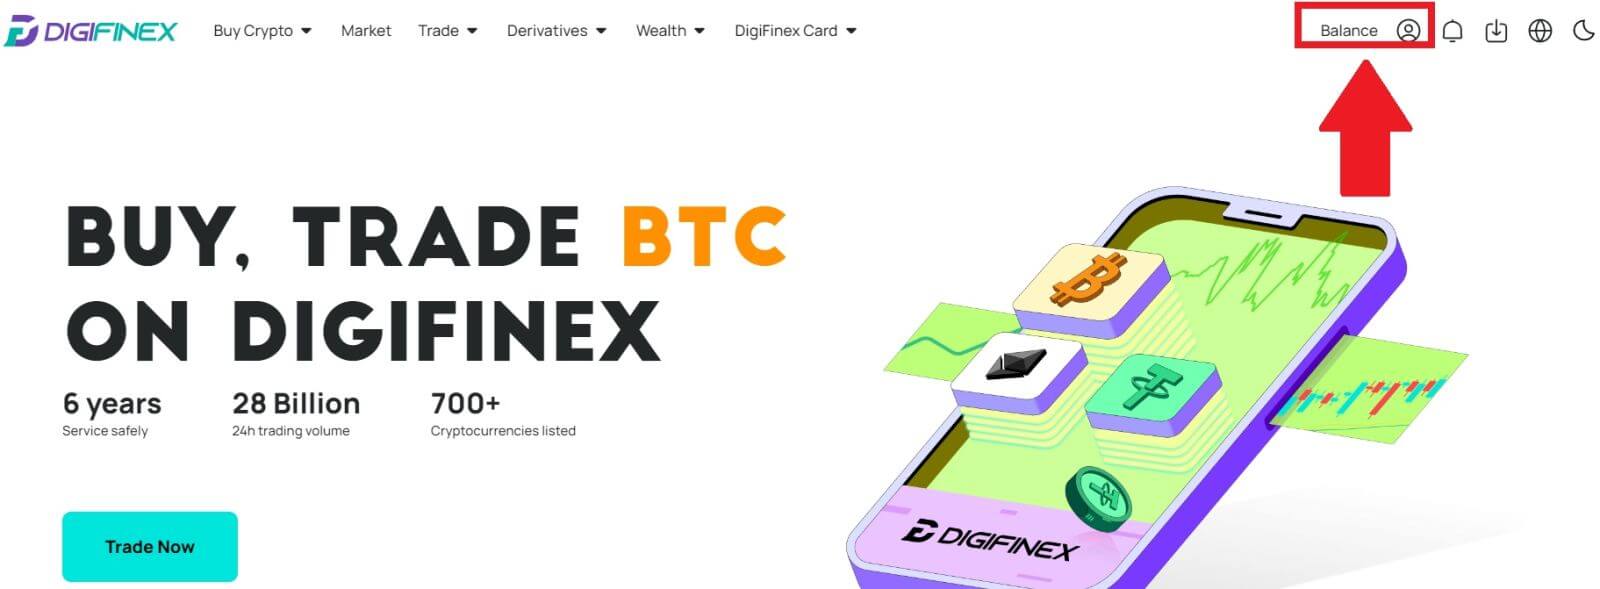
1. Go to the DigiFinex website and click on [Balance].
2. Click on [OTC] and select the desired OTC account and click on [Tranfer].
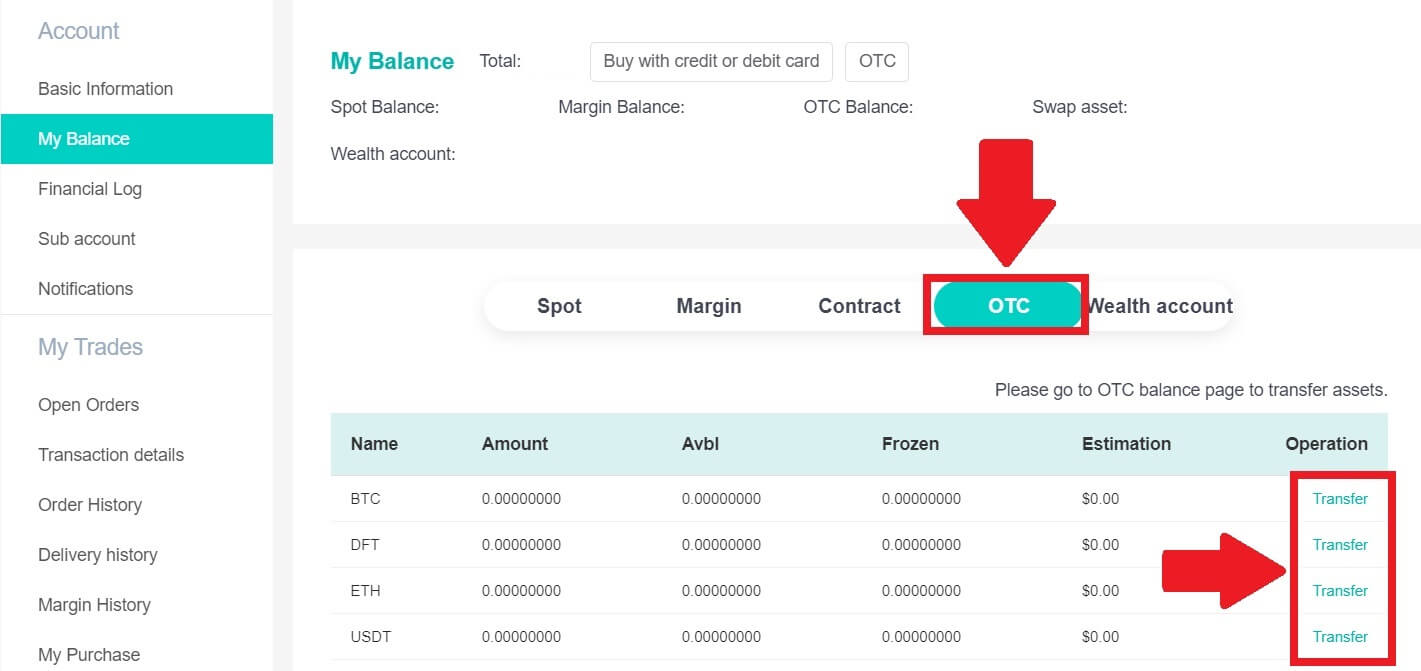
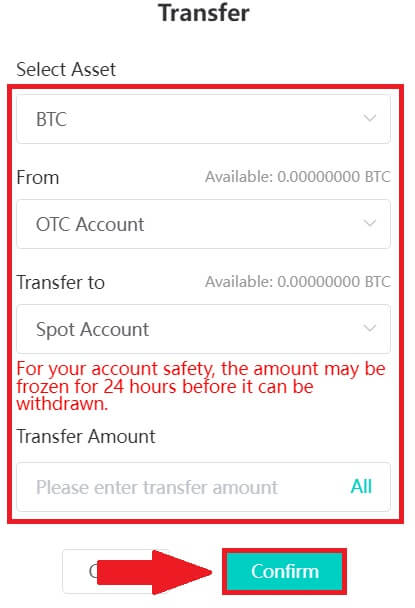
3. Choose the currency type and proceed to the next steps:
- Select From [OTC account] Tranfer to [Spot account].
- Enter the transfer amount.
- Click on [Confirm].
Buy Crypto on DigiFinex P2P (App)
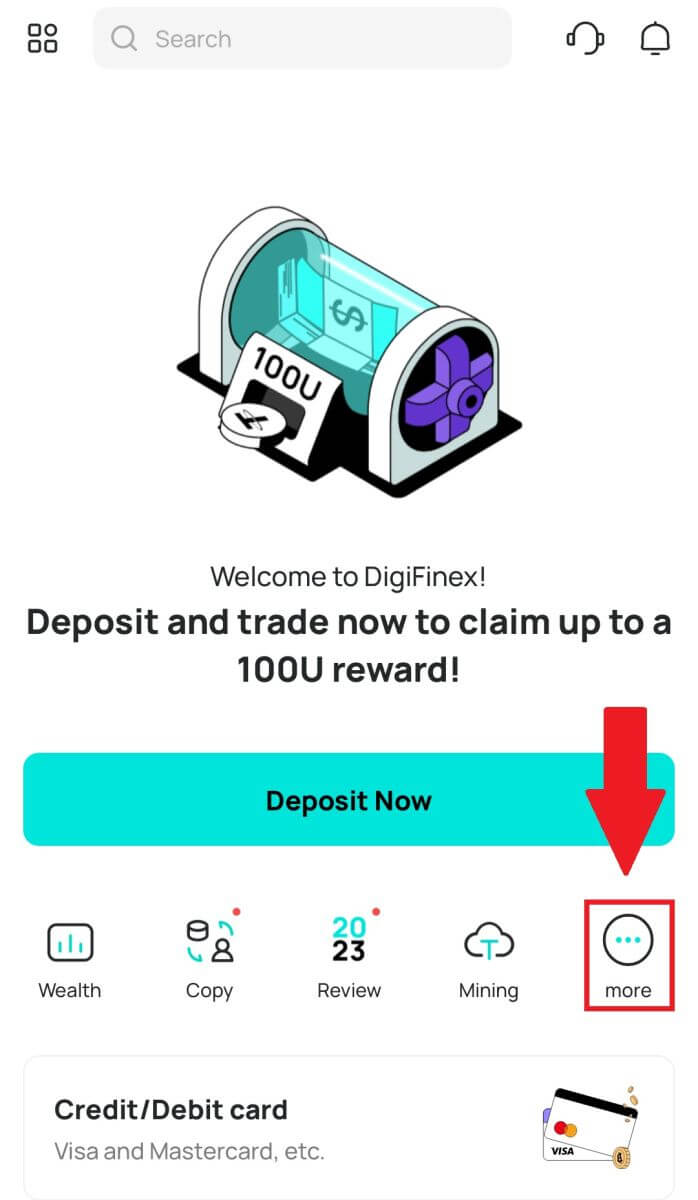
1. Open the DigiFinex app and tap on [more].
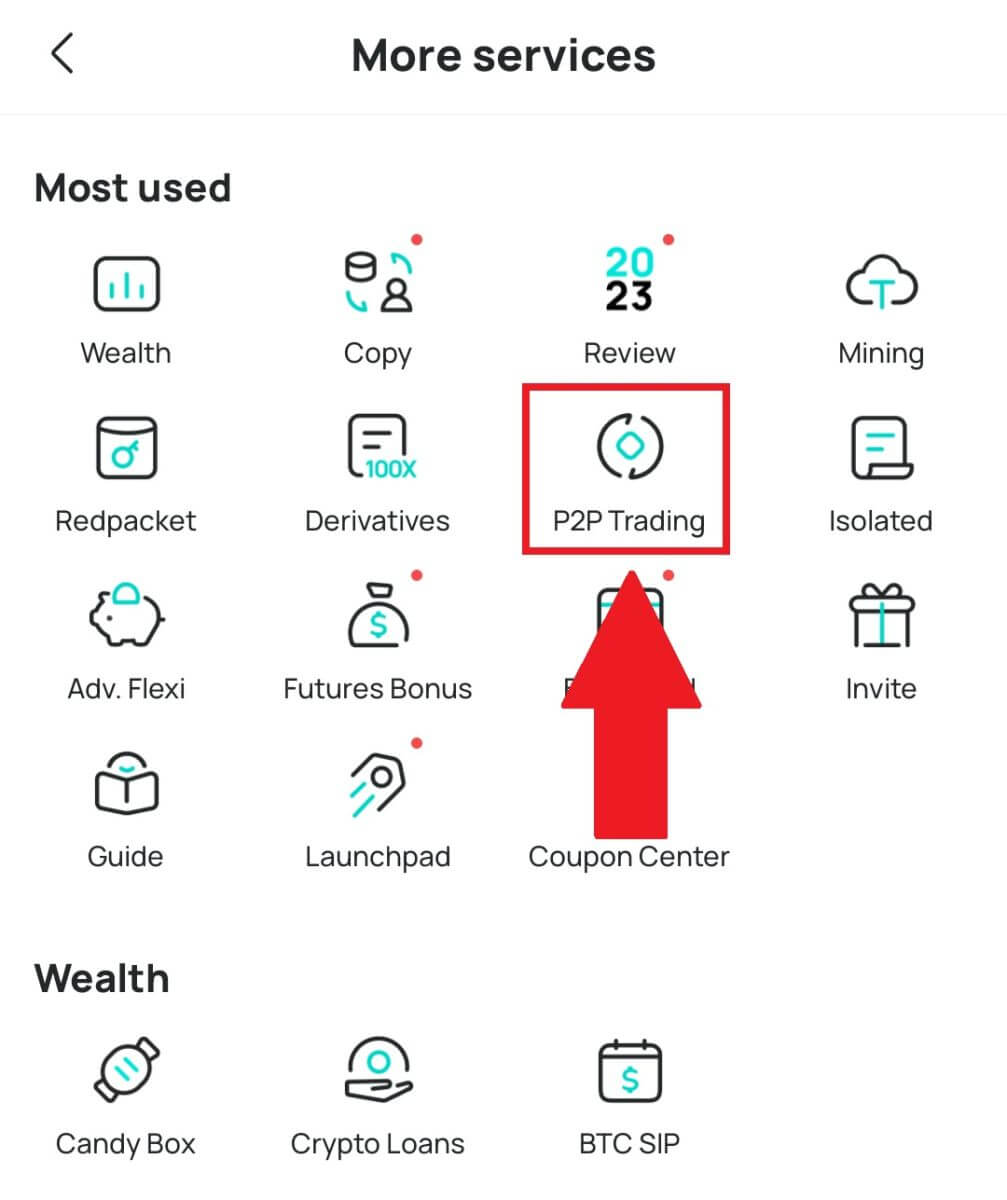
2. Tap on [P2P Trading] to access the OTC trading panel. After reaching the OTC trade panel, follow the steps below.
-
Choose the type of cryptocurrency.
-
Press [Buy] to purchase the chosen cryptocurrency. (In this case, USDT is used as an example).
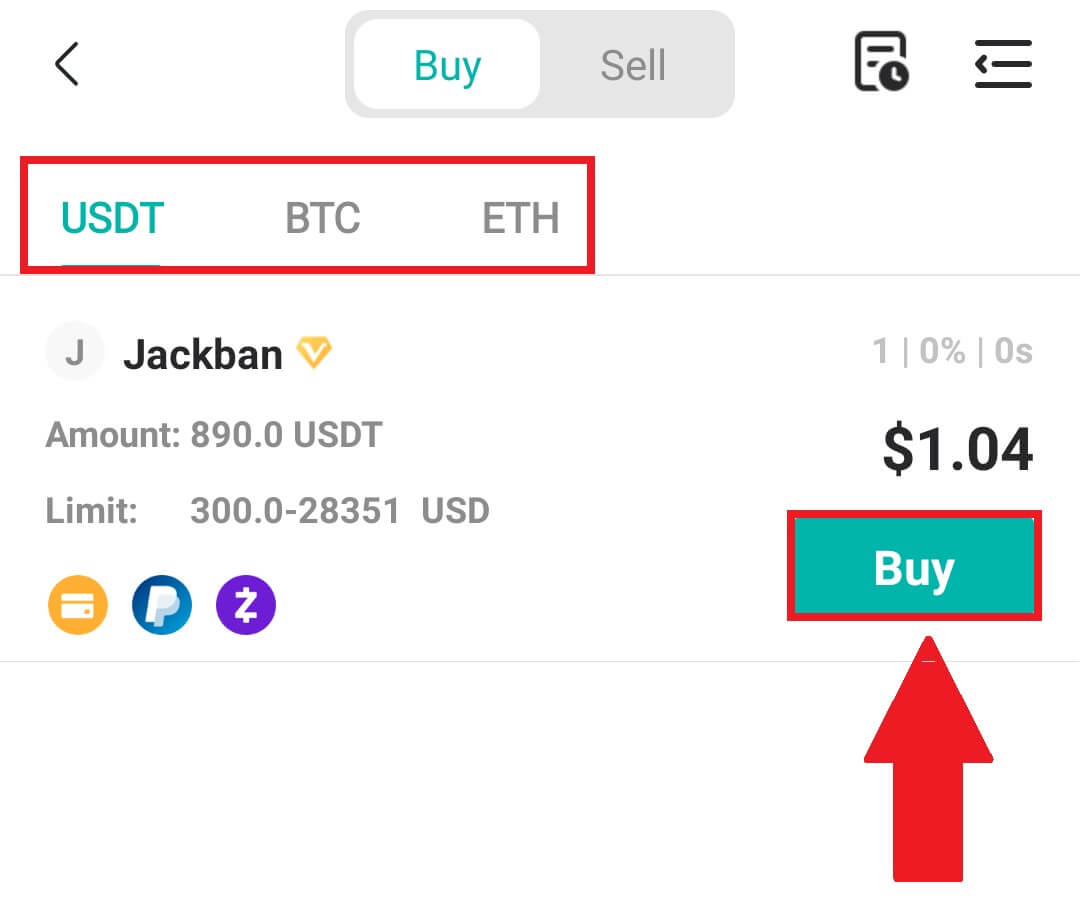
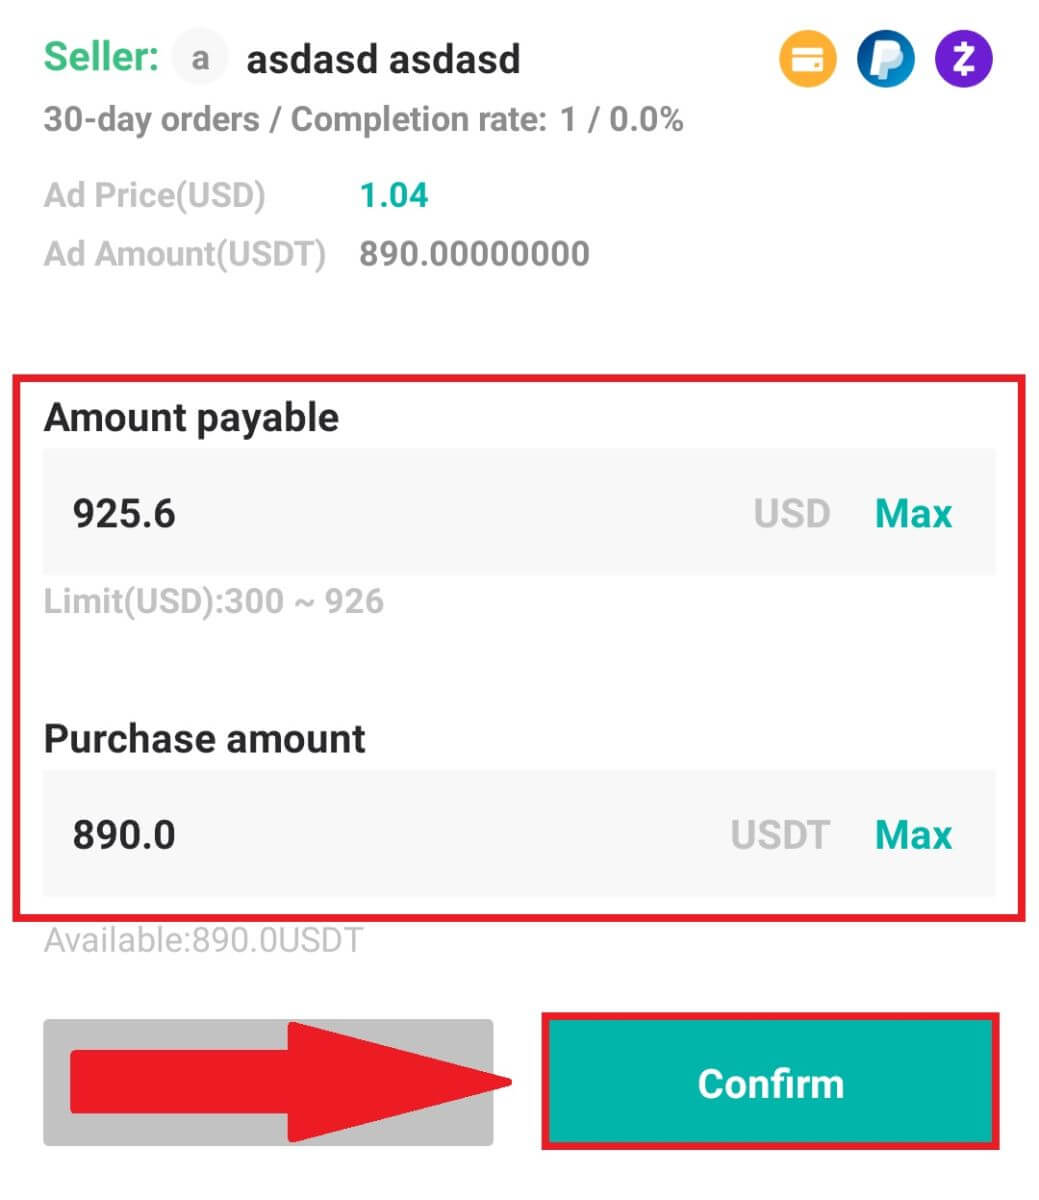
3. Enter the purchase amount, and the system will automatically calculate the corresponding fiat money amount for you, then click [Confirm].
Note: Each transaction must be equal to or exceed the minimum [Order Limit] specified by the businesses.
4. Select payment methods below and click [I have paid].
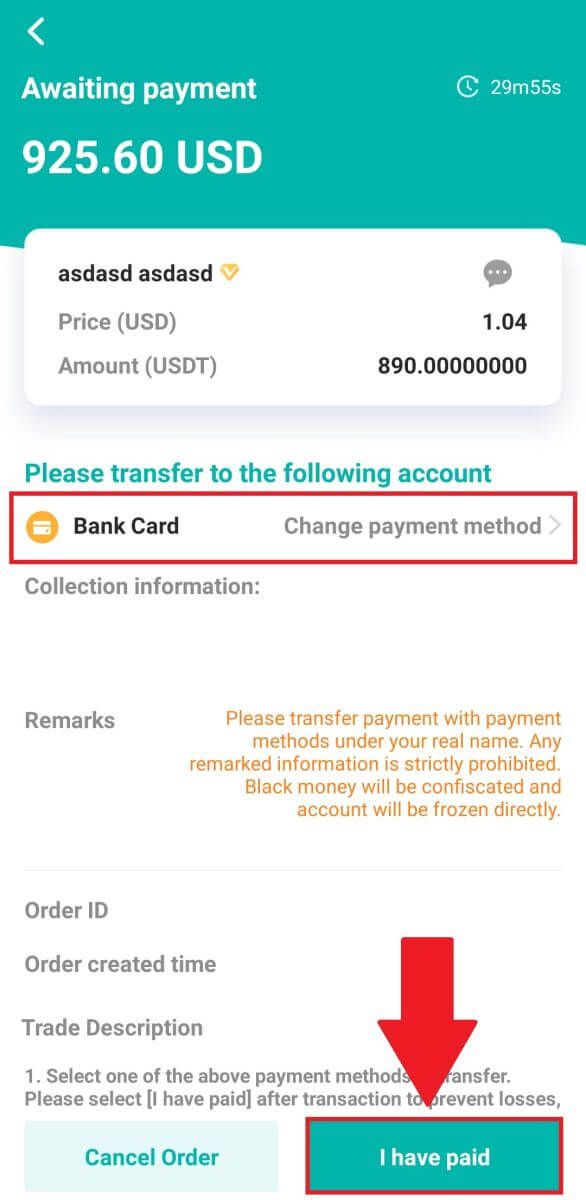
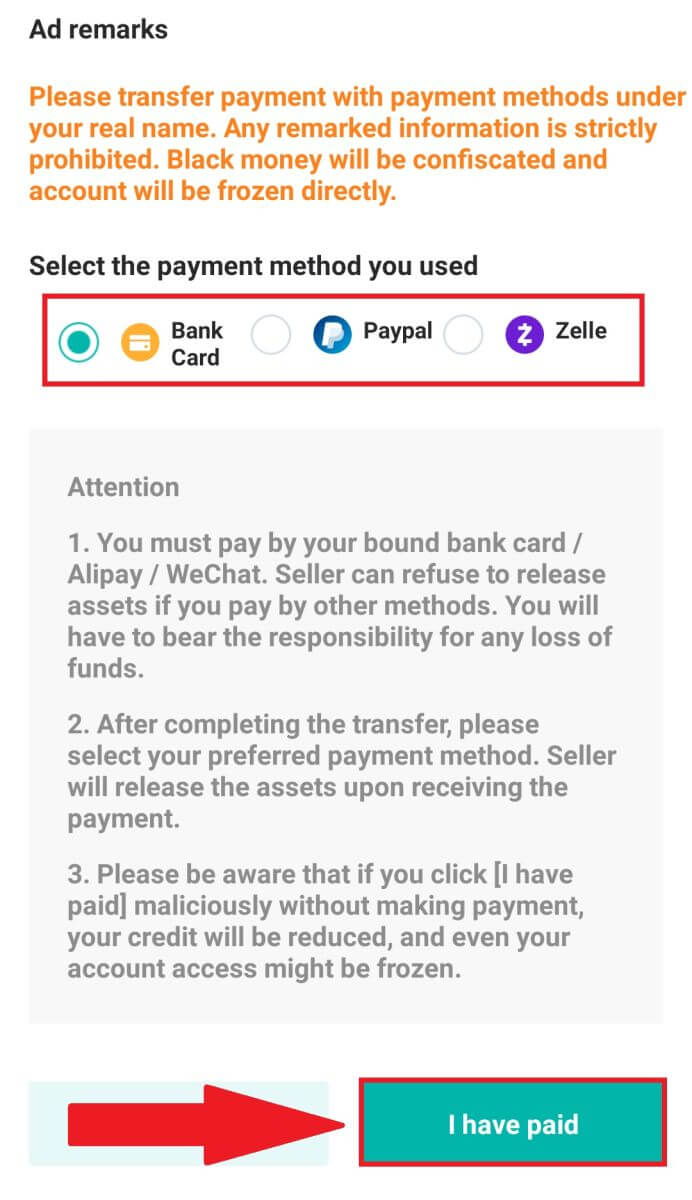
5. Wait for the seller to release the cryptocurrency, and the transaction will be completed.
How to Buy Crypto with Google Pay on DigiFinex
Buy Crypto with Google Pay on DigiFinex (Web)
1. Log in to your DigiFinex account and click [Buy Crypto] - [Credit/Debit Card].
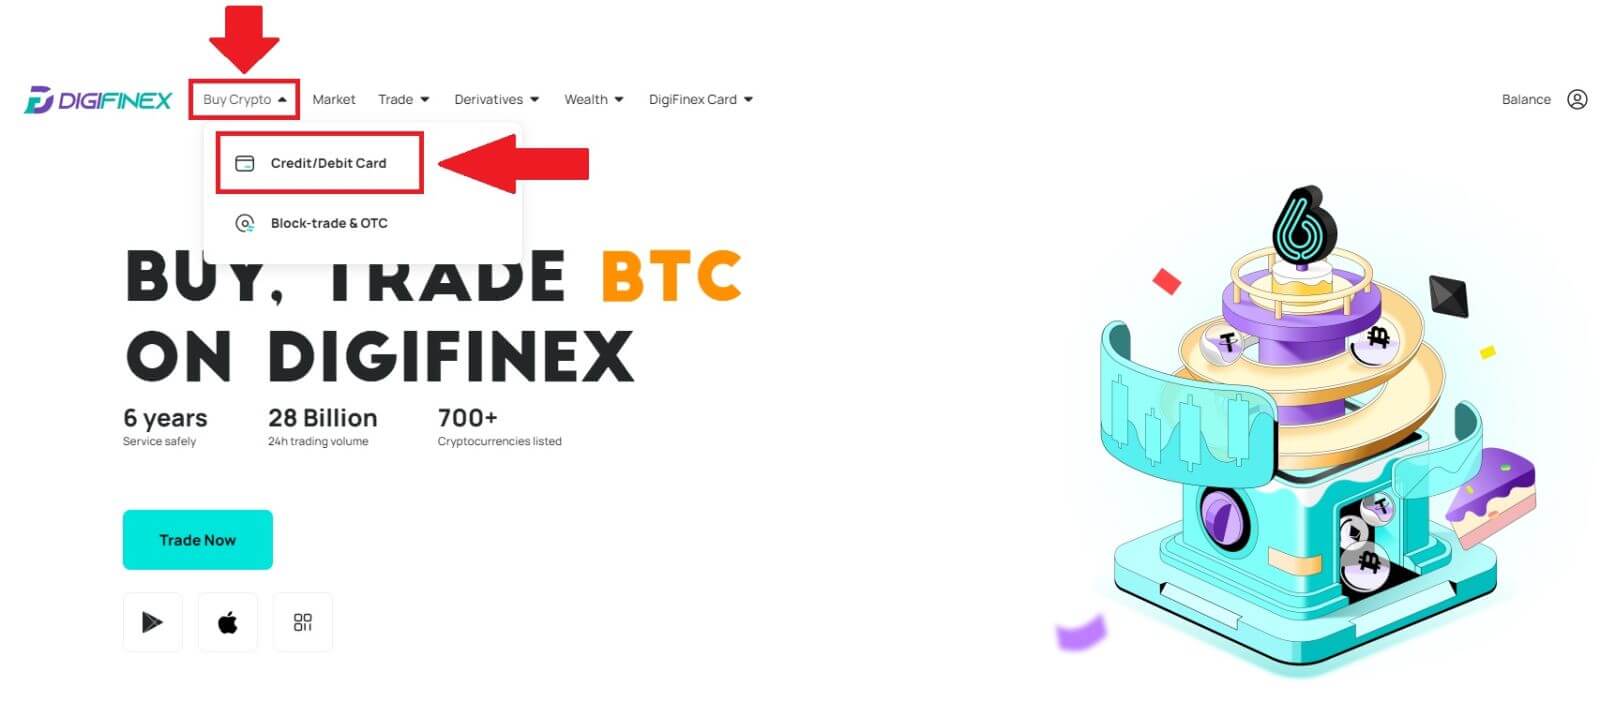
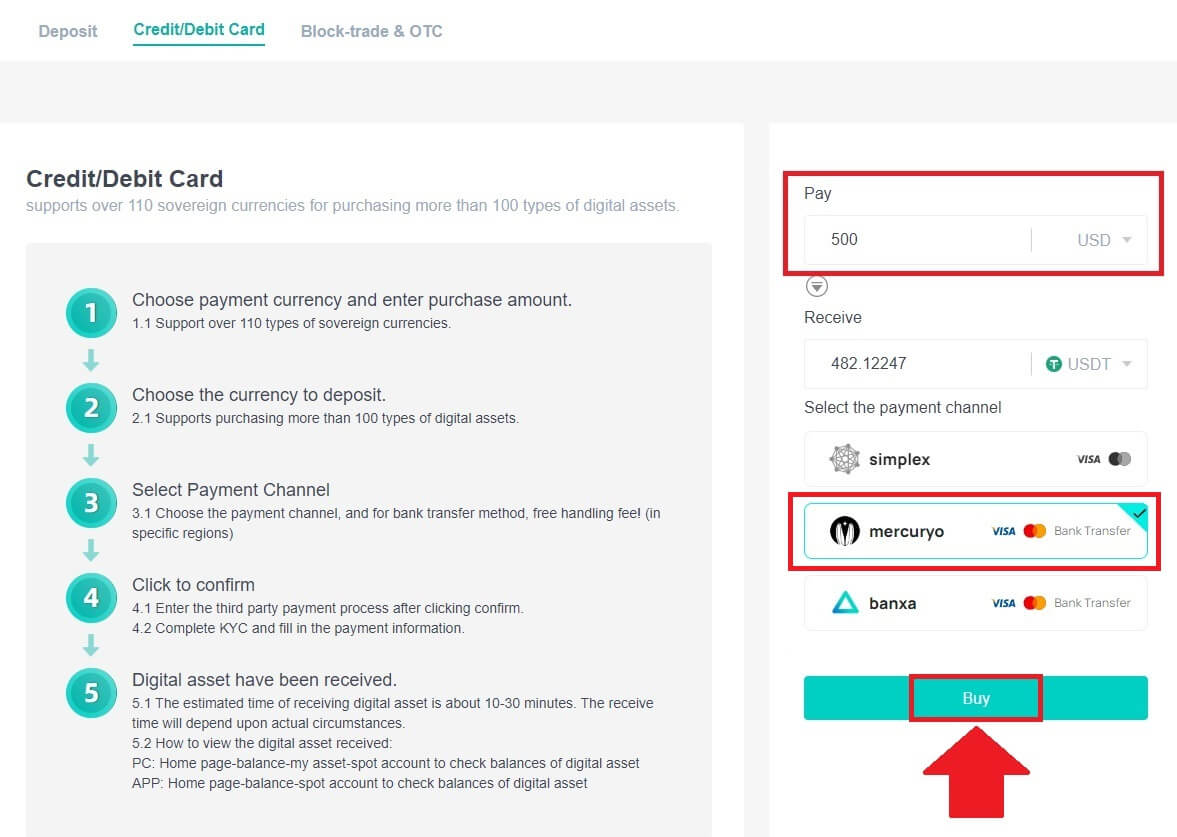
2. Here you can choose to buy crypto with different fiat currencies. Enter the fiat amount you want to spend and the system will automatically display the amount of crypto you can get, select the [mercuryo] payment channel and click [Buy].
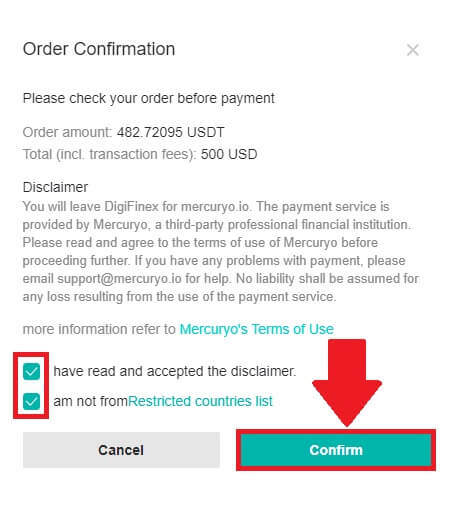
3. Confirm the details of the order. Tick the boxes and press [Confirm].
4. Choose [Google pay] option and press [Buy with Google Pay].
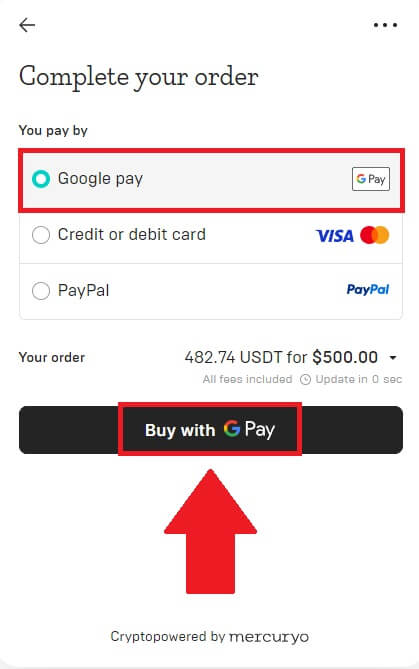
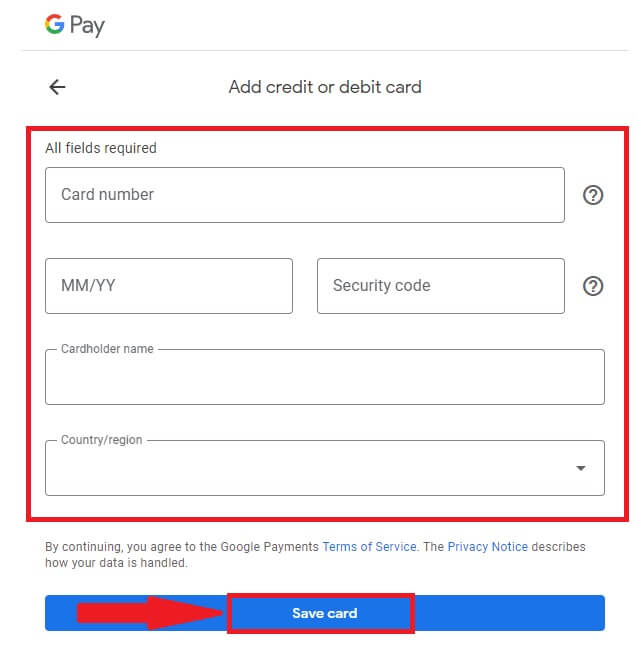
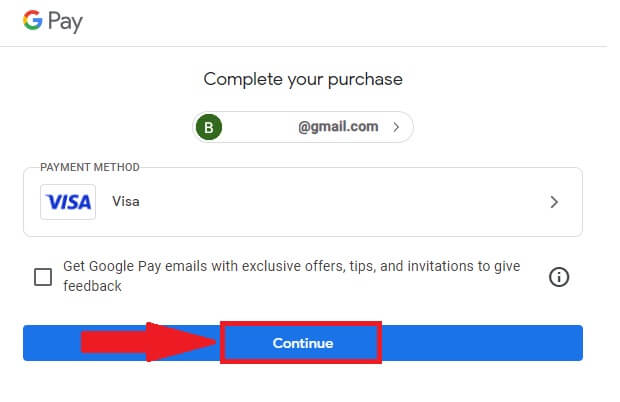
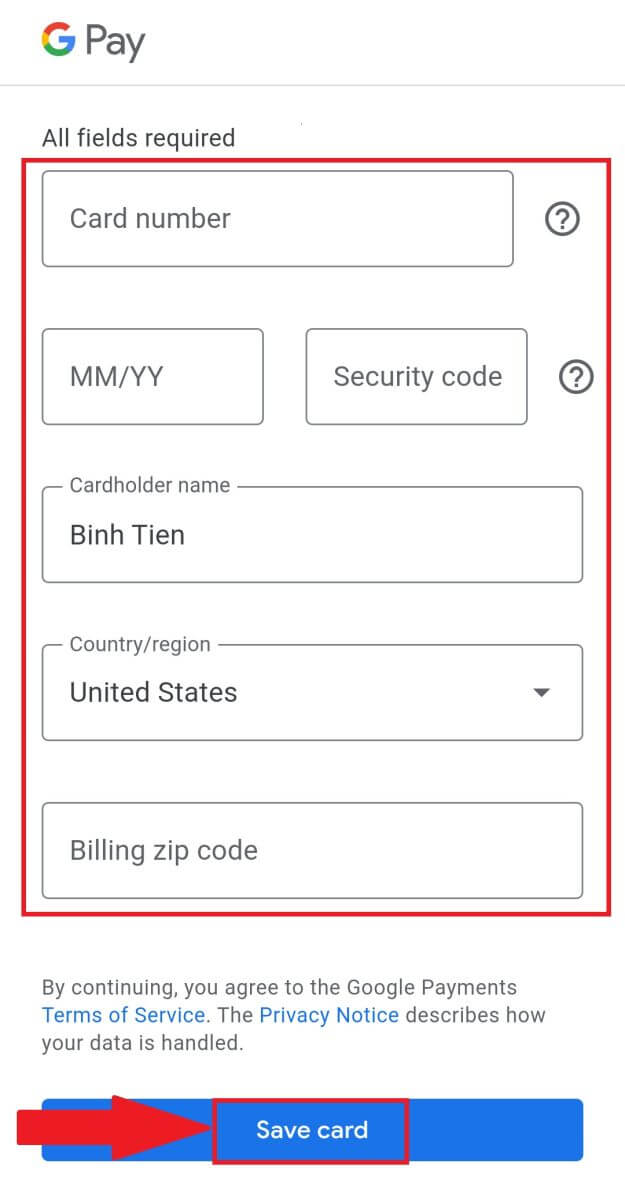
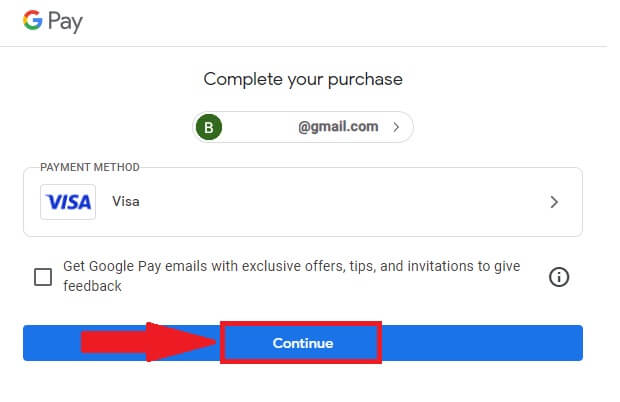
5. Fill out your credit card or debit card details and click [Save card]. Then press [Continue] to finish your transaction.
Buy Crypto with Google Pay on DigiFinex (App)
1. Open your DigiFinex app and tap on [Credit/Debit Card].
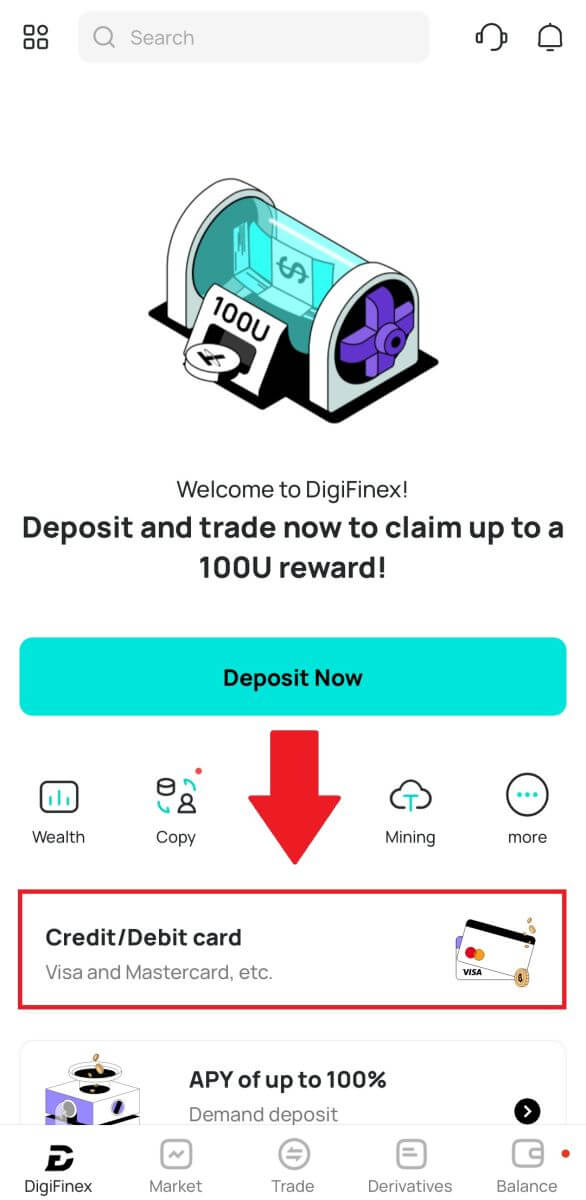
2. Here you can choose to buy crypto with different fiat currencies. Enter the fiat amount you want to spend and the system will automatically display the amount of crypto you can get, select the [mercuryo] payment channel and tap [Purchase].
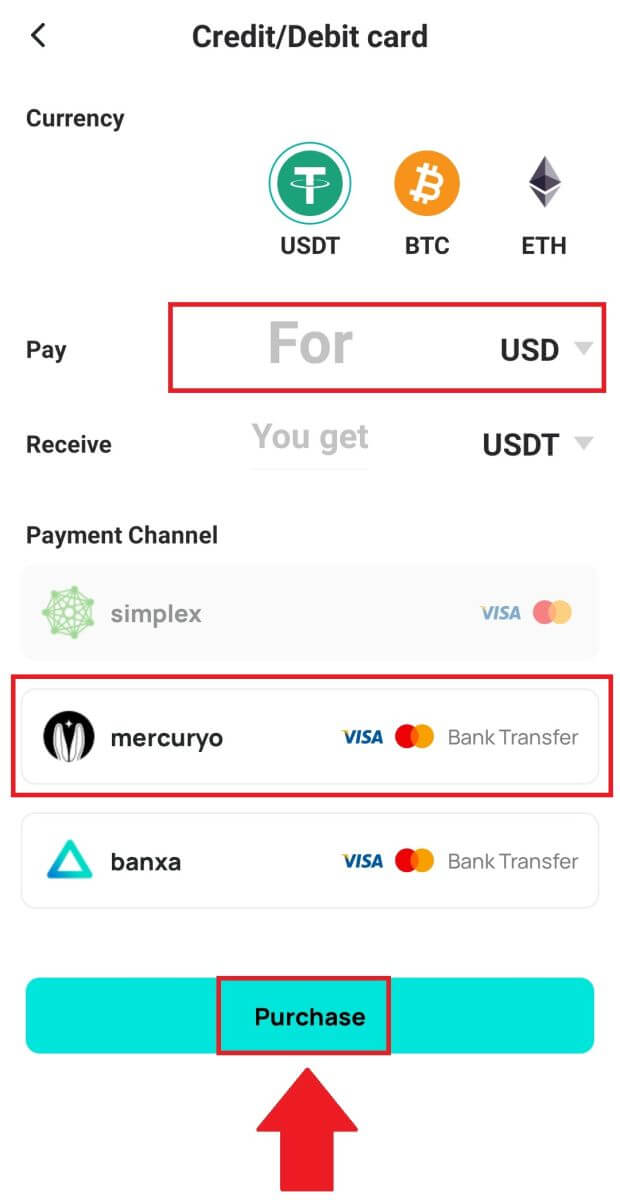
3. Confirm the details of the order. Tick the boxes and press [Confirm].
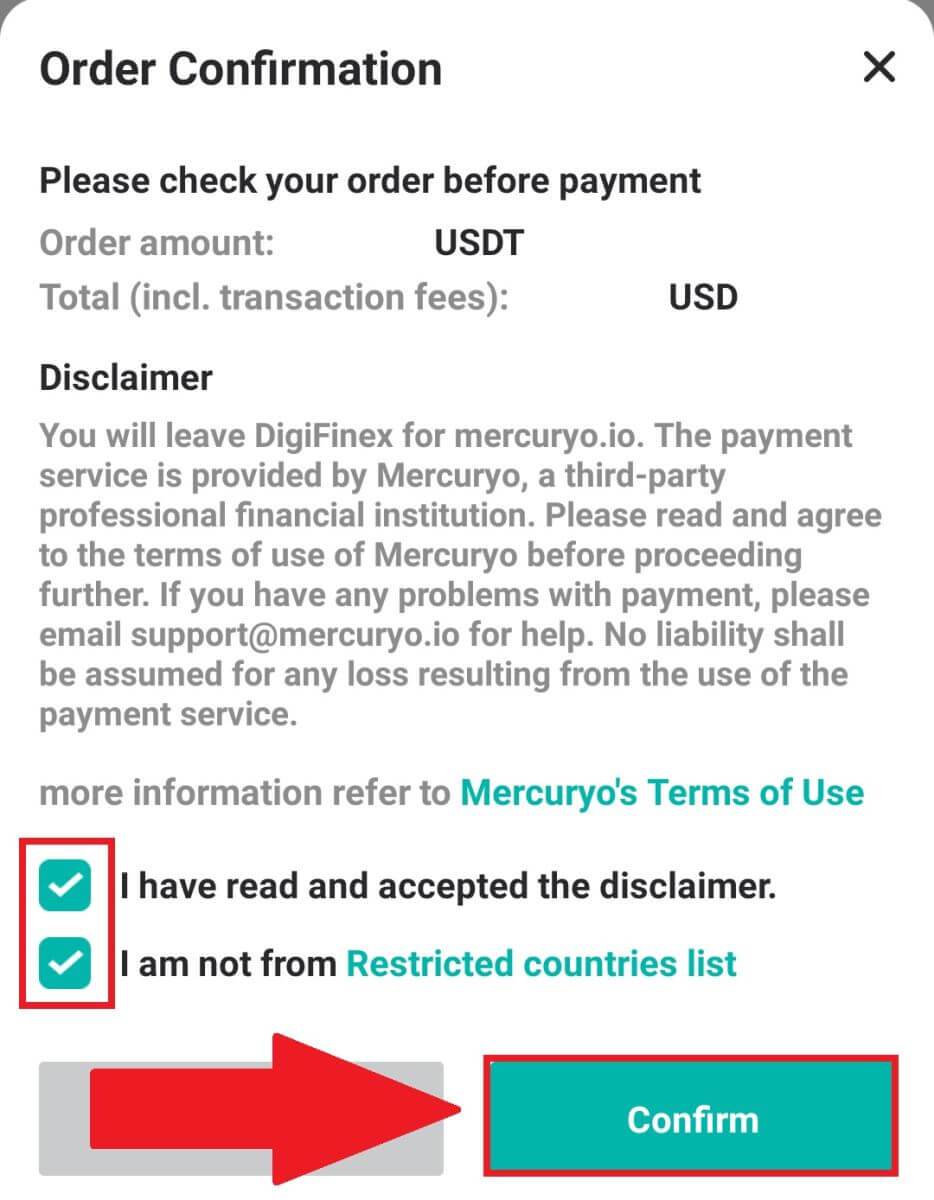
4. Choose [Google pay] option and press [Buy with Google Pay].
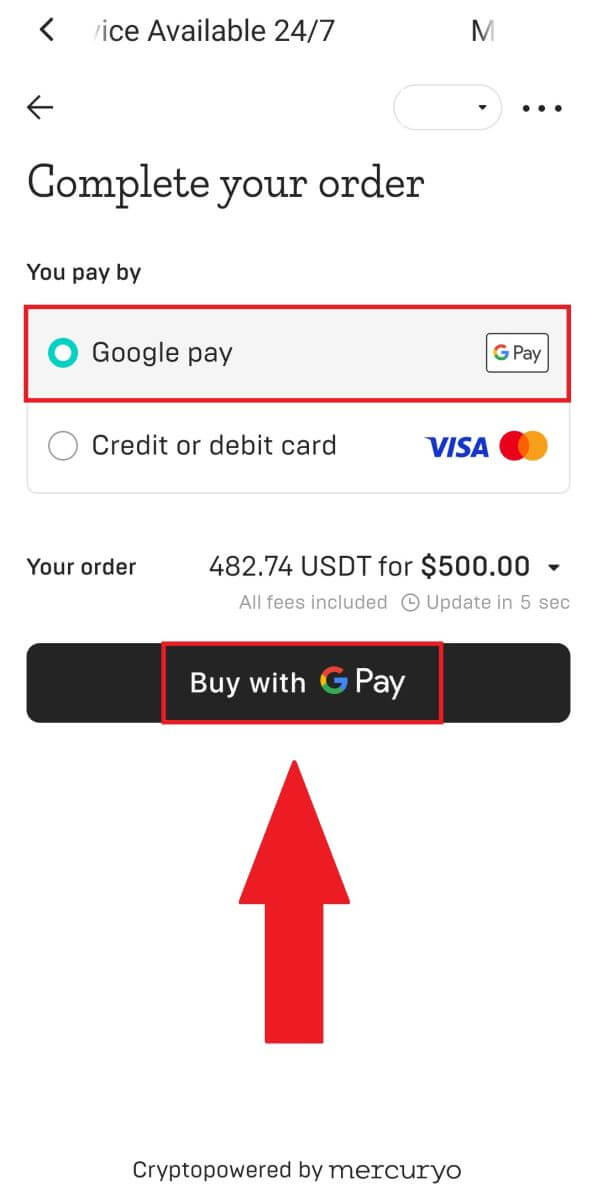
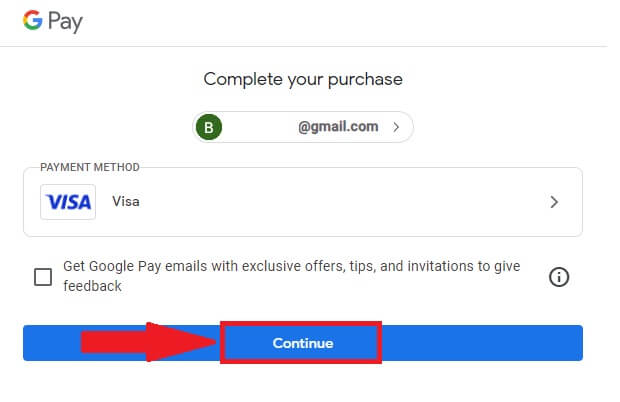
5. Fill out your credit card or debit card details and click [Save card]. Then press [Continue] to finish your transaction.
How to Deposit Crypto on DigiFinex
Deposit Crypto on DigiFinex (Web)
If you own cryptocurrency on another platform or wallet, you can transfer them to your DigiFinex Wallet for trading or earn passive income.
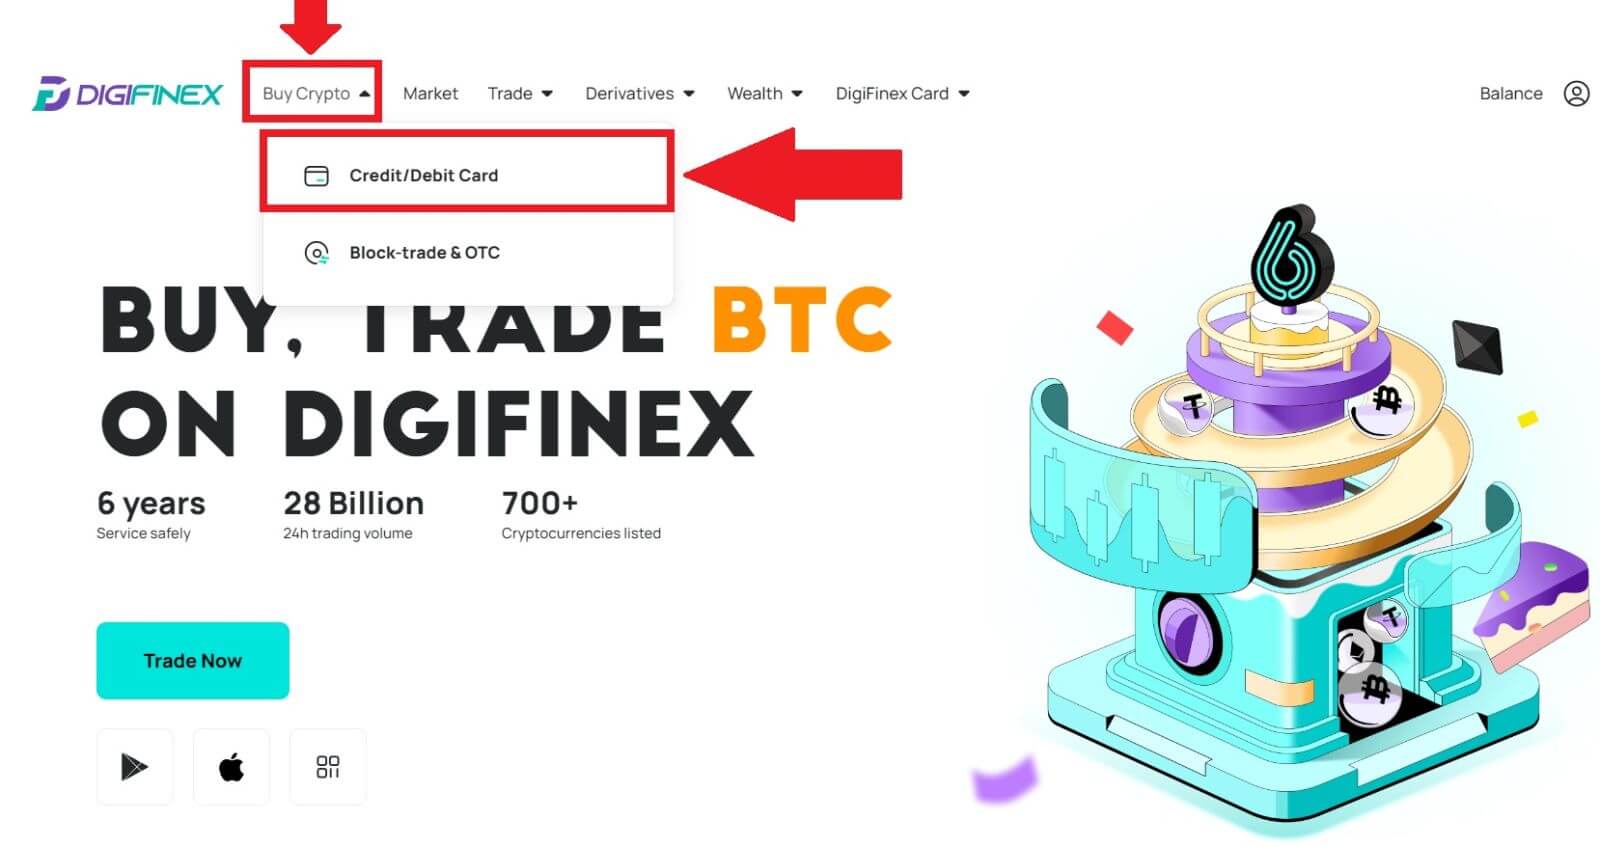
1. Log in to your DigiFinex account and click [Buy Crypto] - [Credit/Debit Card].
2. Click [Deposit] and search the cryptocurrency you want to deposit, such as USDT.
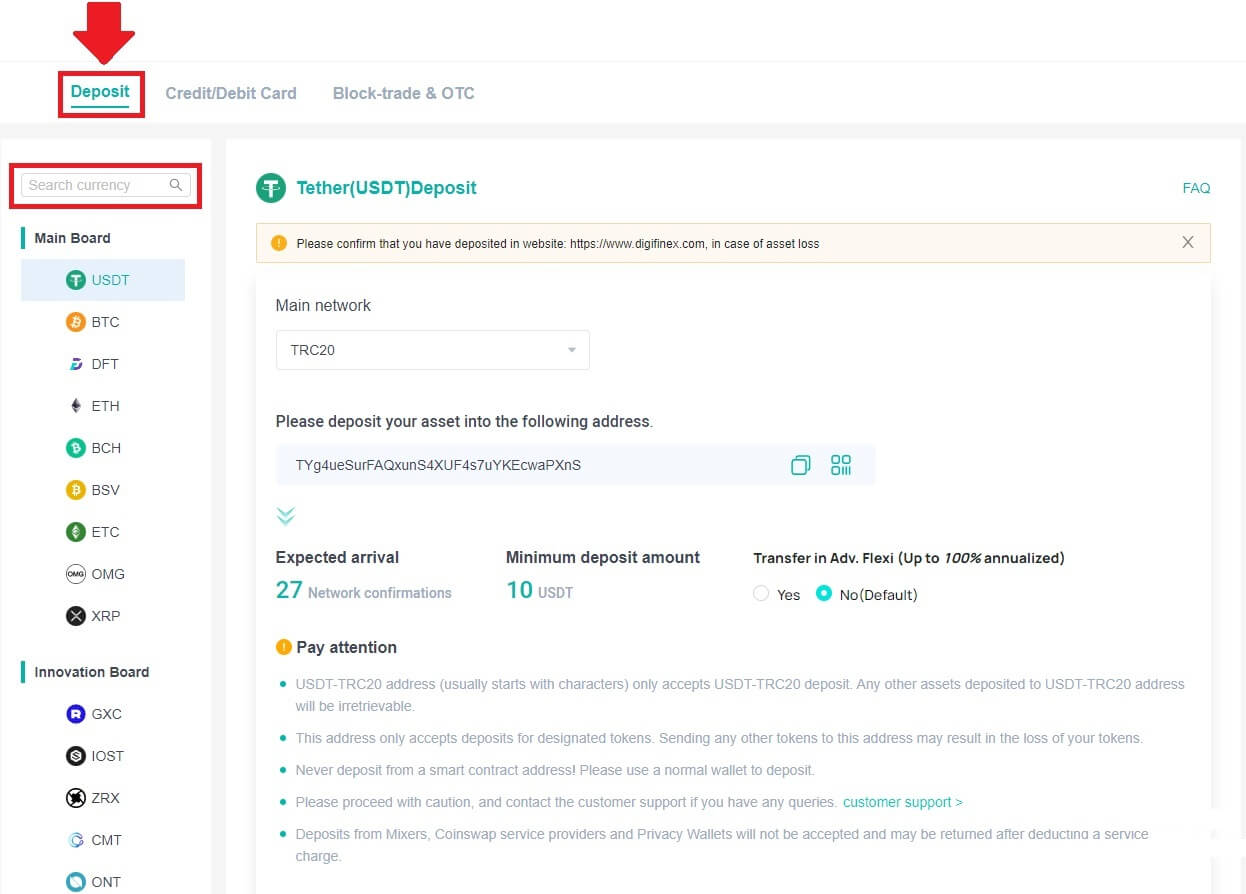
3. Choose the Main network that the currency operates and Click [Generate deposit address] to create a deposit address.
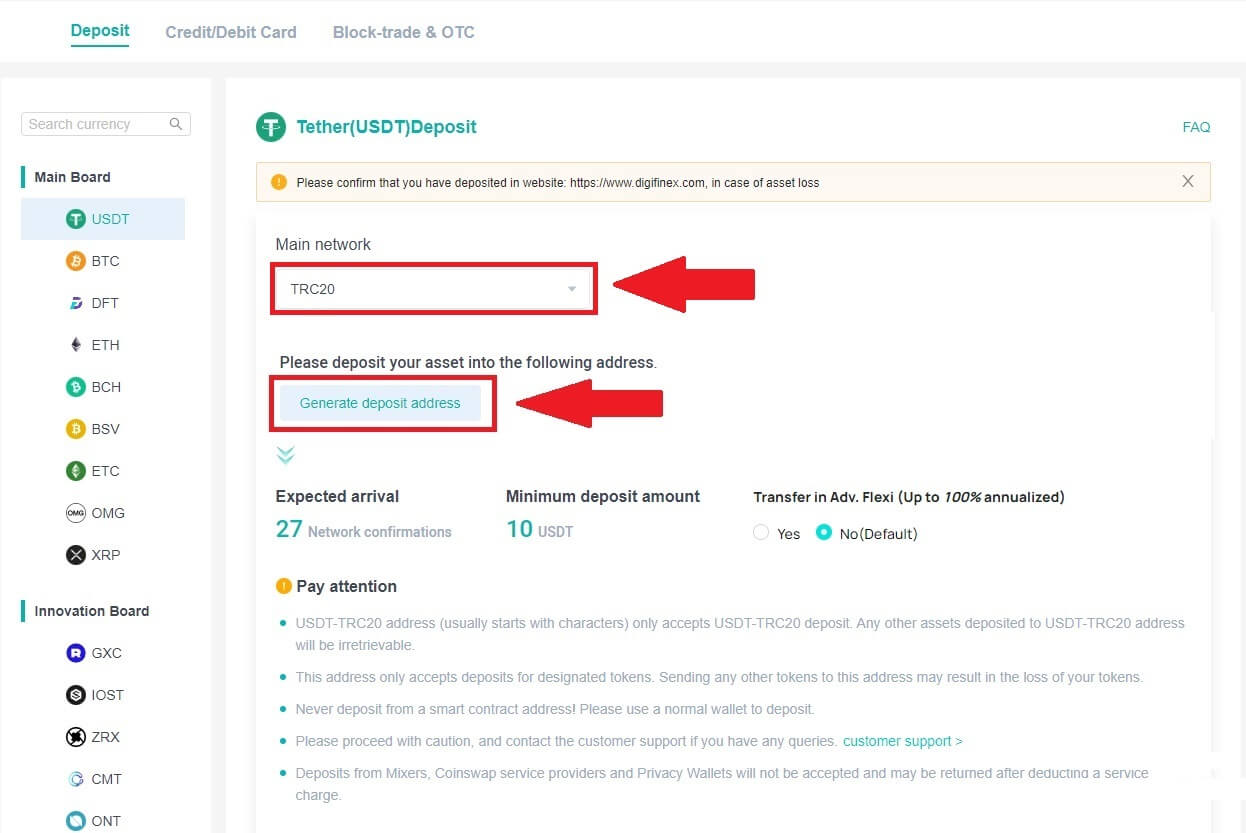
4. Click on the [Copy] icon to copy so you paste the address to the platform or wallet you are withdrawing from to transfer them to your DigiFinex Wallet.
Note:
-
The minium deposit amount is 10 USDT.
-
USDT-TRC20 address (usually starts with characters) only accepts USDT-TRC20 deposit. Any other assets deposited to USDT-TRC20 address will be irretrievable.
-
This address only accepts deposits for designated tokens. Sending any other tokens to this address may result in the loss of your tokens.
-
Never deposit from a smart contract address! Please use a normal wallet to deposit.
-
Please proceed with caution, and contact the customer support if you have any queries.
-
Deposits from Mixers, Coinswap service providers and Privacy Wallets will not be accepted and may be returned after deducting a service charge.
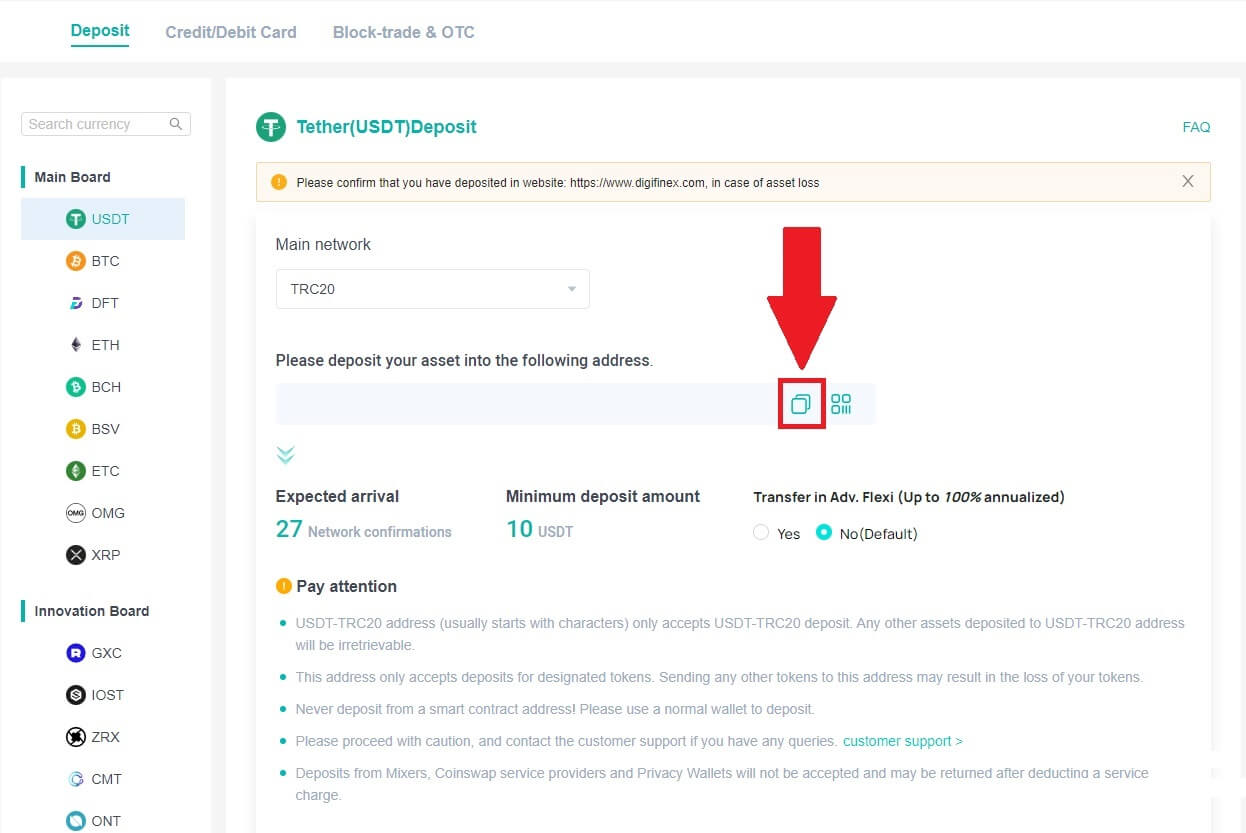
5. Paste the deposit address to the platform or wallet you are withdrawing from to transfer them to your DigiFinex Wallet.
Deposit Crypto on DigiFinex (App)
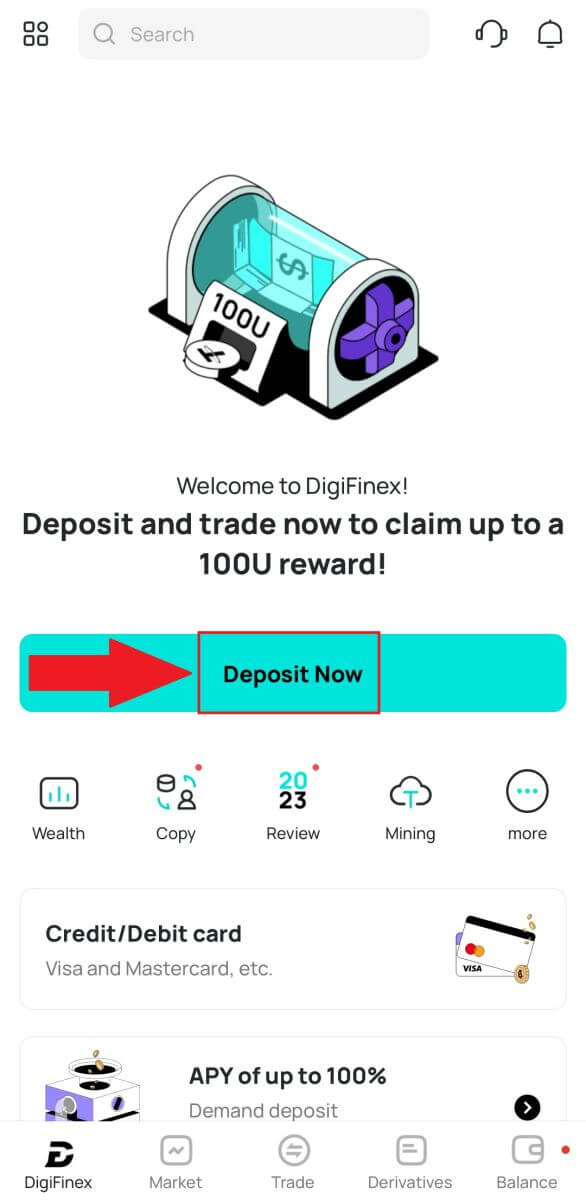
1. Open your DigiFinex App and tap [Deposit Now].
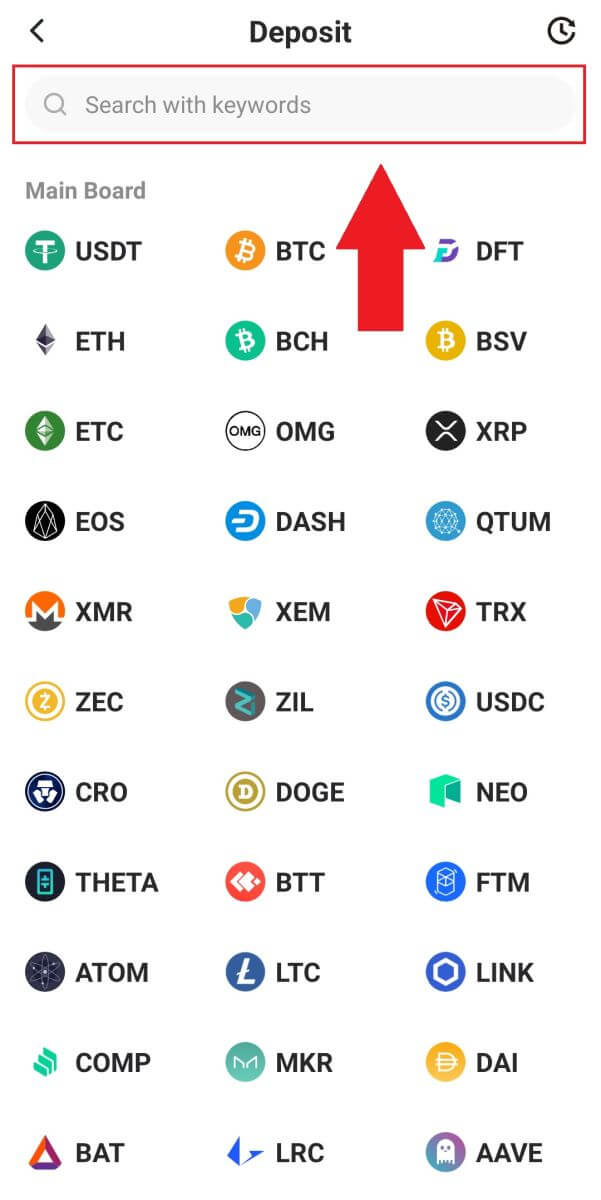
2. Search the cryptocurrency you want to deposit, for example USDT.
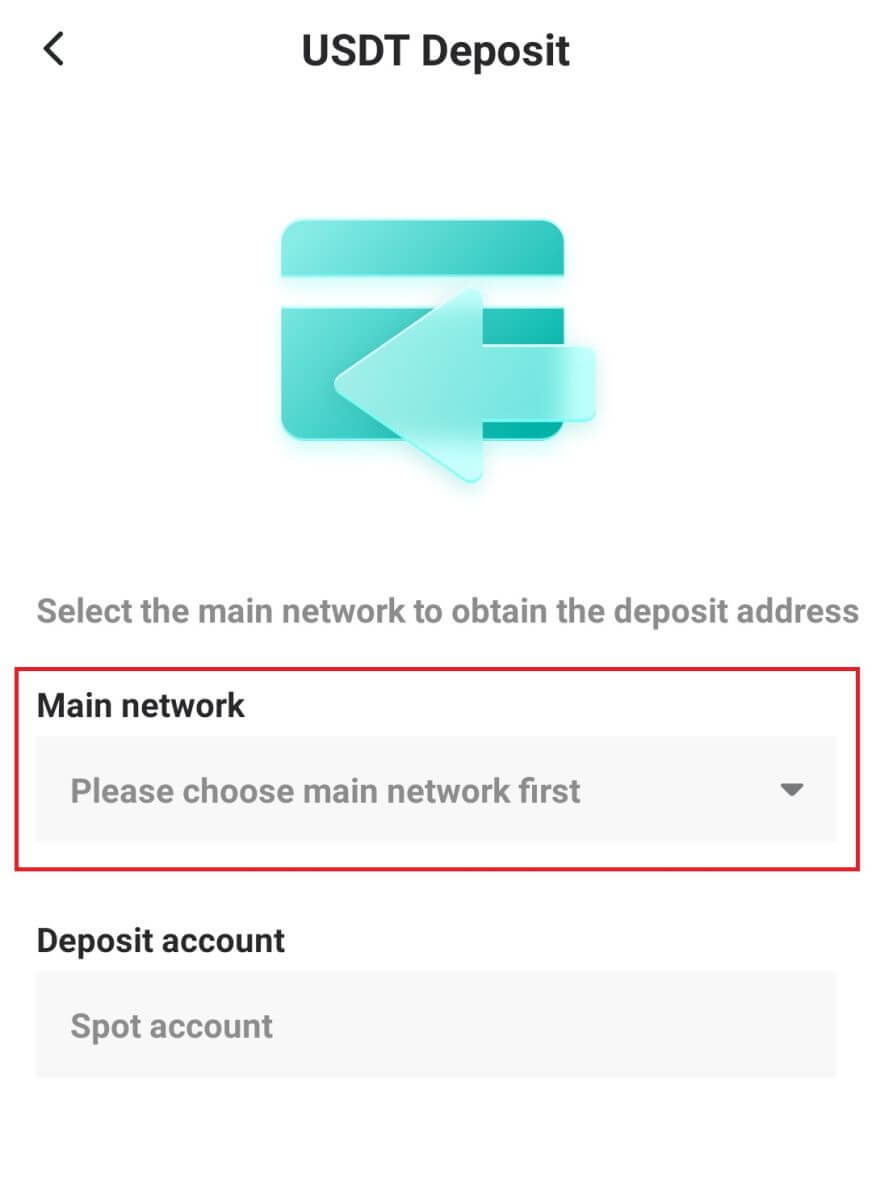
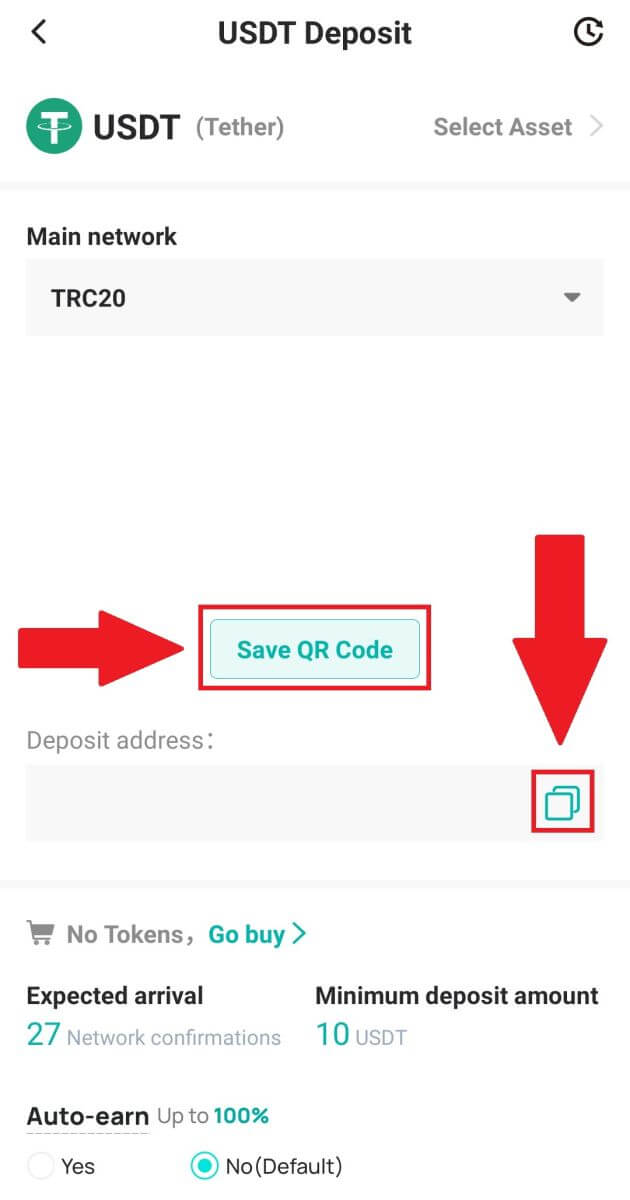
3. Choose the main network and tap on the [Copy] icon to copy the deposit address.
Note:
-
Your deposit address will be automatically generated upon selecting main network..
-
You can press [Save QR Code] to save the deposit address in QR code form.
4. Paste the deposit address to the platform or wallet you are withdrawing from to transfer them to your DigiFinex Wallet.
How to Trade Crypto at DigiFinex
Trade Spot on DigiFinex (Web)
A spot trade is a simple transaction between a buyer and a seller to trade at the current market rate, known as the spot price. The trade takes place immediately when the order is fulfilled.
Users can prepare spot trades in advance to trigger when a specific (better) spot price is reached, known as a limit order. You can make spot trades on DigiFinex through our trading page interface.
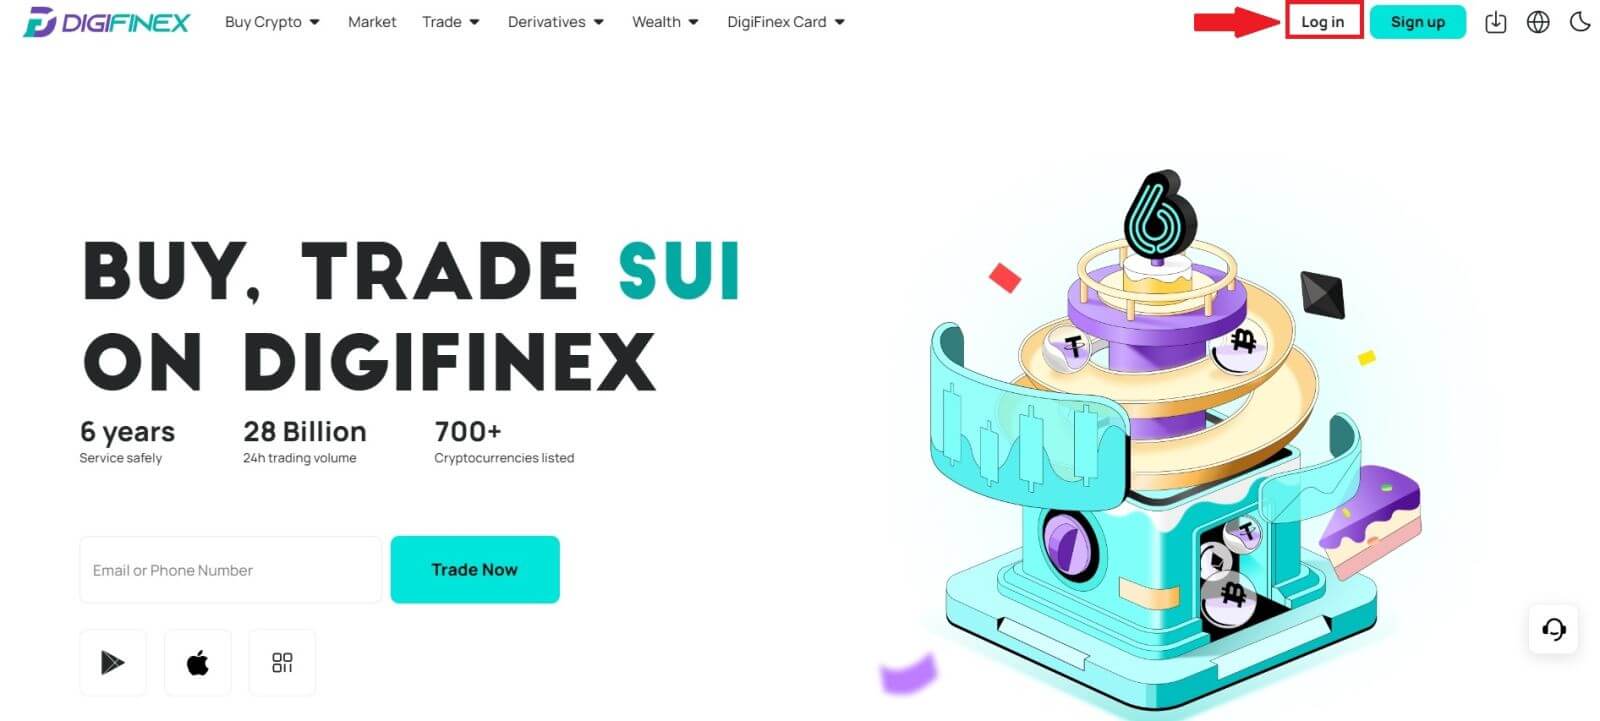
1. Visit our DigiFinex website, and click on [Log in] at the top right of the page to log into your DigiFinex account.
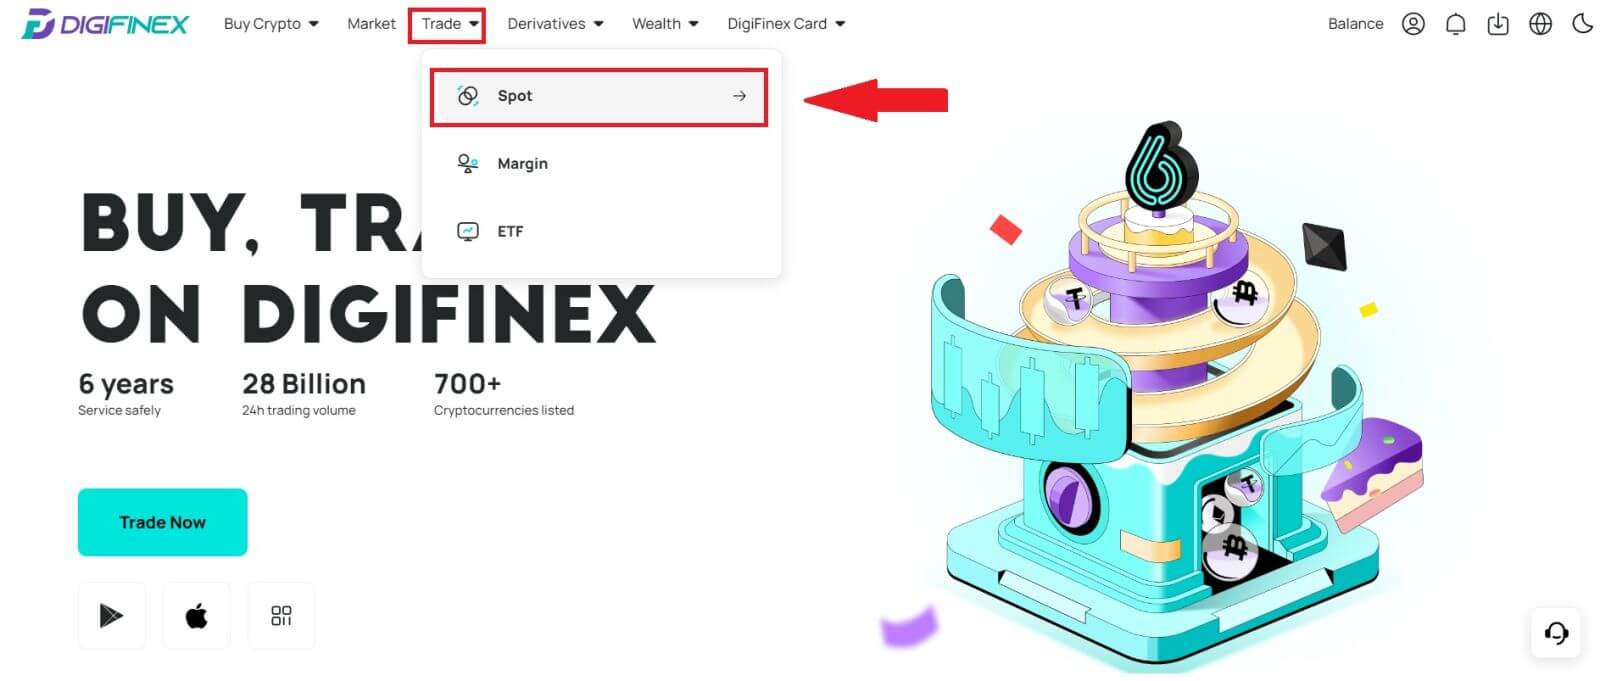
2. Tap on [Spot] in [Trade].
3. You will now find yourself on the trading page interface.
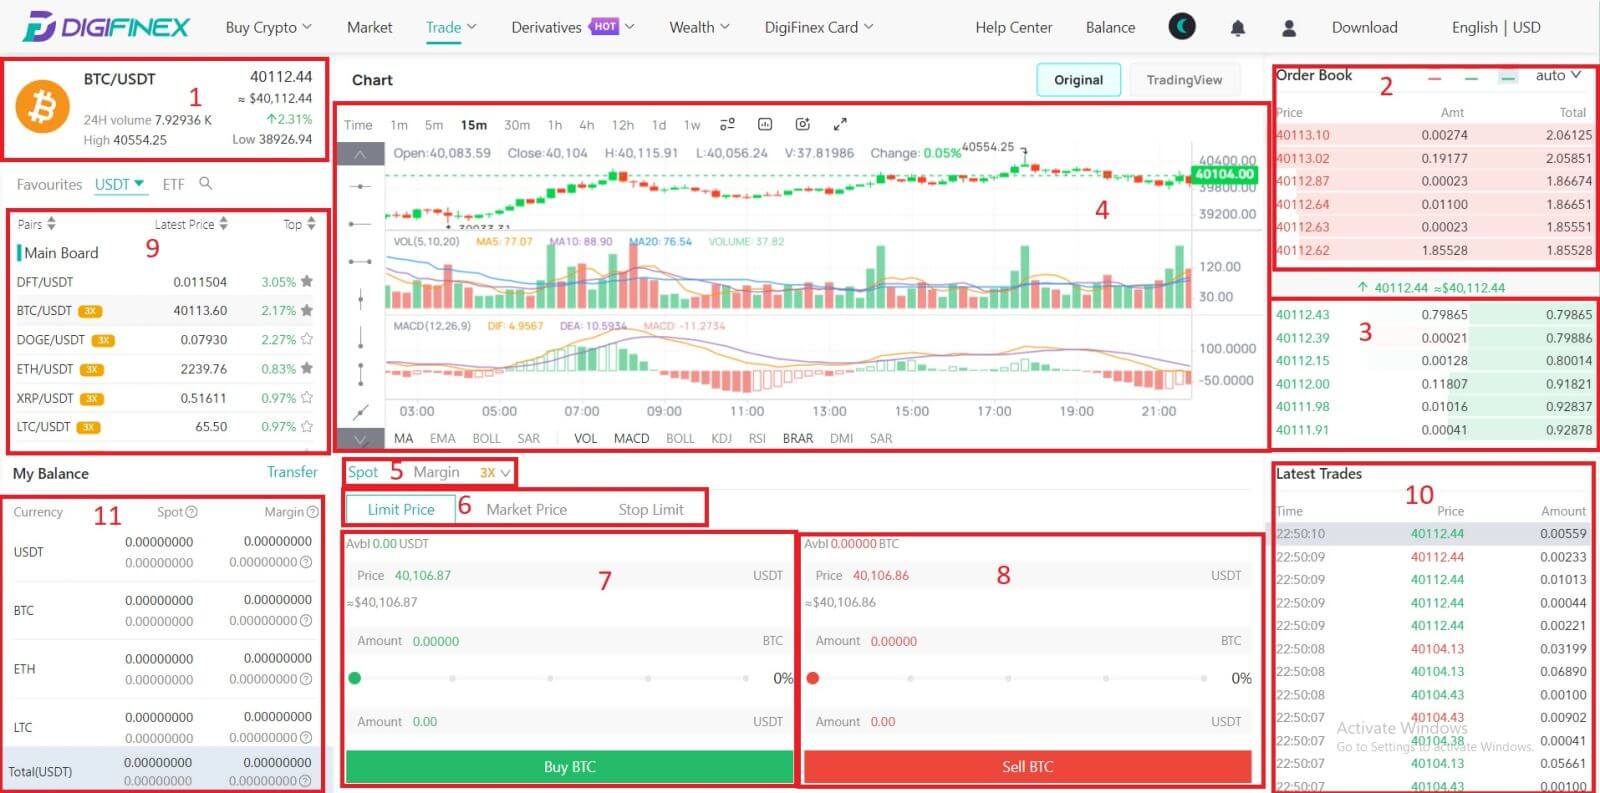
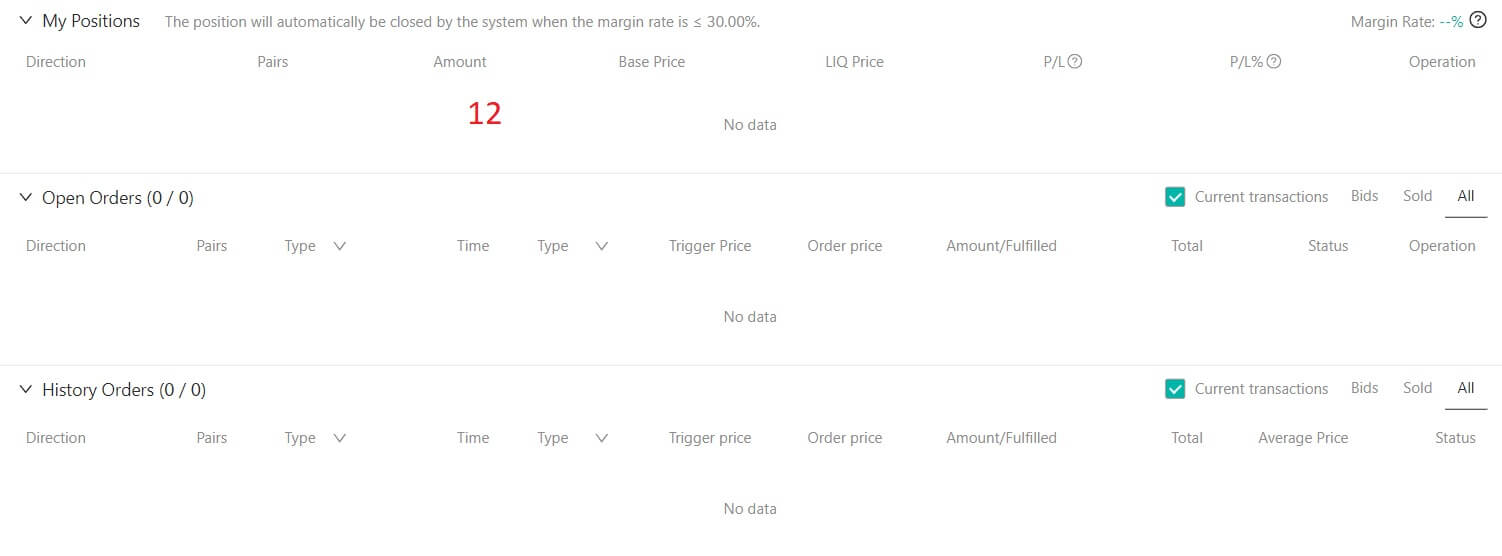
- Market Price Trading volume of trading pair in 24 hours.
- Asks (Sell orders) book.
- Bids (Buy orders) book.
- Candlestick chart and Technical Indicators.
- Trading Type: Spot / Margin / 3X.
- Type of order: Limit / Market / Stop-limit.
- Buy Cryptocurrency.
- Sell Cryptocurrency.
- Market and Trading pairs.
- Market latest completed transaction.
- My Balance
- Your Limit Order / Stop-limit Order / Order History
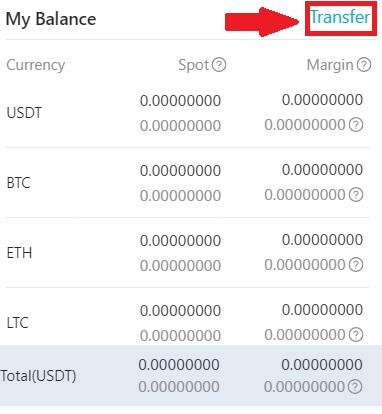
4. Transfer Funds to Spot Account
Click [Transfer] in My Balance.
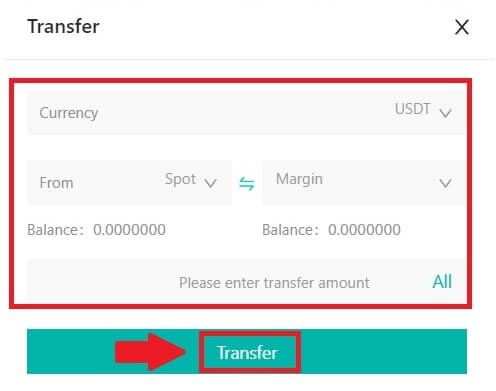
Select your Currency and enter the amount, click [Transfer] .
5. Buy Crypto.
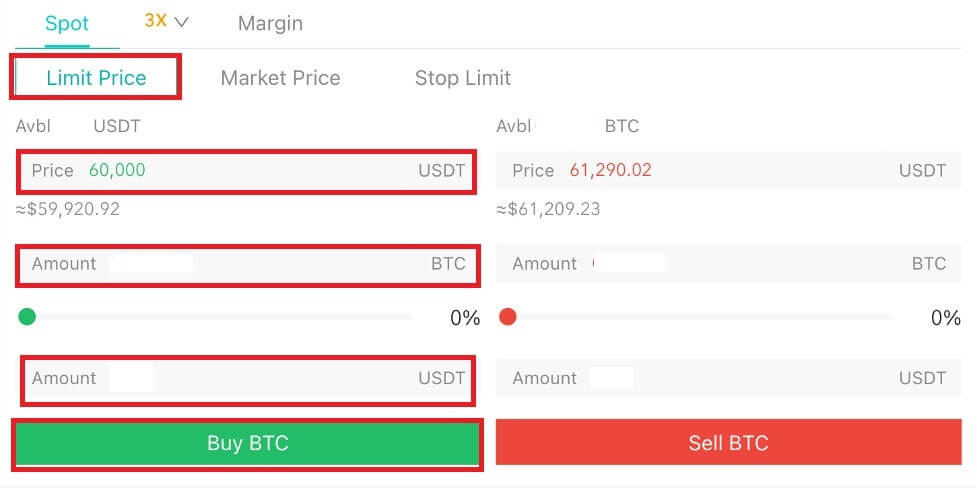
The default order type is a limit order, which allows you to specify a particular price for buying or selling crypto. However, if you wish to execute your trade promptly at the current market price, you can switch to a [Market Price] Order. This enables you to trade instantly at the prevailing market rate.
For instance, if the current market price of BTC/USDT is $61,000, but you desire to purchase 0.1 BTC at a specific price, say $60,000, you can place a [Limit Price] order.
Once the market price reaches your specified amount of $60,000, your order will be executed, and you will find 0.1 BTC (excluding commission) credited to your spot account.
6. Sell Crypto.
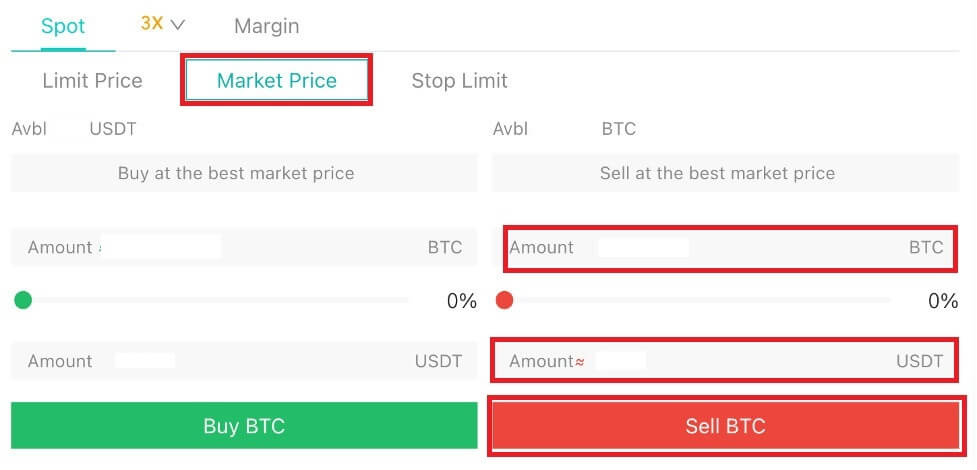
To promptly sell your BTC, consider switching to a [Market Price] order. Enter the selling quantity as 0.1 to complete the transaction instantly.
For example, if the current market price of BTC is $63,000 USDT, executing a [Market Price] Order will result in 6,300 USDT (excluding commission) being credited to your Spot account immediately.
Trade Spot on DigiFinex (App)
Here’s how to start trading Spot on DigiFinex App:
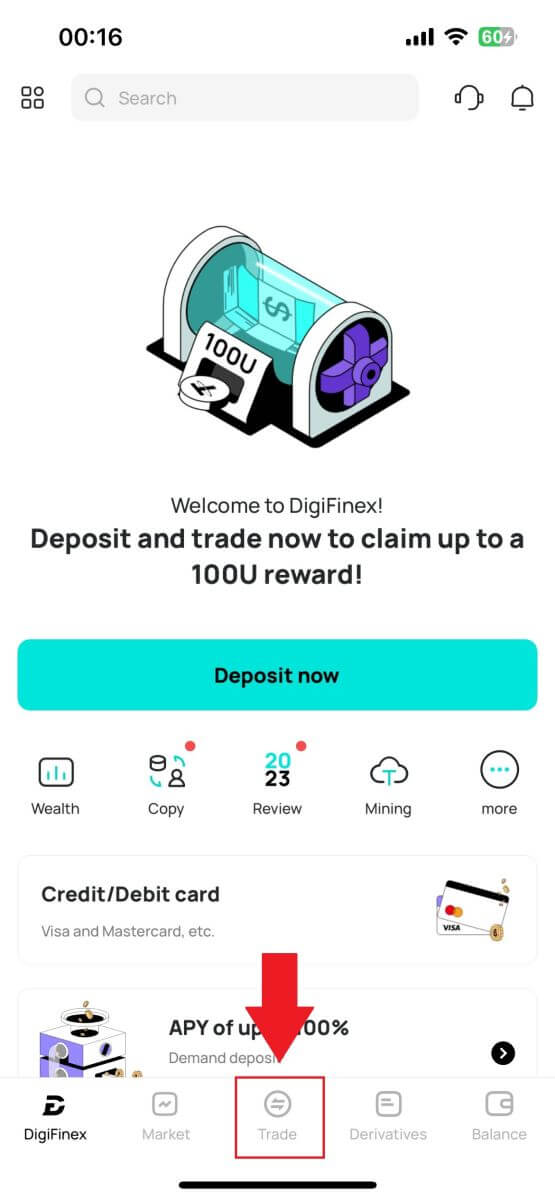
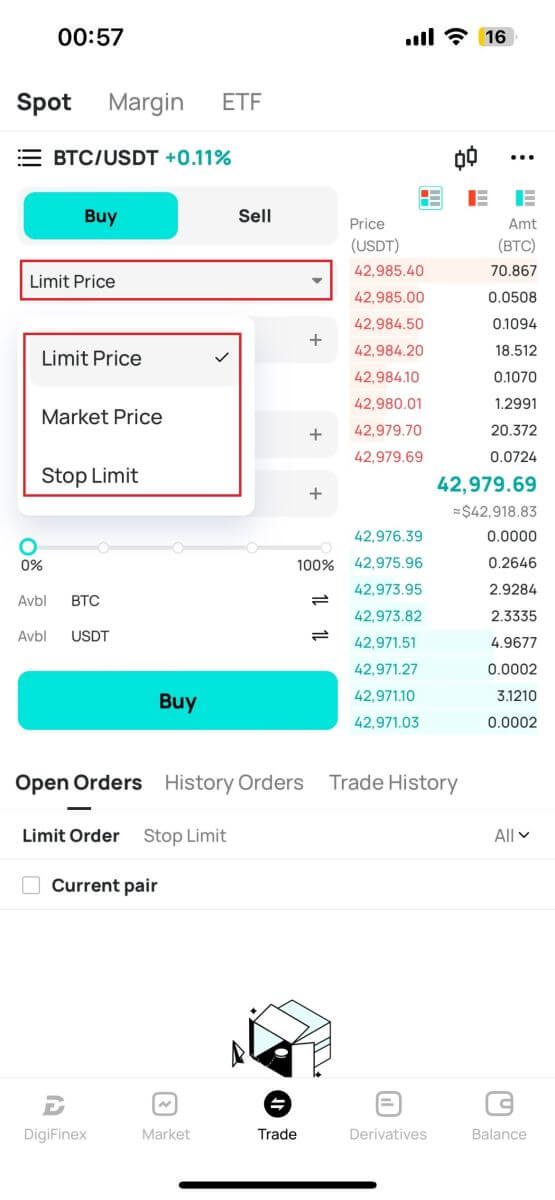
1. On your DigiFinex App, tap [Trade] on the bottom to head to the spot trading interface.
2. Here is the trading page interface.
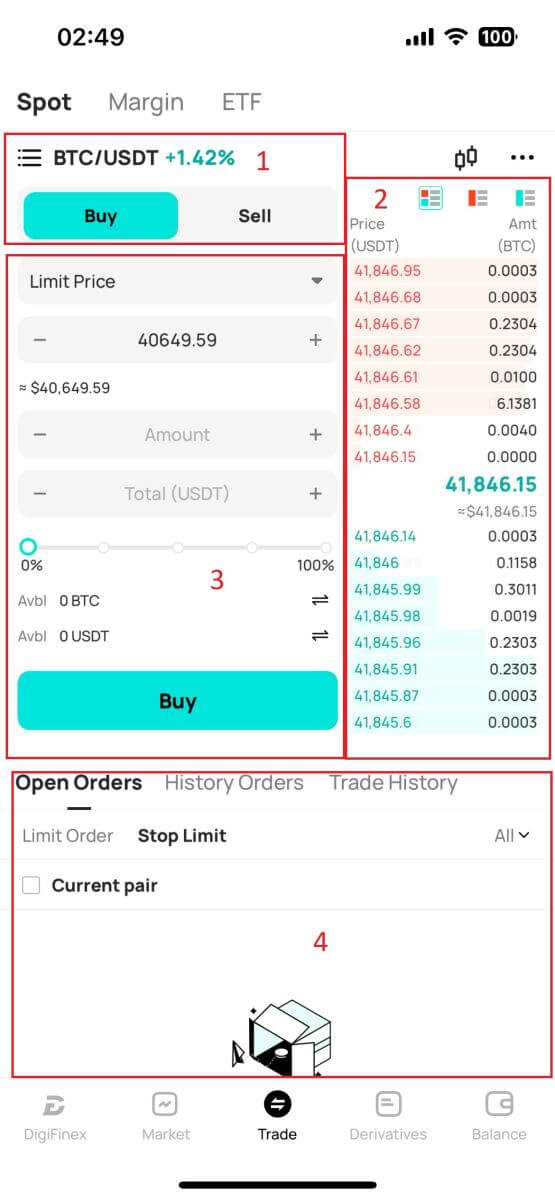
- Market and Trading pairs.
- Sell/Buy order book.
- Buy/Sell Cryptocurrency.
- Open orders.
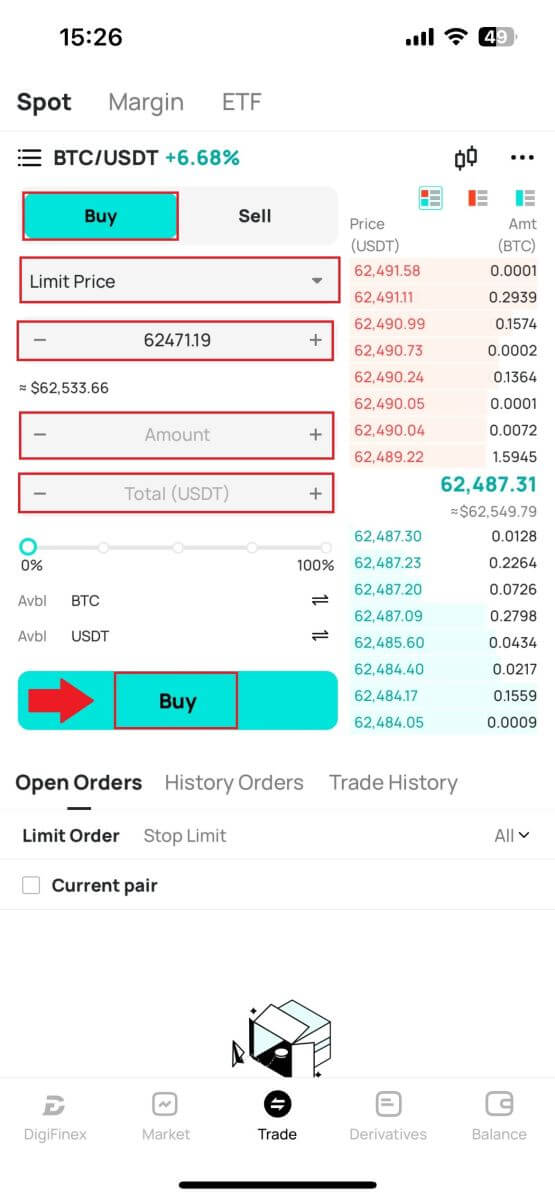
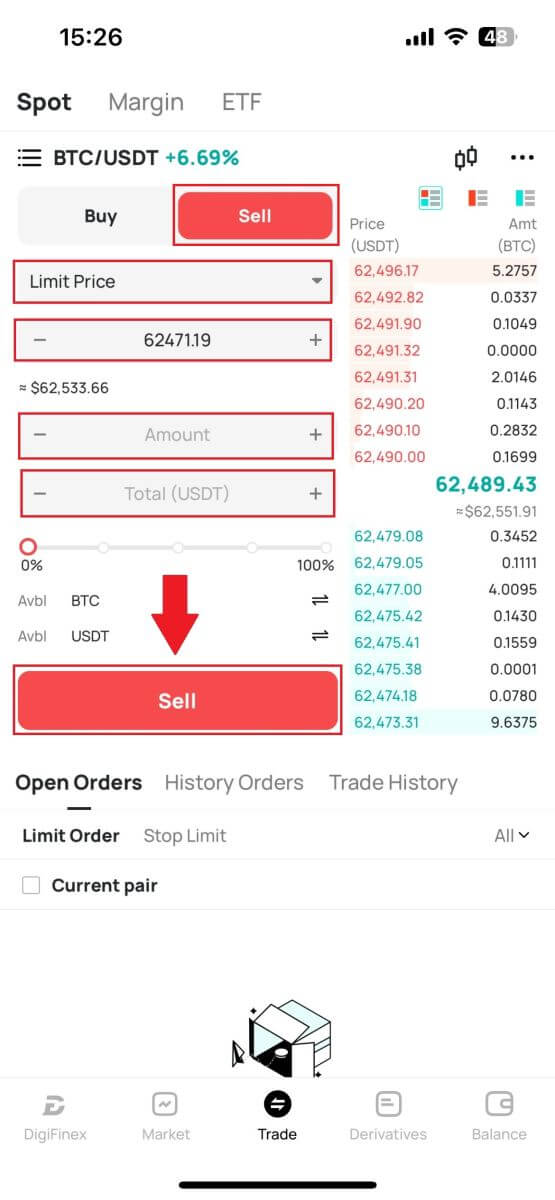
4. Enter Price and Amount.
Click "Buy/Sell" to confirm the order.
Tips: Limit Price order won’t success immediately. It only becomes to a pending order and will be succeeded when the Market price fluctuating to this value.
You can see the current status in the Open order option and cancel it before its success.
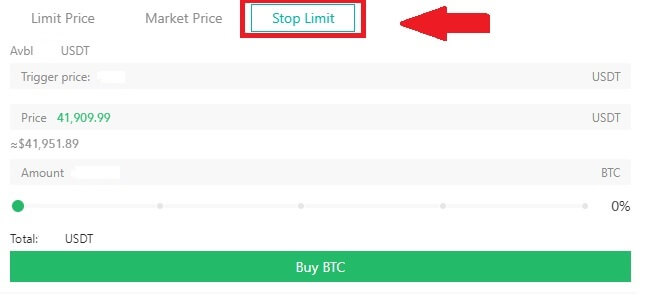
What is the Stop Limit Function and How to use it
A stop-limit order is a specific type of limit order used in trading financial assets. It involves setting both a stop price and a limit price. Once the stop price is reached, the order is activated, and a limit order is placed on the market. Subsequently, when the market reaches the specified limit price, the order is executed.
Here’s how it works:
- Stop Price: This is the price at which the stop-limit order is triggered. When the asset’s price hits this stop price, the order becomes active, and the limit order is added to the order book.
- Limit Price: The limit price is the designated price or a potentially better one at which the stop-limit order is intended to be executed.
It’s advisable to set the stop price slightly higher than the limit price for sell orders. This price difference provides a safety margin between the activation of the order and its fulfillment. Conversely, for buy orders, setting the stop price slightly lower than the limit price helps minimize the risk of the order not being executed.
It’s important to note that once the market price reaches the limit price, the order is executed as a limit order. Setting the stop and limit prices appropriately is crucial; if the stop-loss limit is too high or the take-profit limit is too low, the order may not be filled because the market price may not reach the specified limit.
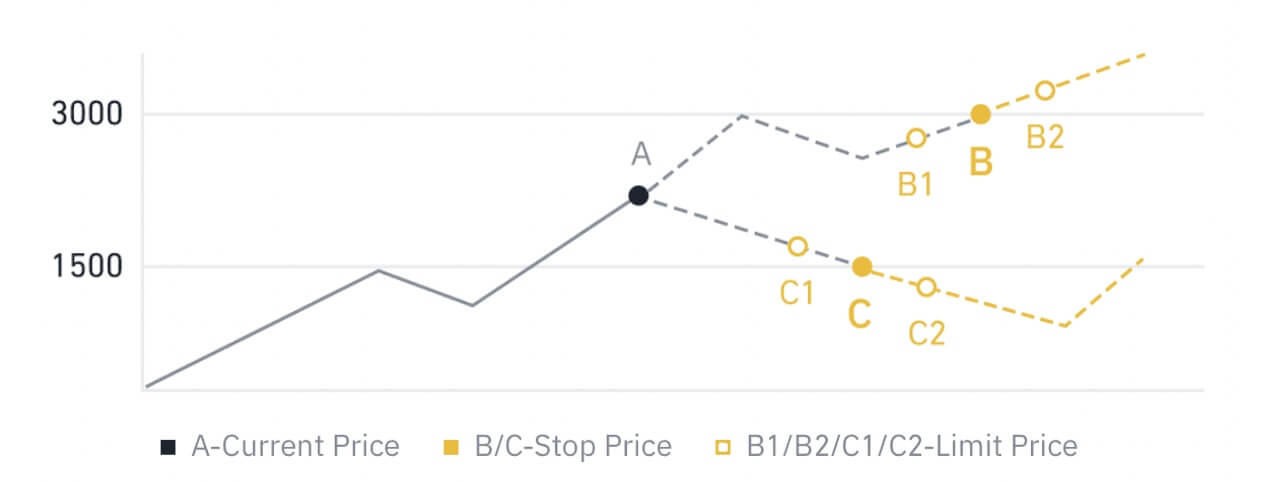
The current price is 2,400 (A). You can set the stop price above the current price, such as 3,000 (B), or below the current price, such as 1,500 (C). Once the price goes up to 3,000 (B) or drops to 1,500 (C), the stop-limit order will be triggered, and the limit order will be automatically placed on the order book.
Limit price can be set above or below the stop price for both buy and sell orders. For example, stop price B can be placed along with a lower limit price B1 or a higher limit price B2.
A limit order is invalid before the stop price is triggered, including when the limit price is reached ahead of the stop price.
When the stop price is reached, it only indicates that a limit order is activated and will be submitted to the order book, rather than the limit order being filled immediately. The limit order will be executed according to its own rules.
How to View my Spot Trading Activity
You can view your spot trading activities from the Orders and Positions panel at the bottom of the trading interface. Simply switch between the tabs to check your open order status and previously executed orders.
1. Open orders
Under the [Open Orders] tab, you can view details of your open orders, including:
- Trading pair.
- Order Date.
- Order Type.
- Side.
- Order price.
- Order Quantity.
- Order amount.
- Filled %.
- Trigger conditions.

2. Order history
Order history displays a record of your filled and unfilled orders over a certain period. You can view order details, including:
- Trading Pair.
- Order Date.
- Order Type.
- Side.
- Average Filled Price.
- Order Price.
- Executed.
- Order Quantity.
- Order Amount.
- Total amount.

How to Withdraw from DigiFinex
Sell Crypto on DigiFinex P2P
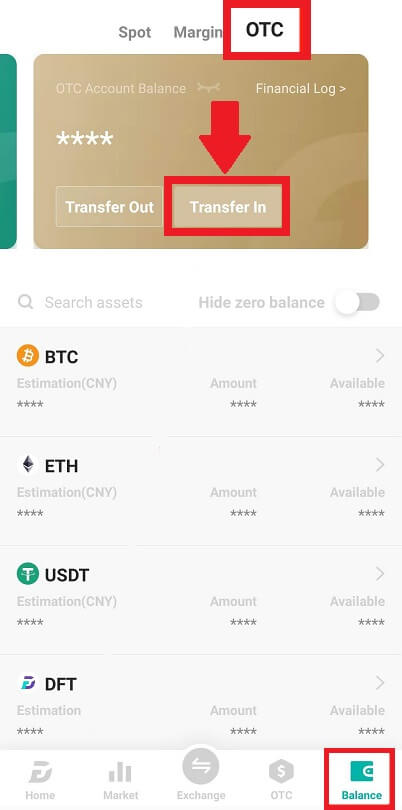
Before users engage in OTC trading and sell their currency, they must initiate the transfer of assets from their spot trading account to the OTC account.
1. Initiate Transfer
-
Navigate to the [Balance] section and slide left to access the OTC page.
-
Click on [Transfer in]
2. Currency Transfer
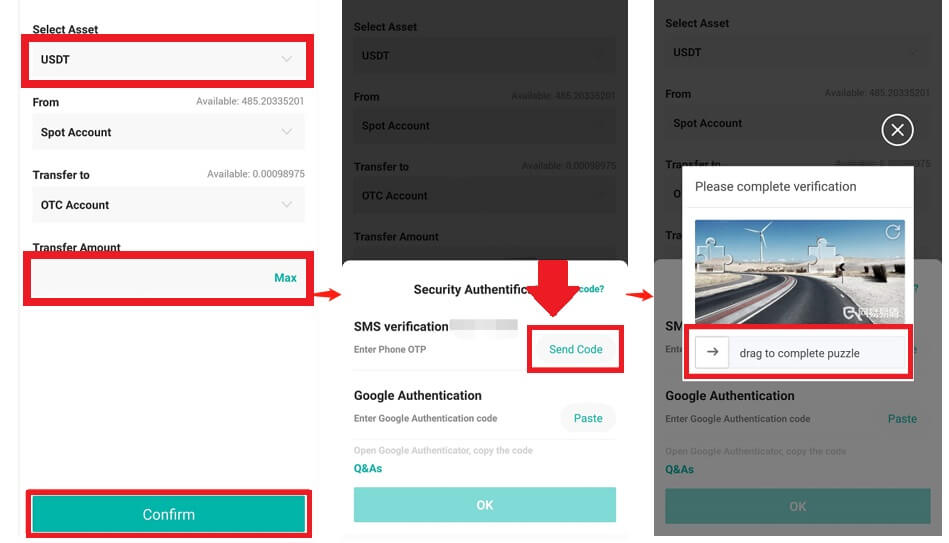
-
Choose the currency for transfer from the Spot account to the OTC account.
-
Enter the transfer amount.
-
Click [Send Code] and complete the puzzle slider, and receive the verification code via email or phone.
3. Verification and Confirmation
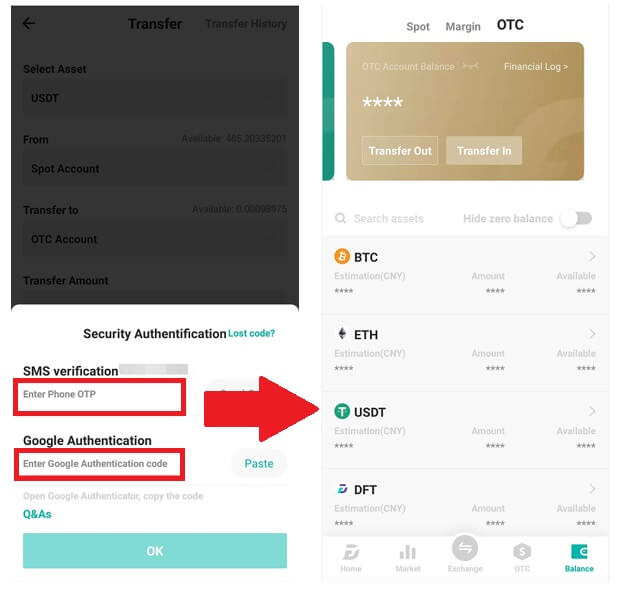
-
Fill in the [OTP] and the [Google Authenticator code] in the pop-up.
4. OTC Trading Procedures
4.1: Access OTC Interface
-
Open the DigiFinex APP and locate the "OTC" interface.
-
Tap the top-left option and choose the cryptocurrency to fiat money pair for trading.
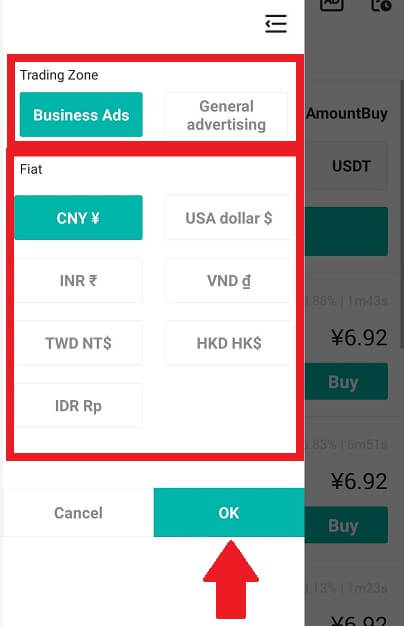
4.2: Initiate Sell Order
-
Select the [Sell] tab.
-
Click the [Sell] button.
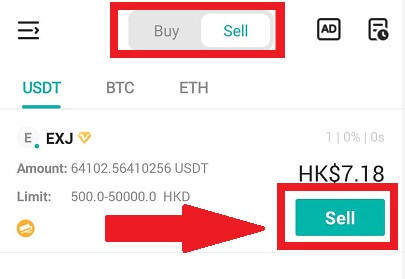
4.3: Input Amount and Confirm
-
Input the amount; the system will calculate the fiat money automatically.
-
Click [Confirm] to initiate the order.
-
Note: The transaction amount must be ≥ the minimum "Order Limit" provided by the business; otherwise, the system will issue a warning to transfer assets.
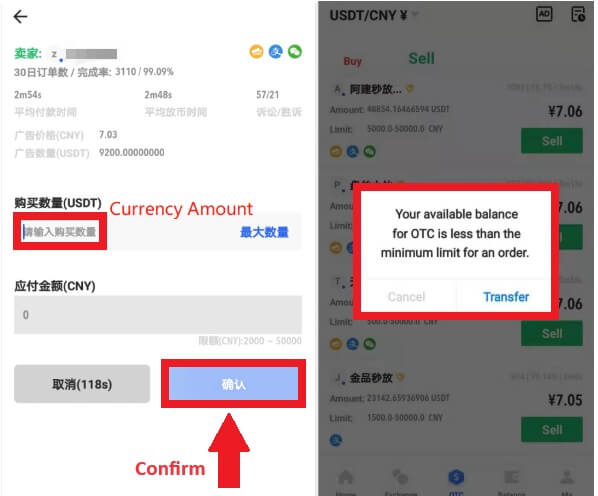
4.4: Waiting for Buyer Payment
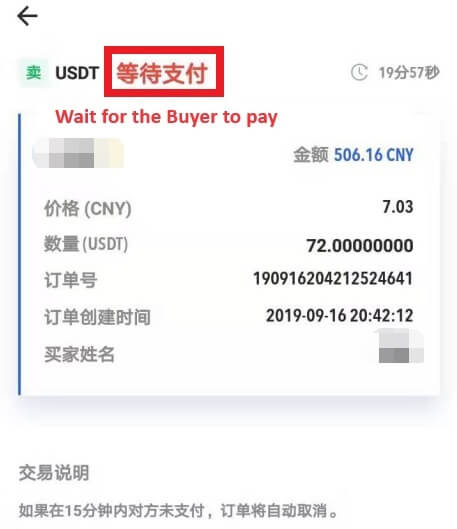
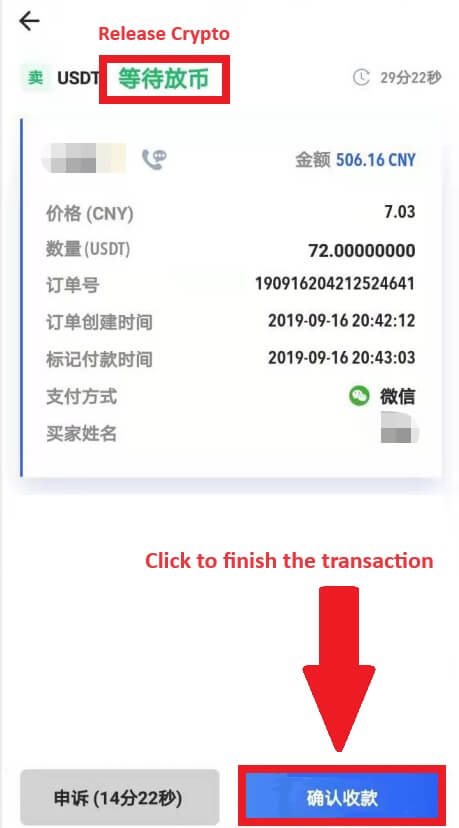
4.5: Confirm and Release Currency
-
When the buyer pays the bill, the interface will automatically switch to another page.
-
Confirm receipt through your payment method.
-
Click "confirm" to release the currency.
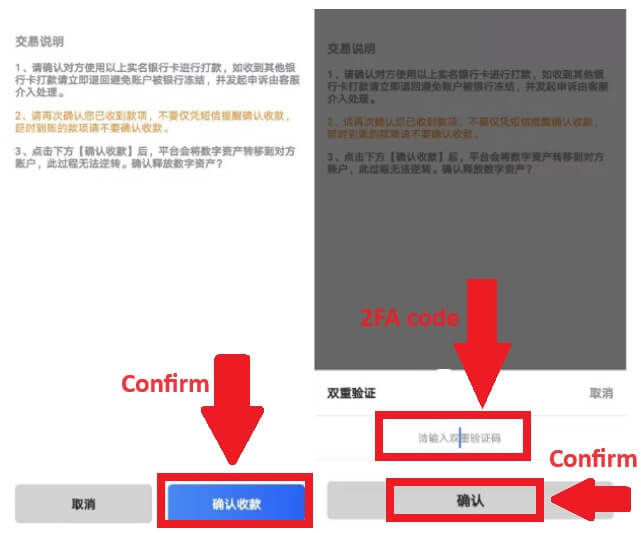
4.6: Final Confirmation
-
Click [Confirm] again in the new interface.
-
Input the 2FA code and click [Confirm].
-
The OTC trade is successful!
Withdraw Crypto from DigiFinex
Withdraw Crypto from DigiFinex (Web)
Let’s use USDT to illustrate how to transfer crypto from your DigiFinex account to an external platform or wallet.
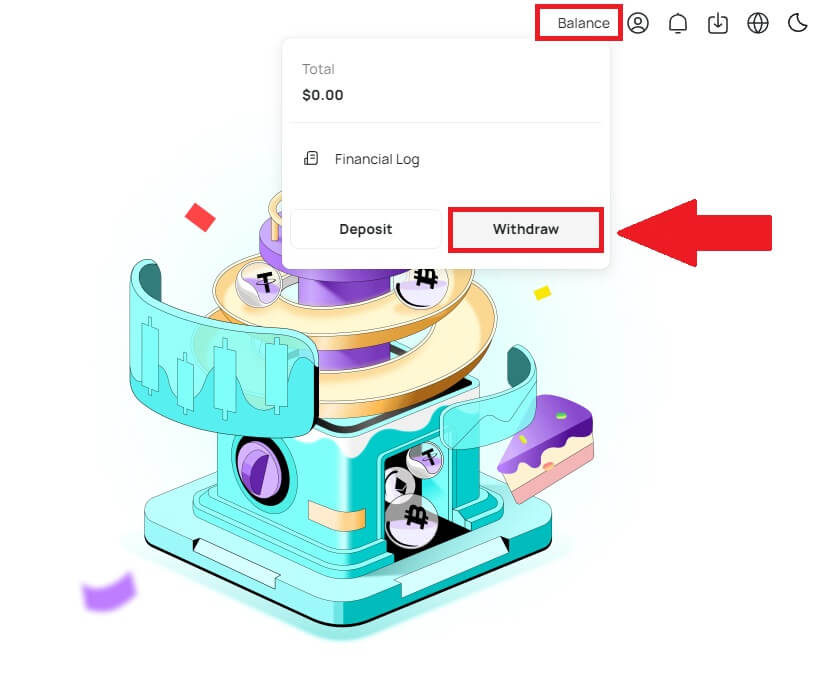
1. Log into your DigiFinex account and click [Balance] - [Withdraw].
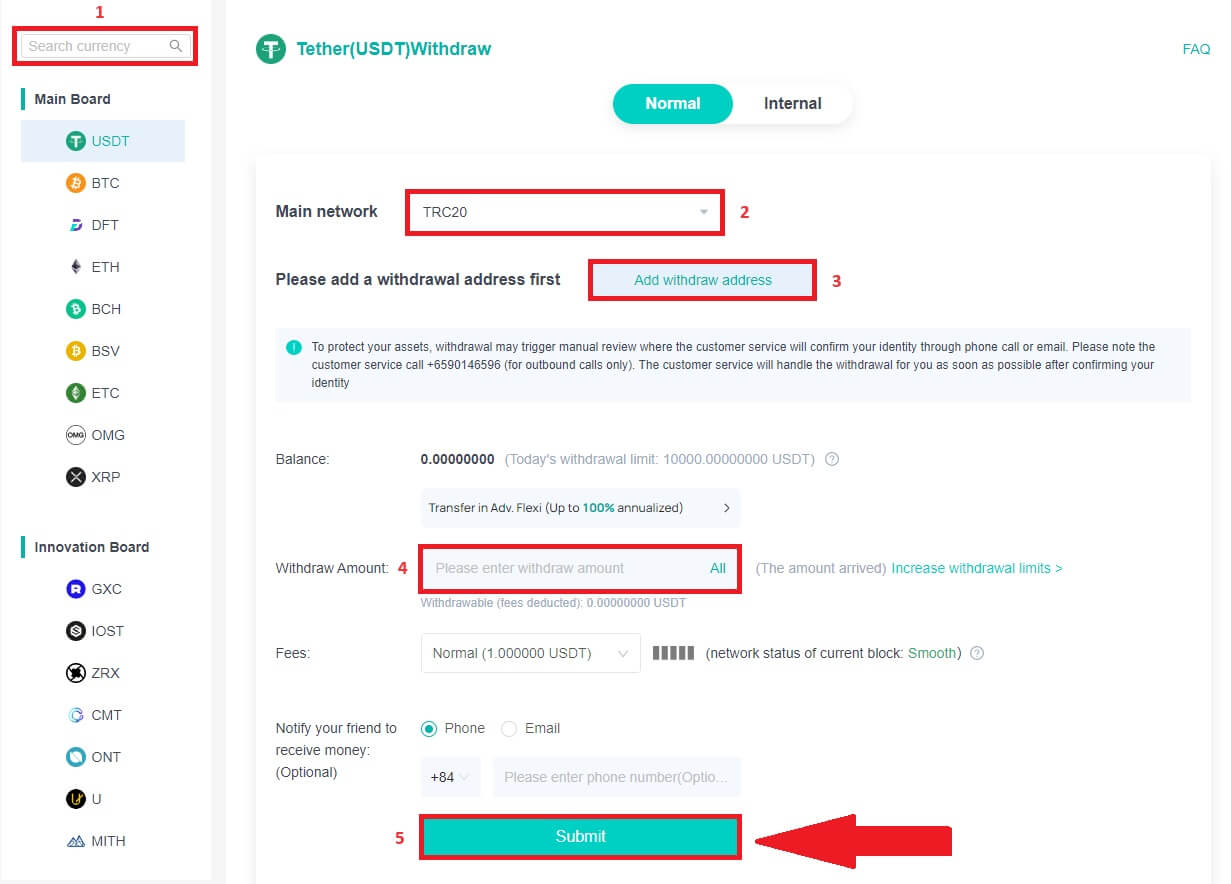
2. Follow the instruction steps to complete the withdrawal process.
-
Type the name of the crypto you want to withdraw into the [Search currency] box.
-
Choose the Main network that the cryptocurrency operates on.
-
Add a withdrawal address information including the Address and Remark (The username for this address).
-
Enter the amount you want to withdraw.
-
Press [Submit] to continue the withdrawal process.
Note:
-
*USDT-TRC20 should match with USDT-TRC20 address (usually starts with characters).
-
Minimum withdrawal amount is 10 USDT.
-
Please do not withdraw directly to a crowdfunding or ICO address! We will not process tokens that have not been officially issued.
-
Customer service will never ask for your password and six-digit Google Authentication code, please never tell anyone to prevent asset loss.
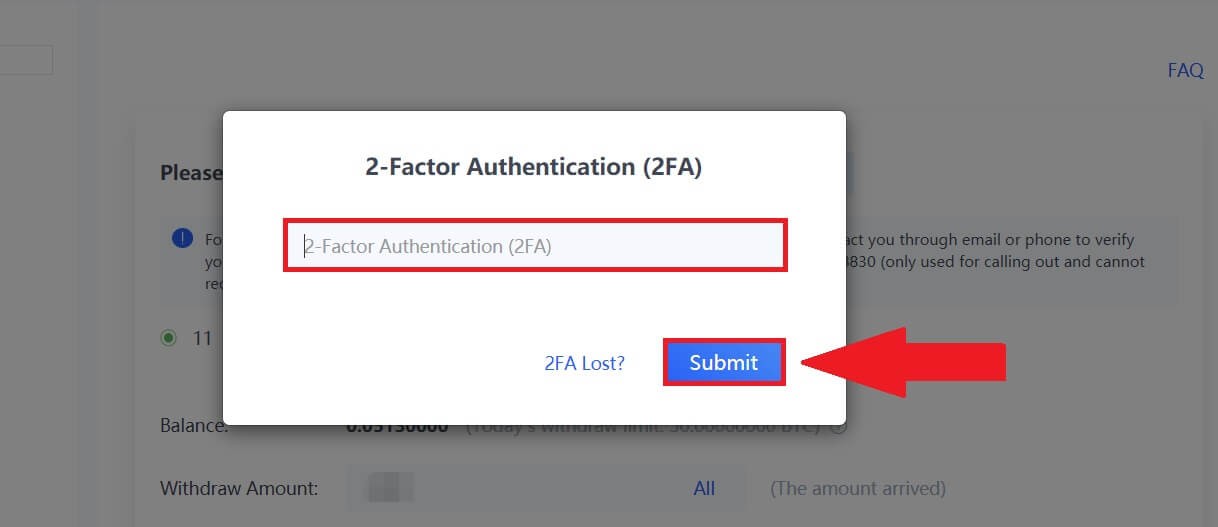
3. Enter 2FA Code to finish the withdrawal process.
Withdraw Crypto from DigiFinex (App)
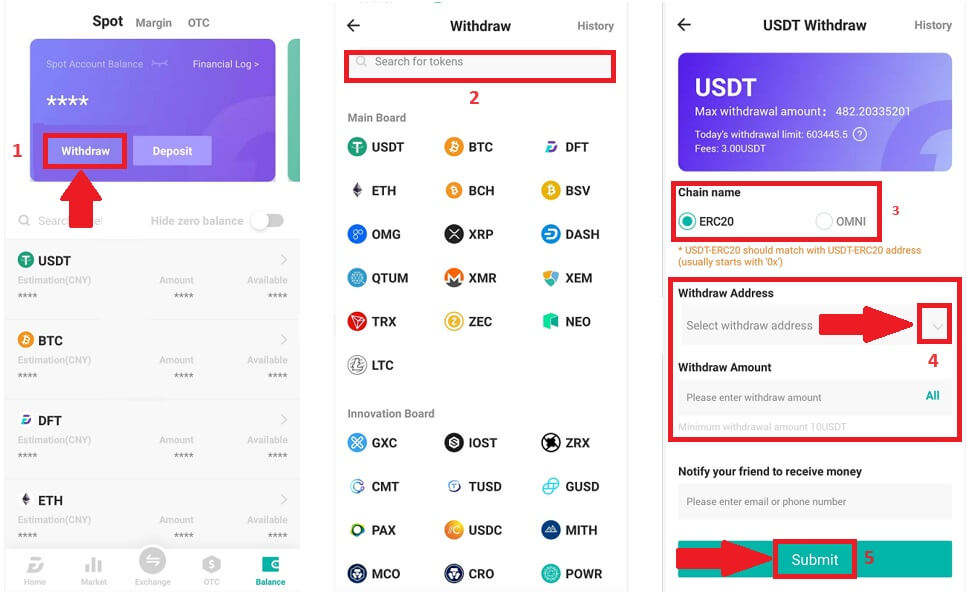
1. Follow the instruction steps to complete the withdrawal process.
-
Open your DigiFinex app and tap [Balance] - [Withdraw].
-
Type the name of the crypto you want to withdraw into the [Search currency] box.
-
Choose the Main network that the cryptocurrency operates on.
-
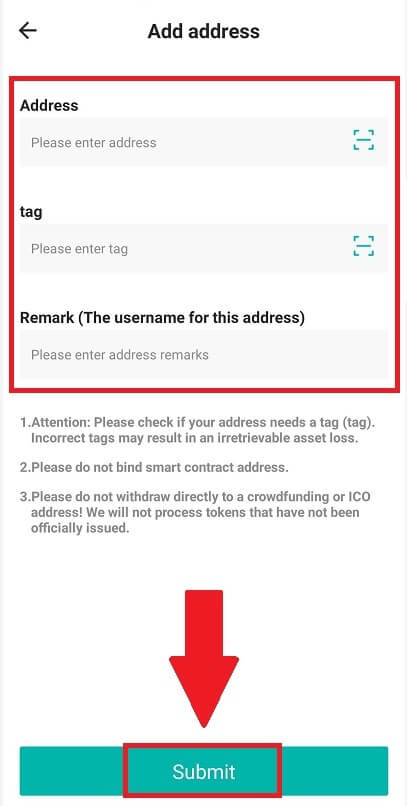
Add a withdrawal address information including the Address, tag and Remark (The username for this address). Enter the amount you want to withdraw.
-
Tap on [Submit].
Note:
-
*USDT-TRC20 should match with USDT-TRC20 address (usually starts with characters).
-
Minimum withdrawal amount is 10 USDT.
-
Please do not withdraw directly to a crowdfunding or ICO address! We will not process tokens that have not been officially issued.
-
Customer service will never ask for your password and six-digit Google Authentication code, please never tell anyone to prevent asset loss.
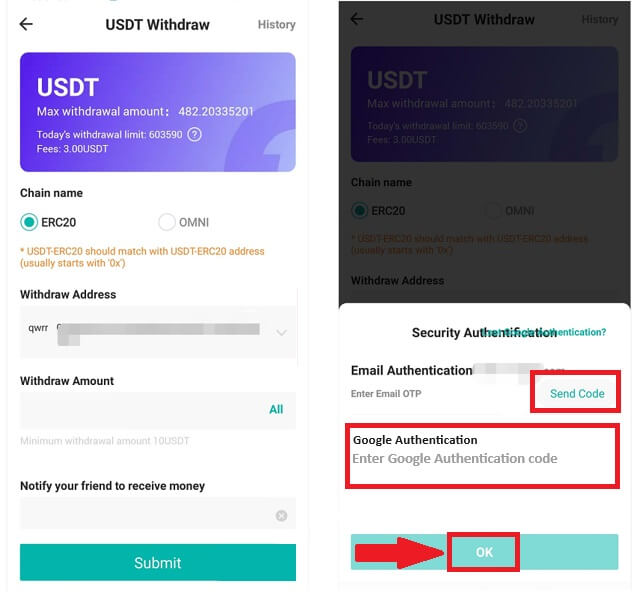
2. Verify the withdrawal process with Email Authentication by tap on [Send Code] and enter the Google Authentication code. Then tap [OK] to complete the withdrawal.
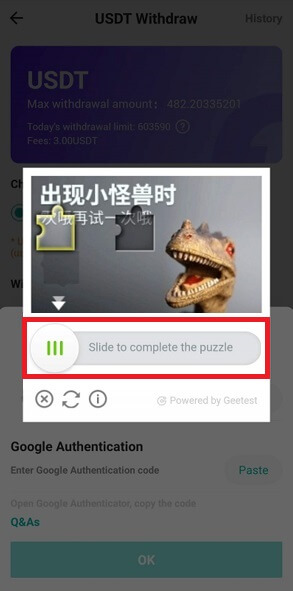
3. Drag the slider to complete the puzzle, and receive the verification code in your Email/Phone.
Frequently Asked Questions (FAQ)
Account
Why Can’t I Receive Emails from DigiFinex
If you are not receiving emails sent from DigiFinex, please follow the instructions below to check your email’s settings:
- Are you logged in to the email address registered to your DigiFinex account? Sometimes you might be logged out of your email on your devices and hence can’t see DigiFinex’s emails. Please log in and refresh.
- Have you checked the spam folder of your email? If you find that your email service provider is pushing DigiFinex emails into your spam folder, you can mark them as “safe” by whitelisting DigiFinex’s email addresses. You can refer to How to Whitelist DigiFinex Emails to set it up.
- Is your email client or service provider working normally? You can check the email server settings to confirm that there isn’t any security conflict caused by your firewall or antivirus software.
- Is your email inbox full? If you have reached the limit, you wont be able to send or receive emails. You can delete some of the old emails to free up some space for more emails.
- If possible, register from common email domains, such as Gmail, Outlook, etc.
Why Can’t I Receive SMS Verification Codes
DigiFinex continuously improves our SMS Authentication coverage to enhance user experience. However, there are some countries and areas currently not supported.
If you cannot enable SMS Authentication, please refer to our Global SMS coverage list to check if your area is covered. If your area is not covered on the list, please use Google Authentication as your primary two-factor authentication instead.
If you have enabled SMS Authentication or you are currently residing in a country or area that’s in our Global SMS coverage list, but you still cannot receiving SMS codes, please take the following steps:
- Ensure that your mobile phone has a good network signal.
- Disable your anti-virus and/or firewall and/or call blocker apps on your mobile phone that might potentially block our SMS Codes number.
- Restart your mobile phone.
- Try voice verification instead.
- Reset SMS Authentication.
How To Enhance DigiFinex Account Security
1. Password Settings
Please set a complex and unique password. For security purposes, make sure to use a password with at least 10 characters, including at least one uppercase and lowercase letter, one number, and one special symbol. Avoid using obvious patterns or information that is easily accessible to others (e.g. your name, email address, birthday, mobile number, etc.). Password formats we do not recommend: lihua, 123456, 123456abc, test123, abc123 Recommended password formats: Q@ng3532!, iehig4g@#1, QQWwfe@242!
2. Changing Passwords
We recommend that you change your password regularly to enhance the security of your account. It is best to change your password every three months and use a completely different password each time. For more secure and convenient password management, we recommend you to use a password manager such as "1Password" or "LastPass". In addition, please keep your passwords strictly confidential and do not disclose them to others. DigiFinex staff will never ask for your password under any circumstances.
3. Two-Factor Authentication (2FA) Linking Google Authenticator
Google Authenticator is a dynamic password tool launched by Google. You are required to use your mobile phone to scan the barcode provided by DigiFinex or enter the key. Once added, a valid 6-digit authentication code will be generated on the authenticator every 30 seconds. Upon successful linking, you need to enter or paste the 6-digit authentication code displayed on Google Authenticator every time you log in to DigiFinex.
4. Beware of Phishing
Please be vigilant of phishing emails pretending to be from DigiFinex, and always ensure that the link is the official DigiFinex website link before logging into your DigiFinex account. DigiFinex staff will never ask you for your password, SMS or email verification codes, or Google Authenticator codes.
What is Two-Factor Authentication?
Two-Factor Authentication (2FA) is an additional security layer to email verification and your account password. With 2FA enabled, you will have to provide the 2FA code when performing certain actions on the DigiFinex platform.
How does TOTP work?
DigiFinex uses a Time-based One-time Password (TOTP) for Two-Factor Authentication, it involves generating a temporary, unique one-time 6-digit code* that is only valid for 30 seconds. You will need to enter this code to perform actions that affect your assets or personal information on the platform.
*Please keep in mind that the code should consist of numbers only.
How To Set Up Google Authenticator
1. Log in to the DigiFinex website, click on the [Profile] icon, and select [2 Factor Authentication].
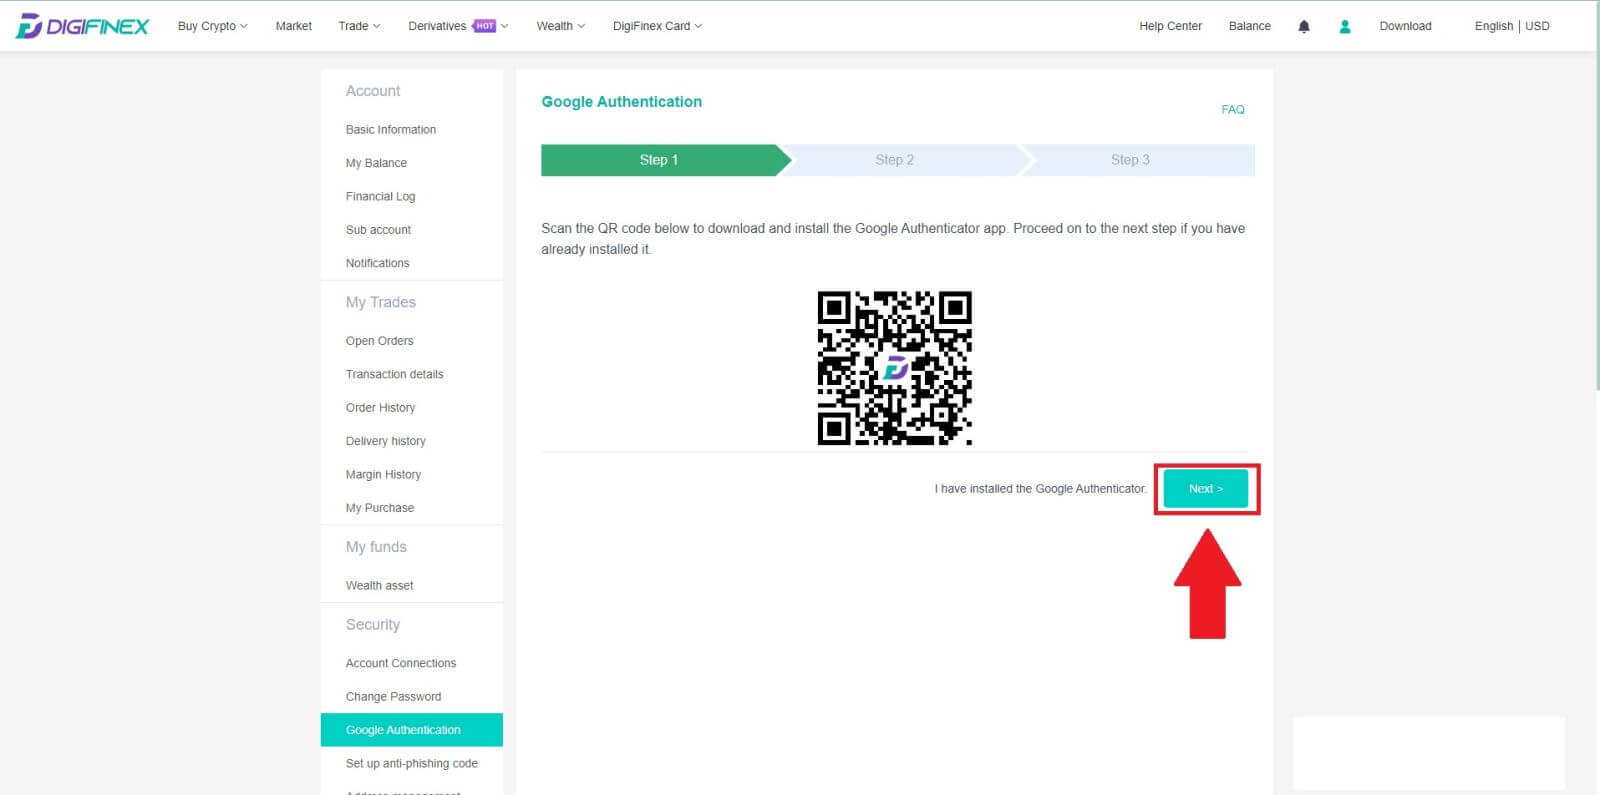
2. Scan the QR code below to download and install the Google Authenticator app. Proceed on to the next step if you have already installed it.Press [Next].
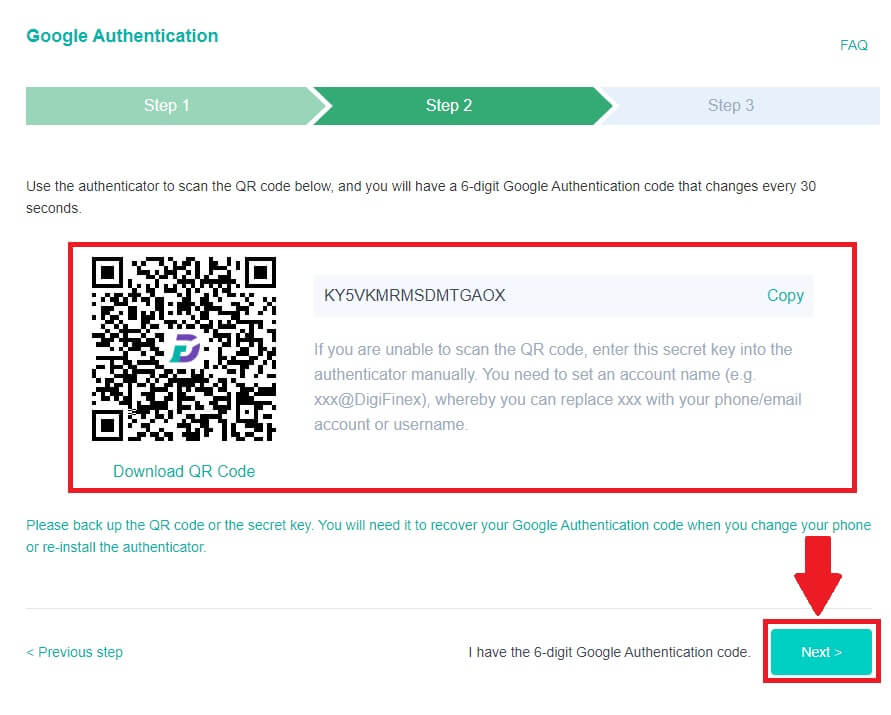
3. Scan the QR code with the authenticator to generate a 6-digit Google Authentication code, which updates every 30 seconds and press [Next ].
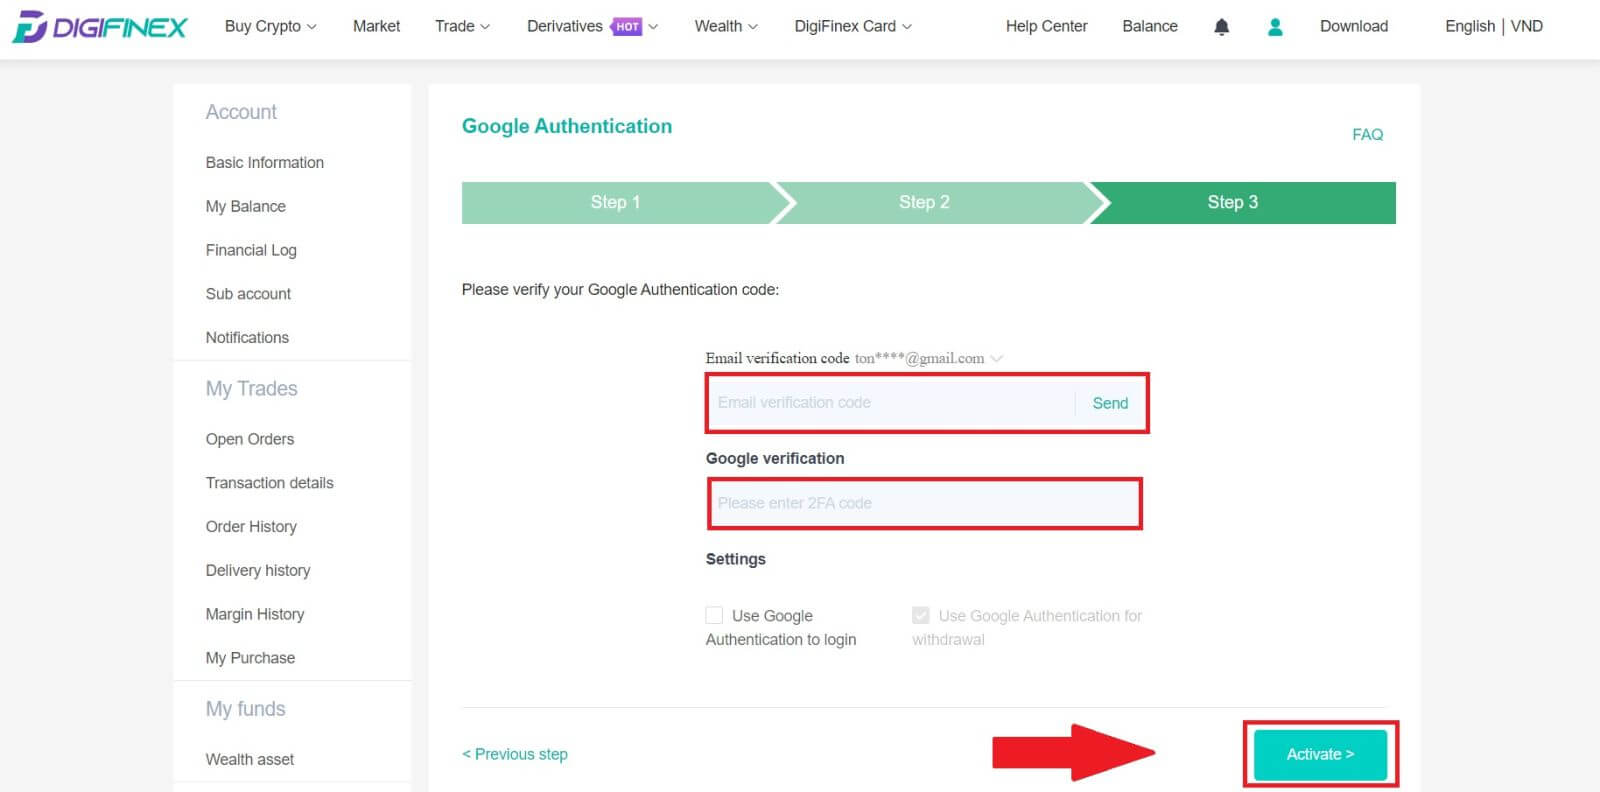
4. Click on [Send] and enter the 6-digit code that was sent to your email and the Authenticator code. Click [Activate] to complete the process.
Verification
What kind of documents do you accept? Are there any requirements on the file size?
Accepted document formats include JPEG and PDF, with a minimum file size requirement of 500KB. Screenshots are not eligible. Kindly submit either a PDF-formatted digital copy of the original document or a photograph of the physical document.
Identity Verification for Buying Crypto with Credit/Debit Card
In order to ensure a stable and compliant fiat gateway, users buying crypto with credit debit cards are required to complete Identity Verification. Users who have already completed Identity Verification for the DigiFinex account will be able to continue to buy crypto without any additional information required. Users who are required to provide extra information will be prompted the next time they attempt to make a crypto purchase with a credit or debit card.
Each Identity Verification level completed will grant increased transaction limits. All transaction limits are fixed to the value of the USDT regardless of the fiat currency used and thus will vary slightly in other fiat currencies according to exchange rates.
How to pass the different KYC levels?
Lv1. Proof of Identity
Choose the country and specify the ID type (National ID Card or Passport) you intend to use. Ensure that all document corners are visible, with no extra objects or graphics. For National ID Cards, upload both sides, and for Passports, include both the photo/information page and the signature page, ensuring the signature is visible.
Lv2. Liveness Check
Position yourself in front of the camera and gradually turn your head in a complete circle for our liveness verification process.
Lv3. Proof of Address
Provide documents as evidence of your address for the purpose of verification. Ensure that the document includes both your complete name and address, and that it has been issued within the last three months. Accepted types of PoA include:
- Bank statement/ Credit Card statement(issued by a bank) with the date of issue and the name of the person (the document must be not older than 3 months);
- Utility bill for gas, electricity, water, linked to the property (the document must not be older than 3 months);
- Correspondence with a government authority (the document must not be older than 3 months);
- National ID document with the name and address (MUST be different from the ID document submitted as proof of identity).
Deposit
How long does it take for my funds to arrive? What is the transaction fee?
After confirming your request on DigiFinex, it takes time for the transaction to be confirmed on the blockchain. The confirmation time varies depending on the blockchain and its current network traffic.
For example, if you’re depositing USDT, DigiFinex supports the ERC20, BEP2, and TRC20 networks. You can select the desired network from the platform you’re withdrawing from, enter the amount to withdraw, and you will see the relevant transaction fees.
The funds will be credited to your DigiFinex account shortly after the network confirms the transaction.
Please note if you entered the wrong deposit address or selected an unsupported network, your funds will be lost. Always check carefully before you confirm the transaction.
How to check my transaction history?
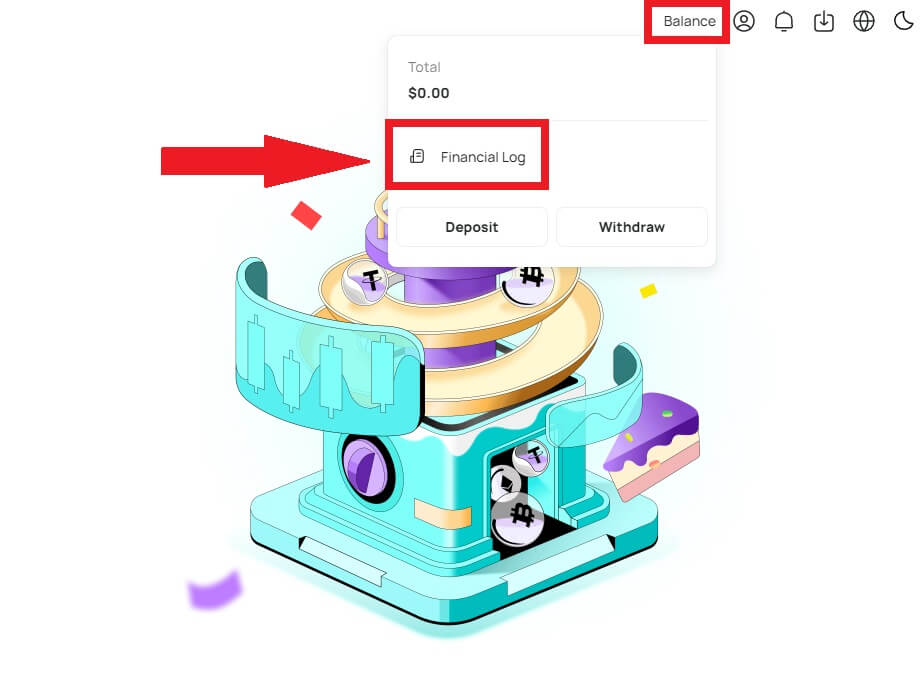
You can check the status of your deposit or withdrawal from [Balance] - [Financial Log] - [Transaction History].
Why Hasn’t My Deposit Been Credited
Transferring funds from an external platform to DigiFinex involves three steps:
- Withdrawal from the external platform
- Blockchain network confirmation
- DigiFinex credits the funds to your account
An asset withdrawal marked as “completed” or “success” in the platform youre withdrawing your crypto from means that the transaction was successfully broadcast to the blockchain network. However, it might still take some time for that particular transaction to be fully confirmed and credited to the platform you’re withdrawing your crypto to. The amount of required “network confirmations” varies for different blockchains.
For example:
- Mike wants to deposit 2 BTC into his DigiFinex wallet. The first step is to create a transaction that will transfer the funds from his personal wallet into DigiFinex.
- After creating the transaction, Mike needs to wait for the network confirmations. He will be able to see the pending deposit on his DigiFinex account.
- The funds will be temporarily unavailable until the deposit is complete (1 network confirmation).
- If Mike decides to withdraw these funds, he needs to wait for 2 network confirmations.
- If the transaction has not yet been fully confirmed by the blockchain network nodes, or has not reached the minimum amount of network confirmations specified by our system, please wait patiently for it to be processed. When the transaction has been confirmed, DigiFinex will credit the funds to your account.
- If the transaction is confirmed by the blockchain but not credited to your DigiFiex account, you may check the deposit status from the Deposit Status Query. You can then follow the instructions on the page to check your account, or submit an enquiry for the issue.
Trading
What is Limit Order
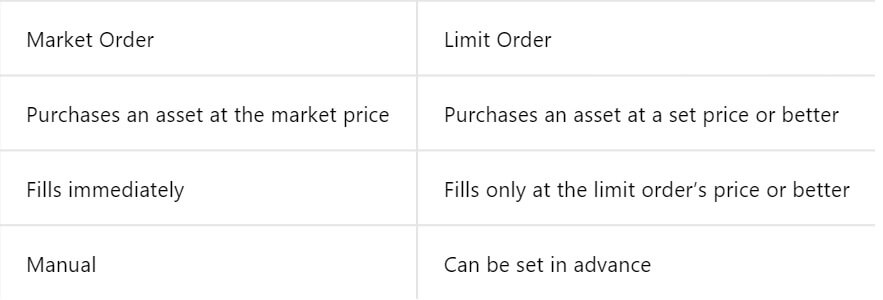
A limit order is an instruction to buy or sell an asset at a specified limit price, which is not executed immediately like a market order. Instead, the limit order is activated only if the market price reaches the designated limit price or surpasses it favorably. This allows traders to aim for specific buying or selling prices different from the prevailing market rate.
For instance:
- If you set a buy limit order for 1 BTC at $60,000 while the current market price is $50,000, your order will be promptly filled at the prevailing market rate of $50,000. This is because it represents a more favorable price than your specified limit of $60,000.
- Similarly, if you place a sell limit order for 1 BTC at $40,000 when the current market price is $50,000, your order will be immediately executed at $50,000, as it is a more advantageous price compared to your designated limit of $40,000.
In summary, limit orders provide a strategic way for traders to control the price at which they buy or sell an asset, ensuring execution at the specified limit or a better price in the market.
What is Market Order
A market order is a type of trading order that is executed promptly at the current market price. When you place a market order, it is fulfilled as swiftly as possible. This order type can be utilized for both buying and selling financial assets.
When placing a market order, you have the option to specify either the quantity of the asset you want to buy or sell, denoted as [Amount], or the total amount of funds you wish to spend or receive from the transaction.
For instance, if you intend to purchase a specific quantity, you can directly enter the amount. Conversely, if you aim to acquire a certain amount with a specified sum of funds, like 10,000 USDT. This flexibility allows traders to execute transactions based on either a predetermined quantity or a desired monetary value.

Types of Order on DigiFinex Futures
If the trigger price is set, when the benchmark price (market price, index price, fair price) selected by the user reaches the trigger price, it will be triggered, and a market order will be placed with the quantity set by the user.
Note: The user’s funds or positions will not be locked when setting the trigger. The trigger may fail due to high market volatility, price restrictions, position limits, insufficient collateral assets, insufficient closeable volume, futures in non-trading status, system issues, etc. A successful trigger limit order is the same as a normal limit order, and it may not be executed. Unexecuted limit orders will be displayed in active orders.
TP/SL
TP/SL refers to the pre-set trigger price (take profit price or stop loss price) and trigger price type. When the last price of the specified trigger price type reaches the pre-set trigger price, the system will place a close market order according to the pre-set quantity in order to take profit or stop loss. Currently, there are two ways to place a stop loss order:
- Set TP/SL when opening a position: This means to set TP/SL in advance for a position that is about to be opened. When the user places an order to open a position, they can click to set a TP/SL order at the same time. When the open position order is filled (partially or fully), the system will immediately place a TP/SL order with the trigger price and trigger price type pre-set by the user. (This can be viewed in open orders under TP/SL.)
- Set TP/SL when holding a position: Users can set a TP/SL order for a specified position when holding a position. After the setting is complete, when the last price of the specified trigger price type meets the trigger condition, the system will place a close market order according to the quantity set in advance.
Stop Limit Order
If the trigger price is set, when the benchmark price (market price, index price, fair price) selected by the user reaches the trigger price, it will be triggered, and a limit order will be placed at the order price and quantity set by the user.
Stop Market Order
If the trigger price is set, when the benchmark price (market price, index price, fair price) selected by the user reaches the trigger price, it will be triggered, and a market order will be placed with the quantity set by the user.
Note: The user’s funds or positions will not be locked when setting the trigger. The trigger may fail due to high market volatility, price restrictions, position limits, insufficient collateral assets, insufficient closeable volume, futures in non-trading status, system issues, etc. A successful trigger limit order is the same as a normal limit order, and it may not be executed. Unexecuted limit orders will be displayed in active orders.
Isolated and Cross Margin Mode
Isolated Margin Mode
A trading configuration that assigns a specific amount of margin to a particular position. This approach ensures that the margin allocated to that position is ring-fenced and does not draw upon the overall account balance.
Cross Margin Mode
Operates as a margin model that utilizes the entire available balance in the trading account to support a position. In this mode, the entirety of the account balance is considered collateral for the position, providing a more comprehensive and flexible approach to managing margin requirements.
|
Isolated Margin Mode |
Cross Margin Mode |
|
|
Challenges |
A restricted margin will be assigned to each position. |
Utilization of the entire available balance in the account as margin. |
|
With separate margins applied to each individual position, profits and losses in one position do not impact others. |
Sharing of margin across all positions, allowing for hedging of profits and losses between multiple swaps. |
|
|
If liquidation is triggered, only the margin associated with the relevant position will be affected. |
Complete loss of the entire account balance in the event of a liquidation trigger. |
|
|
Advantages |
Margin is isolated, which limits losses to a certain range. Suitable for more volatile and high leverage ratio situations. |
Hedging of profit and loss between multiple swaps, leading to reduced margin requirements. Increased utilization of capital for more efficient trading. |
Differences between Coin Margined Perpetual Futures and USDT Margined Perpetual Futures
1. Different crypto is used as the valuation unit, collateral asset, and calculation of PNL:- In USDT margined perpetual futures, valuation and pricing are in USDT, with USDT also used as collateral, and PNL calculated in USDT. Users can engage in diverse futures trading by holding USDT.
- For Coin margined perpetual futures, pricing and valuation are in US dollars (USD), utilizing the underlying cryptocurrency as collateral, and calculating PNL with the underlying crypto. Users can participate in specific futures trading by holding the corresponding underlying crypto.
- The value of each contract in USDT margined perpetual futures is derived from the associated underlying cryptocurrency, exemplified by the 0.0001 BTC face value for BTCUSDT.
- In Coin margined perpetual futures, the price of each contract is fixed in US dollars, as seen in the 100 USD face value for BTCUSD.
- In USDT margined perpetual futures, the collateral asset required is USDT. When the price of the underlying crypto falls, it does not affect the value of the USDT collateral asset.
- In Coin marginedperpetual futures, the collateral asset required corresponds to the underlying crypto. When the price of the underlying crypto falls, the collateral assets required for the users’ positions increase, and more of the underlying crypto is needed as collateral.
Withdraw
Why has my withdrawal not arrived?
I’ve made a withdrawal from DigiFinex to another exchange/wallet, but I haven’t received my funds yet. Why?
Transferring funds from your DigiFinex account to another exchange or wallet involves three steps:
- Withdrawal request on DigiFinex.
- Blockchain network confirmation.
- Deposit on the corresponding platform.
Normally, a TxID (Transaction ID) will be generated within 30-60 minutes, indicating that DigiFinex has successfully broadcasted the withdrawal transaction.
However, it might still take some time for that particular transaction to be confirmed and even longer for the funds to be finally credited into the destination wallet. The amount of required “network confirmations” varies for different blockchains.
What Can I Do When I Withdraw to A Wrong Address?
If you mistakenly withdraw funds to a wrong address, DigiFinex is unable to locate the receiver of your funds and provide you any further assistance. As our system initiates the withdrawal process as soon as you click [Submit] after completing security verification.
How can I retrieve the funds withdraw to a wrong address?
- If you sent your assets to an incorrect address by mistake and you know the owner of this address, please contact the owner directly.
- If your assets were sent to a wrong address on another platform, please contact the customer support of that platform for assistance.
